Hi All,
I had done my "normal" mods to the TJ about three years ago and had been having fun. However, after a fun day recently I had some trouble (viewtopic.php?f=32&t=9192)
So I kicked started phase II of my major mods. I am going to change the transfer case from a slip yoke design to a fixed yoke design with a slip yoke eliminator kit and a matching rear driveshaft.
I had ordered the JB Conversion kit (http://www.jbconversions.com/pages/prod ... t_sye.html) and a matching Tow Wood rear driveshaft (http://www.4xshaft.com/index.html) from a shop in Colorado (http://www.offroadtoystore.com/).
Today I received the driveshaft and its a beefy piece of metal. Much more robust and heavier than stock. I'll put a photo up when the photo albums are back up and working. Now waiting for the sye kit to arrive. Can't wait to fit it all.
I have started this thread to document my modifications from here on.
TJ Build
Re: TJ Build
Today I received the sye kit and its components. Great work NZ Post through Courier Post.
Now the fun begins to try to install it. First step to find a suitable place to take my transfer case apart and put the new parts in (I don't have a garage and its a shared driveway, so its always tricky to spread all the parts around).
Now the fun begins to try to install it. First step to find a suitable place to take my transfer case apart and put the new parts in (I don't have a garage and its a shared driveway, so its always tricky to spread all the parts around).
'12 JK Rubicon V6 3.6L Auto D44/D44
-
waterlilly
- Driver/Navigator
- Posts: 16
- Joined: Sun Jan 13, 2008 5:23 pm
Re: TJ Build
nice one tj, dont forget to drain that transfer case oil before you crack into it! 
98 grand cherokee, jacked up, worked motor
Re: TJ Build
Any spare parts buddy you know where to send them!!!!!!
/| , [____],
l----L -OlllllllO-
()_) ()_)-----)_)
KEEP'N JEEP'N!
l----L -OlllllllO-
()_) ()_)-----)_)
KEEP'N JEEP'N!
Re: TJ Build
Sure, but what would you do with a bent output shaft. I'll post photos of the factory shaft and the new shaft, man is heavy and beefy. The rear driveshaft from Tom Wood weighs roughly twice as much as the factory shaft.
I am just waiting for the transfer case shift relocator bracket from Advance Adapter and then I'll rip into it. Though finding a friendly driveway (or garage) would be really helpful as well. I don't want to pay a shop to do the labour for two reasons:
I am just waiting for the transfer case shift relocator bracket from Advance Adapter and then I'll rip into it. Though finding a friendly driveway (or garage) would be really helpful as well. I don't want to pay a shop to do the labour for two reasons:
- - I probably know more about Wranglers than most commercial shops around central Auckland (if someone knows about one, please let me know as a backup)
- I can use the labour money saved on the next mod (snorkle or winch)
'12 JK Rubicon V6 3.6L Auto D44/D44
-
waterlilly
- Driver/Navigator
- Posts: 16
- Joined: Sun Jan 13, 2008 5:23 pm
Re: TJ Build
look into short term hire of a lockup buddy, my garage is a bit far away otherwise ud b welcom to it
98 grand cherokee, jacked up, worked motor
Re: TJ Build
Here is the offending output shaft. As you can see, it is rotating with a nice big bent. Imagine this shaft sped up to around 60/70 km/hour, no wonder I was feeling such shaking.
http://www.4wdtv.co.nz/node/437
Now only if the photo albums were available, I can't post photos otherwise.
http://www.4wdtv.co.nz/node/437
Now only if the photo albums were available, I can't post photos otherwise.
'12 JK Rubicon V6 3.6L Auto D44/D44
Re: TJ Build
My word!!! And now idea how this happened?
/| , [____],
l----L -OlllllllO-
()_) ()_)-----)_)
KEEP'N JEEP'N!
l----L -OlllllllO-
()_) ()_)-----)_)
KEEP'N JEEP'N!
Re: TJ Build
I have really no idea, it was just a gentle farm outing with sand and grass (Christmas do). I guess metal fatigue over the years may have weakened it.
'12 JK Rubicon V6 3.6L Auto D44/D44
Re: TJ Build
I just installed it yesterday, all by myself (except for two little helpers running around me) in my shared parking lot with the neighbours thinking I had lost the plot completely. It took me a good 6-7 hours and was very involved process - basically taking the half of your transfer case apart. I haven't put the new driveshaft on yet, it got dark. But to give an illustration, this is how the stock transfer case output shaft works:
http://www.4wdtv.co.nz/node/437
And this is what the JB Conversion Super Shorty does:
http://www.4wdtv.co.nz/node/441
My driveshaft has gone from 12.5" u-joint to u-joint to 20.25" yoke to yoke.
Hope this helps. I'll install the driveshaft in a couple of days. Very happy with it and what I have learnt about the internals of Jeeps in the process.
I am doing a much more detailed write-up of the steps in between, but need to set-up something to upload photos.
'12 JK Rubicon V6 3.6L Auto D44/D44
Re: TJ Build
This is what a stock output shaft looks on a TJ (as you can see its very long for a short wheelbase vehicle and bent in my case).

To solve the problem, I got a slip yoke eliminator kit and a matching rear double cardan driveshaft from the US. The kit looked really beefy and well designed. The kit also allowed me to add about six inches to the driveshaft length. This is great because it allows better running angles on the u-joints. But best of all, the kit takes the slip joint from the output on to the driveshaft where it belongs.


When I got the kit, I called up a couple of shops to find out how much the labour would be. The answers I got were more along the lines “do you have instructions with the kit”? I was not prepared to pay someone else follow the same instructions that I had. So I decided to tackle the job myself this Saturday.
I will outline the steps involved below:
1. Secured the TJ with wheel blocks as I was not about to risk my life with just handbrake made by Jeep.
2. Put the transfer case into 4L.
3. Supported the engine and transmission with two axle stands and a scissor jack. Safety overkill, but its better to be safe.
4. Removed the four bolts of the transmission mount.
5. Put a hydraulic jack under the transmission skid to support the weight, primarily because I was working alone and did not want it to fall down and cause an injury. Again, safety first!
6. Removed the six bolts holding the skid to the frame and then slowly release the hydraulic jack. Nice and gentle removal of the skid.

7. Now I marked the front driveshaft and both end yokes with some paint. This was to make sure that when I assembled it back together, I did not rotate the yokes and possibly cause an out of balance driveshaft.
8. Drained the transfer case of oil before disassembling anything.
9. Removed the yoke from the front output shaft of the transfer case.
10. Removed the dust shield from the rear mainshaft. This was done by using a chisel to dent the dust shield collar area (where the rubber boot band was located) in two places at 180 degrees apart then prying the shield loose using a screwdriver.
11. Next removed the oil seal from the rear bearing housing.
12. Removed the rear shaft retaining ring using a pair of snap-ring pliers. I had a 9” pair and still struggled with it.

13. Undid the bolts and removed the tail housing from the rear case half. This housing contains the bearing and speedo gear. This exposes the oil pump that sits on the mainshaft and rotates and circulates oil as the vehicles is being driven.

14. Now comes the fun part, undid the bolts holding the rear half of the case. There is one bolt at the top that is different from all the others. It is a 10mm star shaped bolt. I cannot understand why New Process designers would do this, but it is there.
15. Once all the bolts are off, use two prying positions and pry the back half free. Be careful not to cause all the internal to fall out as that would make it difficult to see how things fit together.


16. Remove the spring from the top of the mode fork and keep it handy. It will be required at assembly time.
17. Then remove the front and rear shafts along with the drive chain. Put the front shaft and chain to a side. Take the rear shaft and remove the snap ring holding the main sprockets on it. Once that is removed, its an easy slide off the old shaft and on to the new shaft. Just be careful to make sure the everything goes back in the same orientation. It is possible to assemble the main sliding part to be assembled backwards (again a wonderful design concept).
18. As you can see the new mainshaft is so much smaller.


19. Installed the mainshaft assembly and mode fork into the case. The mode fork rod should be well lubricated before performing this step. The lubricated rod should slide through the range fork easily. Install the spring you removed in step 16.
20. Looped the chain around the main sprocket and front output shaft then installed the front output shaft through the bearing until it sat firmly.
21. Positioned the oil pump and pickup tube assembly into the rear case half. Ran a bead of a gasket sealer on the rear half and installed the rear case/pump onto the front case half. Be careful that the oil pickup tube does not come off the oil pump.
22. Installed the bolts, including the star bolt at the top.
23. Placed the tone wheel onto the mainshaft. Be careful that the tone wheel is not installed in the reverse position. You will note that the tone wheel will rest on top of the oil pump and spin easily. This is not an issue. Installation of the yoke nut will draw the shaft outward therefore sandwiching the tone wheel off of the pump surface.

24. Ran a bead of gasket sealer and installed the new rear bearing housing into position. Apply grease to the seal lip before positioning the housing into place.
25. Installed the 5 bolts to hold the rear housing in place.
26. Applied a small amount of gasket sealer to the back side of the yoke nut and in the threads before tightening it on to the shaft.
27. Installed the yoke nut and torqued it to 150 ft-lbs. The instructions say to torque it to 200 ft-lbs, but my torque wrench does not go that far high. I will be going to a shop to get this nut torqued properly before installing the rear driveshaft.
28. Installed the front yoke and torqued it to recommend 130 ft-lbs. Installed the front driveshaft.
29. Install the new speedo sensor into the rear housing and filled the case with Mopar ATF+4.
30. Installed the transmission skid plate back on.

This is where I have stopped. Next I will be installing the speedo recalibration unit to properly convert the new electronic signal to match Jeep signal. I will also be installing the new rear driveshaft.
I have test driven it to make sure that internals work and I can shift through 2H - 4H - N - 4L. It works fine, just needs a rear driveshaft.
To solve the problem, I got a slip yoke eliminator kit and a matching rear double cardan driveshaft from the US. The kit looked really beefy and well designed. The kit also allowed me to add about six inches to the driveshaft length. This is great because it allows better running angles on the u-joints. But best of all, the kit takes the slip joint from the output on to the driveshaft where it belongs.
When I got the kit, I called up a couple of shops to find out how much the labour would be. The answers I got were more along the lines “do you have instructions with the kit”? I was not prepared to pay someone else follow the same instructions that I had. So I decided to tackle the job myself this Saturday.
I will outline the steps involved below:
1. Secured the TJ with wheel blocks as I was not about to risk my life with just handbrake made by Jeep.
2. Put the transfer case into 4L.
3. Supported the engine and transmission with two axle stands and a scissor jack. Safety overkill, but its better to be safe.
4. Removed the four bolts of the transmission mount.
5. Put a hydraulic jack under the transmission skid to support the weight, primarily because I was working alone and did not want it to fall down and cause an injury. Again, safety first!
6. Removed the six bolts holding the skid to the frame and then slowly release the hydraulic jack. Nice and gentle removal of the skid.
7. Now I marked the front driveshaft and both end yokes with some paint. This was to make sure that when I assembled it back together, I did not rotate the yokes and possibly cause an out of balance driveshaft.
8. Drained the transfer case of oil before disassembling anything.
9. Removed the yoke from the front output shaft of the transfer case.
10. Removed the dust shield from the rear mainshaft. This was done by using a chisel to dent the dust shield collar area (where the rubber boot band was located) in two places at 180 degrees apart then prying the shield loose using a screwdriver.
11. Next removed the oil seal from the rear bearing housing.
12. Removed the rear shaft retaining ring using a pair of snap-ring pliers. I had a 9” pair and still struggled with it.
13. Undid the bolts and removed the tail housing from the rear case half. This housing contains the bearing and speedo gear. This exposes the oil pump that sits on the mainshaft and rotates and circulates oil as the vehicles is being driven.
14. Now comes the fun part, undid the bolts holding the rear half of the case. There is one bolt at the top that is different from all the others. It is a 10mm star shaped bolt. I cannot understand why New Process designers would do this, but it is there.
15. Once all the bolts are off, use two prying positions and pry the back half free. Be careful not to cause all the internal to fall out as that would make it difficult to see how things fit together.
16. Remove the spring from the top of the mode fork and keep it handy. It will be required at assembly time.
17. Then remove the front and rear shafts along with the drive chain. Put the front shaft and chain to a side. Take the rear shaft and remove the snap ring holding the main sprockets on it. Once that is removed, its an easy slide off the old shaft and on to the new shaft. Just be careful to make sure the everything goes back in the same orientation. It is possible to assemble the main sliding part to be assembled backwards (again a wonderful design concept).
18. As you can see the new mainshaft is so much smaller.
19. Installed the mainshaft assembly and mode fork into the case. The mode fork rod should be well lubricated before performing this step. The lubricated rod should slide through the range fork easily. Install the spring you removed in step 16.
20. Looped the chain around the main sprocket and front output shaft then installed the front output shaft through the bearing until it sat firmly.
21. Positioned the oil pump and pickup tube assembly into the rear case half. Ran a bead of a gasket sealer on the rear half and installed the rear case/pump onto the front case half. Be careful that the oil pickup tube does not come off the oil pump.
22. Installed the bolts, including the star bolt at the top.
23. Placed the tone wheel onto the mainshaft. Be careful that the tone wheel is not installed in the reverse position. You will note that the tone wheel will rest on top of the oil pump and spin easily. This is not an issue. Installation of the yoke nut will draw the shaft outward therefore sandwiching the tone wheel off of the pump surface.
24. Ran a bead of gasket sealer and installed the new rear bearing housing into position. Apply grease to the seal lip before positioning the housing into place.
25. Installed the 5 bolts to hold the rear housing in place.
26. Applied a small amount of gasket sealer to the back side of the yoke nut and in the threads before tightening it on to the shaft.
27. Installed the yoke nut and torqued it to 150 ft-lbs. The instructions say to torque it to 200 ft-lbs, but my torque wrench does not go that far high. I will be going to a shop to get this nut torqued properly before installing the rear driveshaft.
28. Installed the front yoke and torqued it to recommend 130 ft-lbs. Installed the front driveshaft.
29. Install the new speedo sensor into the rear housing and filled the case with Mopar ATF+4.
30. Installed the transmission skid plate back on.
This is where I have stopped. Next I will be installing the speedo recalibration unit to properly convert the new electronic signal to match Jeep signal. I will also be installing the new rear driveshaft.
I have test driven it to make sure that internals work and I can shift through 2H - 4H - N - 4L. It works fine, just needs a rear driveshaft.
'12 JK Rubicon V6 3.6L Auto D44/D44
Re: TJ Build
TJ, first of all well done, good kiwi have a go attitude and nothing wrong with kerb side engineering, great write up and pictures also. --------  Please take this part as advice and encouragement to continue with your mechanical endeavours, when ever I see (in your case BLUE) sealer squashed out of cases I become very concerned at the amount that is also on the inside of the housing and this stuff flakes off and blocks oil galleries and pumps and has been the cause of many mechanical failures, it has to be used very sparingly, use a very thin bead.
KEEP UP THE GOOD WORK,
FITZY.
KEEP UP THE GOOD WORK,
FITZY.
Re: TJ Build
SMOKEY wrote:TJ, first of all well done, good kiwi have a go attitude and nothing wrong with kerb side engineering, great write up and pictures also. --------
KEEP UP THE GOOD WORK,
FITZY.
Thanks. As for the blue goo, well it looks a lot worse in the photos than in real life (flash light reflections). Also the housings actually have inner lips on the parts where goo was applied, thus it was squished outwards and not likely to have gone inwards. The point where it shows most is the flat area against which it was sitting as in photo below point 23.
I know I am not a mechanic and appreciate your suggestions (it was a thin bead, I promise
'12 JK Rubicon V6 3.6L Auto D44/D44
Re: TJ Build
TJ,the NUT behind the wheel should be fine  , to make sure you may like to follow these recommended non-factory procedures.
For safety reasons an extra pair of Feminine hands is needed.
Pay special attention to Horn and Airbag.
Remove soft covering.
Use lubricant and slowly pull NUT off, take time over this procedure you don't want bits flying every where.
When finished, wash and dry all parts and reassemble in reverse procedure.
Once fully assembled your helping hand(Feminine) may require your assistance to help her with a job.
WARNING: DON'T OVER TALK THE NUT,
FITZY.
For safety reasons an extra pair of Feminine hands is needed.
Pay special attention to Horn and Airbag.
Remove soft covering.
Use lubricant and slowly pull NUT off, take time over this procedure you don't want bits flying every where.
When finished, wash and dry all parts and reassemble in reverse procedure.
Once fully assembled your helping hand(Feminine) may require your assistance to help her with a job.
WARNING:
FITZY.
Re: TJ Build
FITZY, you are a funny man. Lets keep this thread family oriented, shall we 
'12 JK Rubicon V6 3.6L Auto D44/D44
Re: TJ Build
Went to Herb Morgan Tyres (probably the most friendly bunch I have come across) and got the yoke nut torqued to 200 ft lbs (my torque wrench only went up to 150 ft lbs). Came home and installed the new rear driveshaft.

It is a double cardan style and I love it. The only thing is I did not wipe all the grease from the u-joint exteriors before going for a test drive and it was nicely plastered over the under side of the body tub (you can see in the photos).

Took it on the Motorway for a short test run and the Jeep has never run this smooth before. I am very pleased with the outcome (though my wallet is still hurting).
It is a double cardan style and I love it. The only thing is I did not wipe all the grease from the u-joint exteriors before going for a test drive and it was nicely plastered over the under side of the body tub (you can see in the photos).
Took it on the Motorway for a short test run and the Jeep has never run this smooth before. I am very pleased with the outcome (though my wallet is still hurting).
'12 JK Rubicon V6 3.6L Auto D44/D44
Re: TJ Build
very nice indeed.
I'm now been scuppered with relation to doing anything else....... bathroom has to be done first, according to the master and commander.
tell ya what though, the dudes on TM trying to hock off the ragtops for 1200-1800 are going to be without a buyer..... (when im allowed to) ive sourced a Rugged ridge replace-a-top, on my doorstep for $670.00... (includes GST).
you would think that folks would get a little smarter about pricing their products these days. People have the ability to shop, and it truely is now a global market.
/| , [____],
l----L -OlllllllO-
()_) ()_)-----)_)
KEEP'N JEEP'N!
l----L -OlllllllO-
()_) ()_)-----)_)
KEEP'N JEEP'N!
Re: TJ Build
Well the controller of all things was with me when I did the deed, so she was aware of what needs to be changed. I just went with the best option available, rather than the cheapest solution. Took her again on a test drive this evening and the comment "this is now very smooth" kind of is the seal of approval.
I agree with the comment about global market, I sourced these from the US and only paid a fraction of what I would have paid here locally.
I agree with the comment about global market, I sourced these from the US and only paid a fraction of what I would have paid here locally.
'12 JK Rubicon V6 3.6L Auto D44/D44
Re: TJ Build
Haven't updated this for a while, so here it is:
I finally received the Superlift TruSpeed speed sensor calibrator from SummitRacing. The model applicable for Jeep applications is 33002 as it properly converts the new electronic signal to match Jeep signal being fed to the engine computer. The install was relatively simple. I had to find a suitable location inside the cab to mount the TruSpeed module. The module is water resistant, but I installed it inside for two reasons. First its protected from the elements and heat sources (e.g. the exhaust). Second, it is easier to adjust the signal for calibration as it saved me from driving a little and then lying under the Jeep to calibrate, and then repeating the process again.
I had to supply the sensor with a ground source, switched and fused source (came from the fuse box) and the signal wire. On TJs, the speed sensor is located on the tail housing of the transfer case. The sensor has three wires in it, out of which the white wire with an orange stripe is the signal wire. I used an existing hole in the tub for getting the wires to the speedo gear (this hole is typically filled by the gear shifter on manual transmission equipped TJs). To protect the connections, these were soldered and then wrapped in tape. An additional layer of protection was added in the shape of a protecting tube.
Next step was to calibrate the unit so that the signal was converted correctly. There are four basic ways of doing this. However, since in my case I had not changed the gear ratios or the tyre size, calibration by percentage difference between the Jeep signal and the one generated by the new tone ring made my life easy. I turned the adjusting key a quarter of a turn for 1 percent of correction at a time and got to the desired correction factor. To test the accuracy, I ran the Jeep for a week over 500 kms with a GPS running at the same time as a comparison. My speedometer is now accurate to about 0.29 percent. This accuracy level is better than what the factory shipped.

As I had asked on this forum as well, my battery had died as well recently. To replace it with something similar would have been a waste as I do plan on getting a winch in future. So I went with an Exide Orbital blue top (34DC-48). This is a fully sealed deep cycle/starting hybrid AGM battery with 750 CCA at 00F and a reserve capacity of 100 minutes. I could have gone with a similar Optima yellow top, but the Exide unit came with a lot of recommendations from fellow Jeepers in Australia and USA. Install was easy and now the Jeep starts at half a crank.

Next I finally hard mounted the air compressor in the engine bay. I would have installed it inside the cab, but cab real estate is very precious in a Wrangler. I have had the Bushranger MaxAir II for almost a year now and carrying it in a bag was becoming a bit tedious. I already had the optional hard mount bolts from the friendly people at Auckland 4x4.
I did a bit of research on the internet and chose the tray under the brake master cylinder as the appropriate location. It is hidden a little from the mud and is as far away from the exhaust manifold as possible, particularly on a RHD TJ. This tray is normally used by factory for mounting ABS module, but since I do not have that luxury, it was vacant space. Incidentally, this location is where the main battery is installed on LHD Wranglers (as the brake system would be on the opposite side right next to the exhaust). Install was simple, I just needed a double jointed elbow and very thin and long fingers!!
I did install a relay in the plastic cavity of the compressor and connected it to the battery directly. This was necessary as the load can be up to 40A and I did not want a trigger switch inside the cab running such a high load.
I have installed a 900 elbow on the output side to make it easier to connect the air hose. I have also extended the intake filter to point higher than the brake cylinder to avoid sucking any water splashes.
I then took the trigger wire through an existing hole in the firewall inside the cab. I have acquired a switch that this wire will be connected to so that I would be able to turn the compressor on and off from the comfort of driving seat. Ultimately, the idea is to add a small tank and possibly front and rear lockers.


This is where I had stopped about ten days ago.
I finally received the Superlift TruSpeed speed sensor calibrator from SummitRacing. The model applicable for Jeep applications is 33002 as it properly converts the new electronic signal to match Jeep signal being fed to the engine computer. The install was relatively simple. I had to find a suitable location inside the cab to mount the TruSpeed module. The module is water resistant, but I installed it inside for two reasons. First its protected from the elements and heat sources (e.g. the exhaust). Second, it is easier to adjust the signal for calibration as it saved me from driving a little and then lying under the Jeep to calibrate, and then repeating the process again.
I had to supply the sensor with a ground source, switched and fused source (came from the fuse box) and the signal wire. On TJs, the speed sensor is located on the tail housing of the transfer case. The sensor has three wires in it, out of which the white wire with an orange stripe is the signal wire. I used an existing hole in the tub for getting the wires to the speedo gear (this hole is typically filled by the gear shifter on manual transmission equipped TJs). To protect the connections, these were soldered and then wrapped in tape. An additional layer of protection was added in the shape of a protecting tube.
Next step was to calibrate the unit so that the signal was converted correctly. There are four basic ways of doing this. However, since in my case I had not changed the gear ratios or the tyre size, calibration by percentage difference between the Jeep signal and the one generated by the new tone ring made my life easy. I turned the adjusting key a quarter of a turn for 1 percent of correction at a time and got to the desired correction factor. To test the accuracy, I ran the Jeep for a week over 500 kms with a GPS running at the same time as a comparison. My speedometer is now accurate to about 0.29 percent. This accuracy level is better than what the factory shipped.
As I had asked on this forum as well, my battery had died as well recently. To replace it with something similar would have been a waste as I do plan on getting a winch in future. So I went with an Exide Orbital blue top (34DC-48). This is a fully sealed deep cycle/starting hybrid AGM battery with 750 CCA at 00F and a reserve capacity of 100 minutes. I could have gone with a similar Optima yellow top, but the Exide unit came with a lot of recommendations from fellow Jeepers in Australia and USA. Install was easy and now the Jeep starts at half a crank.
Next I finally hard mounted the air compressor in the engine bay. I would have installed it inside the cab, but cab real estate is very precious in a Wrangler. I have had the Bushranger MaxAir II for almost a year now and carrying it in a bag was becoming a bit tedious. I already had the optional hard mount bolts from the friendly people at Auckland 4x4.
I did a bit of research on the internet and chose the tray under the brake master cylinder as the appropriate location. It is hidden a little from the mud and is as far away from the exhaust manifold as possible, particularly on a RHD TJ. This tray is normally used by factory for mounting ABS module, but since I do not have that luxury, it was vacant space. Incidentally, this location is where the main battery is installed on LHD Wranglers (as the brake system would be on the opposite side right next to the exhaust). Install was simple, I just needed a double jointed elbow and very thin and long fingers!!
I did install a relay in the plastic cavity of the compressor and connected it to the battery directly. This was necessary as the load can be up to 40A and I did not want a trigger switch inside the cab running such a high load.
I have installed a 900 elbow on the output side to make it easier to connect the air hose. I have also extended the intake filter to point higher than the brake cylinder to avoid sucking any water splashes.
I then took the trigger wire through an existing hole in the firewall inside the cab. I have acquired a switch that this wire will be connected to so that I would be able to turn the compressor on and off from the comfort of driving seat. Ultimately, the idea is to add a small tank and possibly front and rear lockers.
This is where I had stopped about ten days ago.
'12 JK Rubicon V6 3.6L Auto D44/D44
Re: TJ Build
This weekend:
Got a shop do the rear axle seal and bearing on the passenger side. Part numbers are: Spicer 994261 (Seal) and Spicer 994262K (Bearing kit with retainer). Bearing was replaced as it gets destroyed while getting to the seal, so its part and parcel of getting this done.
Also got the shop to drain, flush and recharge the brake fluid. It had been in there for 7 years absorbing moisture. Just a safety precaution.
I then finally installed the switch for the compressor inside. I wanted to keep it simple. So found a nice unused spot. Took out the dremel tool and made a nice little hole in the centre console. It is wired with a switched source through to a relay that starts/controls the compressor. I also linked the switch with the dash lights (the dimmer function makes the led dim with the lights).

The gauges on the console are for engine oil and transmission oil temperatures.
Then went to Thompsons Track with the guys from ORE. Had a fun day and tested all my repairs. Everything seems to be working okay.
Being a long weekend, decided to do the deep pan replacement for the tranmission. 3-speed auto transmission on TJs is a direct decendent of Torque Flite 999, internals are marginally different but the pans are identical. I got the kit from SummitRacing (Mopar part number 4007886AB). It comes with new filter and longer pick-up.

Sucked the fluid out of the dip stick (factory pan has no drain plug and I was not in the mood to create a big mess). Took the old pan off. It was not dirty and was not full of metal shavings (good news). Took the magnet off the old pan, cleaned it and put on the new one.
Here is a comparison of depth (old pan is on left).

Old filter looked tired. Other internals were bright and shiny.

Installed the new pick-up and filter. It comes with three longer bolts to keep it in place.

Put the new pan on and tightened the bolts. Finally I have a drain plug on my transmission pan!!!! Also the new pan holds an additional litre of oil, keeping the transmission cooler.

I put new oil through the dip stick (the only real way of doing it). Took it for a test drive. Boy was I surprised to find a lot more up and go. I had not realised how dirty the old filter and oil were. Now in the next few days I'll keep checking the fluid level to make sure I have put the correct quantity in. The oil level can only be checked when the oil is hot and the tranmission is in neutral with engine idling.
Got a shop do the rear axle seal and bearing on the passenger side. Part numbers are: Spicer 994261 (Seal) and Spicer 994262K (Bearing kit with retainer). Bearing was replaced as it gets destroyed while getting to the seal, so its part and parcel of getting this done.
Also got the shop to drain, flush and recharge the brake fluid. It had been in there for 7 years absorbing moisture. Just a safety precaution.
I then finally installed the switch for the compressor inside. I wanted to keep it simple. So found a nice unused spot. Took out the dremel tool and made a nice little hole in the centre console. It is wired with a switched source through to a relay that starts/controls the compressor. I also linked the switch with the dash lights (the dimmer function makes the led dim with the lights).
The gauges on the console are for engine oil and transmission oil temperatures.
Then went to Thompsons Track with the guys from ORE. Had a fun day and tested all my repairs. Everything seems to be working okay.
Being a long weekend, decided to do the deep pan replacement for the tranmission. 3-speed auto transmission on TJs is a direct decendent of Torque Flite 999, internals are marginally different but the pans are identical. I got the kit from SummitRacing (Mopar part number 4007886AB). It comes with new filter and longer pick-up.
Sucked the fluid out of the dip stick (factory pan has no drain plug and I was not in the mood to create a big mess). Took the old pan off. It was not dirty and was not full of metal shavings (good news). Took the magnet off the old pan, cleaned it and put on the new one.
Here is a comparison of depth (old pan is on left).
Old filter looked tired. Other internals were bright and shiny.
Installed the new pick-up and filter. It comes with three longer bolts to keep it in place.
Put the new pan on and tightened the bolts. Finally I have a drain plug on my transmission pan!!!! Also the new pan holds an additional litre of oil, keeping the transmission cooler.
I put new oil through the dip stick (the only real way of doing it). Took it for a test drive. Boy was I surprised to find a lot more up and go. I had not realised how dirty the old filter and oil were. Now in the next few days I'll keep checking the fluid level to make sure I have put the correct quantity in. The oil level can only be checked when the oil is hot and the tranmission is in neutral with engine idling.
'12 JK Rubicon V6 3.6L Auto D44/D44
Re: TJ Build
Nice work TJ.
Is there a pan guard that goes on?
Matt.
Is there a pan guard that goes on?
Matt.

Re: TJ Build
Looks like a great job. I understand that Automatic TJ gearboxes do suffer from water getting inside. I have not read your earlier posts on upgrades to the TJ, but I assume you have looked at that aspect?
The gearbox breather is open to the bell housing, and the solution I understand is to put a breather hose on the transmission, then through the bell housing then up into the engine bay.
Many thanks for your posts on this up grade a very interesting read well done.
The gearbox breather is open to the bell housing, and the solution I understand is to put a breather hose on the transmission, then through the bell housing then up into the engine bay.
Many thanks for your posts on this up grade a very interesting read well done.
Re: TJ Build
Mattman wrote:Nice work TJ.
Is there a pan guard that goes on?
Matt.
Thanks. There is a skid plate that is supposed to protect/support the transmission and transfer case (i.e. the infamous shovel on Wranglers). You can see that towards the left side of the photo just under the new pan. But it now looks like I will have to put another plate in front of it to protect the new pan. I didn't need that extension before as the pan was tucked up. Now it does look a little exposed. Oh well, one more mod to do now.
'12 JK Rubicon V6 3.6L Auto D44/D44
Re: TJ Build
needswork wrote:Looks like a great job. I understand that Automatic TJ gearboxes do suffer from water getting inside. I have not read your earlier posts on upgrades to the TJ, but I assume you have looked at that aspect?
The gearbox breather is open to the bell housing, and the solution I understand is to put a breather hose on the transmission, then through the bell housing then up into the engine bay.
Many thanks for your posts on this up grade a very interesting read well done.
Thanks. I am aware of the mod to extend the breather that is actually inside the bell housing. But so far I have not had any problems. Besides with a drain plug, I can now change the oil after deep water crossings (not that we have many of those in North Island) much more easily.
The only hick-up with that breather upgrade is that the transmission has to be dropped and a new hole drilled on top of the bell housing (I don't mind the hole being drilled). As I have not had a need to drop the transmission yet, I am taking my chances.
'12 JK Rubicon V6 3.6L Auto D44/D44
Re: TJ Build
needswork wrote:Looks like a great job. I understand that Automatic TJ gearboxes do suffer from water getting inside. I have not read your earlier posts on upgrades to the TJ, but I assume you have looked at that aspect?
The gearbox breather is open to the bell housing, and the solution I understand is to put a breather hose on the transmission, then through the bell housing then up into the engine bay.
Many thanks for your posts on this up grade a very interesting read well done.
My wifes automatic Wrangler had a breather tube running to just above the top of the transmission bellhousing, originating from the top of the transmission, others that i have looked at were set up the same, as was my manual. I have extended both to just under the top of the bonnet. Im a little lost by your description as its certainly not the case with ours, nor the others Ive looked at. I found out the hard way, and drowned my wifes one. Im at work at the moment, but ill take a pic when i get home and post it up.
/| , [____],
l----L -OlllllllO-
()_) ()_)-----)_)
KEEP'N JEEP'N!
l----L -OlllllllO-
()_) ()_)-----)_)
KEEP'N JEEP'N!
Re: TJ Build
xj wrote:My wifes automatic Wrangler had a breather tube running to just above the top of the transmission bellhousing, originating from the top of the transmission, others that i have looked at were set up the same, as was my manual. I have extended both to just under the top of the bonnet. Im a little lost by your description as its certainly not the case with ours, nor the others Ive looked at. I found out the hard way, and drowned my wifes one. Im at work at the moment, but ill take a pic when i get home and post it up.
You only make such a mistake once in a lifetime
A photo would be great, because my understanding was that the tube that goes from the transmission area is actually for the transfer case (you can actually see it going to the top of the transfer case). 3-speed (32RH) is not known to have an external breather. If you have found it, let us less knowledgeable mortals know.
'12 JK Rubicon V6 3.6L Auto D44/D44
Re: TJ Build
nono, the knowledgable mortals are quite correct.
On the out end.......

I now know that my TRANSFER CASE will never get infused with water.
About 20mm out in my estimation of locale
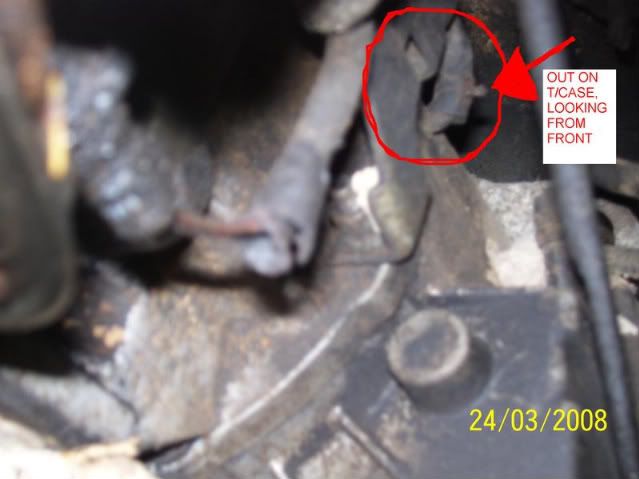
Learnt something else new today....... always happy to stand corrected gents, cheers!!
On the out end.......
I now know that my TRANSFER CASE will never get infused with water.
About 20mm out in my estimation of locale
Learnt something else new today....... always happy to stand corrected gents, cheers!!
/| , [____],
l----L -OlllllllO-
()_) ()_)-----)_)
KEEP'N JEEP'N!
l----L -OlllllllO-
()_) ()_)-----)_)
KEEP'N JEEP'N!
Re: TJ Build
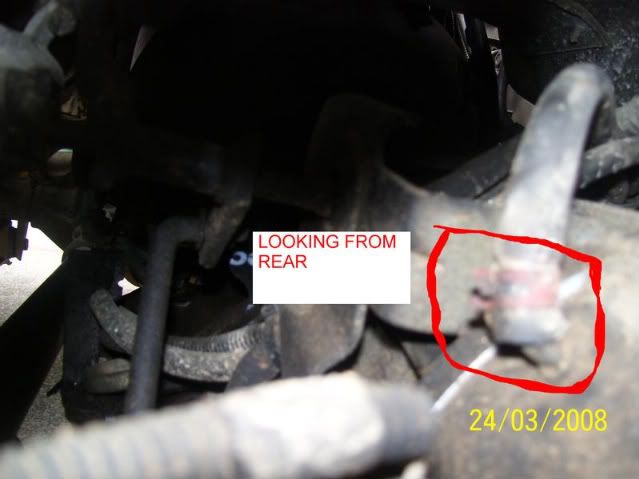
I was just under it and have discovered another breather sitting just on top of the bell housing (hidden from everything). I don't know where its connected (can't see with the mud stuck all around it). So now I am off to wash it first and then have a look in the next couple of days. You might be on to something.
'12 JK Rubicon V6 3.6L Auto D44/D44
Re: TJ Build
I was getting a lot of chatter from the rear diff for about a week now. Around the corners it was like how an automatic locker would behave. But I don't have an auto locker, its just a limited slip diff. So I thought I'll just check the oil level.
When I put my finger through the hole, it looked and felt a bit dirty. There was no water or anything else, just a bit "worn". I had done the oil change about 6 months ago, so this was unusual.
I changed the oil and went with Penrite LIMSLIP 85W 140 full synthetic. I also poured in LSD additive from Mopar (as recommended by Jeep). Closed up everything and went for a drive. No more chatter or bangs.
Insides were not really dirty, gear teeth looked nice and clean, no big chunky metal bits were visible. So it looks like last batch of oil just worn down much more quickly than it should have. Oil changes would be so much simpler and quicker if Dana differentials had drain plugs in them!!!!!!
'12 JK Rubicon V6 3.6L Auto D44/D44
Re: TJ Build
Now all you need is a long arm suspension system, a 5 o 6 inch lift, a set of 35's, a D44 for the front, gear down to 4.88 to compensate for the bigger tyre diameters, fit alloy axle shafts all round, greaseless UJs everywhere, some armour underneath, remote breathers for the transmission and bell housing & diffs of course, a locker or LSD for the rear and the same for the front, on board air, Tuffy boxes, a good winch, a high mount steering linkage set, an upgraded steering box, an upgraded steering pump, an upgraded brake (Vanco) kit for all four wheels including changing the rears to discs, then you'll find the engine has run out of steam carying all this stuff.
So get a whipple supercharger with aftercooler, a link computer to manage boost and engine repsonses, then your gas tank will be too small. Put in a bigger gas tank, after the next trip realise you should have guarded it. Collect the TJ from the Auto transmission shop where they've been beefing up the torque converter and you're darn near there. Just need an Atlas transfer case to take the extra power now there's a supercharger fitted. Take it from someone who's been there, still doing that. You will wind up with a weapon, but for the money spent to get there and be reliable you could have bought an Abrams tank. Cheers and good luck,
So get a whipple supercharger with aftercooler, a link computer to manage boost and engine repsonses, then your gas tank will be too small. Put in a bigger gas tank, after the next trip realise you should have guarded it. Collect the TJ from the Auto transmission shop where they've been beefing up the torque converter and you're darn near there. Just need an Atlas transfer case to take the extra power now there's a supercharger fitted. Take it from someone who's been there, still doing that. You will wind up with a weapon, but for the money spent to get there and be reliable you could have bought an Abrams tank. Cheers and good luck,
Who is online
Users browsing this forum: No registered users and 35 guests