GQ project.

User avatar
flyingbrick
Hard Yaka
Posts: 1725
Joined: Sun Jan 18, 2009 7:36 pm
Location: Hamilton/Auckland
Contact:

GQ project.

Postby flyingbrick » Sat May 30, 2009 7:30 pm

Hi all. Thought I'd make a post to show what I've been doing and why I ask so many questions :-) Plus I like taking photos and having something to look back on in the future.

Basically right now I'm in parts acquisition mode :lol: trying to get as much crap together as I can. I'm just an apprentice machinist so do not have abundant amounts of money sitting there- but bargain hunting and trademe seem to be working great so far :lol:

I feel like its all kinda coming together into something I can start working on now- Its taken me 6 months of question asking, reading and pushing money around the country....

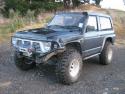
Anyways, this is the truck as purchased. It was covered in dog hair and filth inside and was just really really gross.
Image
Image

I liked the fact it was coil sprung/solid axle f/r, short wheelbase and it had way more power than the early hiluxes I test drove. As an added bonus EVERYONE I'd spoken with about the safaris and every article I read mentioned that they were about as unbreakable as factory jap vehicles get........and the intention was always to EVENTUALLY go a little larger in tire size.

Within about a month I'd pulled off and sold the roof rack, front nudge bar, side steps, bumpers and various other pieces for added project money and/or because they were dragging on shit and getting bent. The GF and I pulled the interior out and gave everything a hose/scrub with soap and I then used VHT vinyl die to spray the front floor carpets and boot carpet black.
Image

The factory speakers were in a terrible state so they were removed and some sony items were installed in their place. The rears fit straight in where as up front I machined off the factory speakers mounting ring and used it as an adaptor.

I bought some uhumpee plastic and made myself some body lift blocks to give 35mm extra hight... and then cut/welded my gear lever to stop it fouling on the rear of its trans tunnel hole. (both now sold.... i think)
Image
Image

I stripped and rebuilt the factory Warn winch as its free spool had locked up. I had to drill two small holes in the end of the housing and then heat things with a torch so I could punch the outer planetary gear ring free.
Everything was then sand blasted, greased and then sprayed nice and black.
Image

And then I fitted a TQ converter lockup switch (well recommend this to anyone).

And it was about now I think that things started going really bad. Parts started being purchased and project holes dug. All of this happened:

New 37" creepy crawlers arrived (thanks Karam)
Image

Shortly afterwards some REALLY NICE drop boxes turned up to push the radius arms down 100mm and forwards around 30mm (just eyeballed it.. unsure how far jsut yet).
http://4wdbits.co.nz/ProductDetails.aspx?productID=1186
Image

I bought a rear Terrano LSD for the front (Thanks Ryan) which has just been transported to Hamilton for me by Taz01.. flippin legend. :shock:

Some black steelies from 4WDbits to fit the tires:
http://4wdbits.co.nz/ProductDetails.aspx?productID=1222
Image

Some manual front hubs were bought off trademe and cleaned up REAL well after being stripped/sand blasted and all greased up nice.
Image

Various 4" rubber hose bends were purchased from TRT (iirc) for a home-style snorkel setup.

A pipe bender was bought.

An S14 silvia steering wheel was purchased to replace the crackign/gross factory one. This new one was cheap and is leather bound and black and pretty. :D
Image

annnnd.
Today I collected these parts from 4wd bits 8) 8) 8) and a spare front GQ diff to set this lsd up in to limit potential down time.

100-125mm lift EFS extreme struts, and 100mm lift EFS springs (which should give around a 3" lift after sagging/front bar etc)
http://4wdbits.co.nz/ProductDetails.aspx?productID=450
http://4wdbits.co.nz/ProductDetails.aspx?productID=449
http://4wdbits.co.nz/ProductDetails.aspx?productID=465
http://4wdbits.co.nz/ProductDetails.aspx?productID=457
Image

TO DO!:
-Purchase longer rear arms from that fellow on trademe- waiting for his rubber bushes to arrive.
-Have made or purchase longer brake lines
-Purchase new rubber spring hats to remove the DONK my current ones are giving off
-Fit terrano LSD
-Fit snorkel
-Cut my guards out/have the steel lip welded back in by pannel shop (front and rear)
-Purchase/fit a turbo to spin these things. Evo3 TDO5 was purchased but was found to require a rebuild $$$ so sold
-have front panhard mount moved forwards so things dont clash when the diff is pushed forwards by drop box.
-Purchase front/rear adjustable panhards
-GU front axle or longfields.
-etc!


HUGE THANKS to:
4wdbits.co.nz for going out of their way to answer my many questions and for giving me a free steering dampener with my lift package (exchanged for store credit in the end to make upgrading to better shocks a little less painful :D)

Darinz for answering my many PM's/E-mails and providing farkloads of useful info.

Vvega for providing motivational abuse.

Taz01 for doing his bit in ORE's courier service. 8).

My beautiful girlfriend, Hayley, for not leaving me yet :lol: She often gets neglected because of this truck and these forums. (or does my truck and these forums get neglected because of her? :lol: :lol: :lol: )

Everyone else who has helped me so far. You guys rule :-D


Unsure if anyones made it down this far. I talk lots :lol: but I'll update this thread as parts get added to the list and work gets done. I've got the next 3 weekends free for shed time 8) so something may happen.

-Flyingbrick

Image
Last edited by flyingbrick on Sun May 31, 2009 9:18 am, edited 2 times in total.
phone Ross Bolus (secretary of the BOP club) He'll save you.

User avatar
PigFmr
Hard Yaka
Posts: 631
Joined: Sat Jun 17, 2006 12:00 pm
Location: Ashburton,Hinds
Contact:

Re: GQ project.

Postby PigFmr » Sat May 30, 2009 9:24 pm

you have the 4WD bug,LOL,
good luck with your projects.
vince

vvega
Hard Yaka
Posts: 972
Joined: Thu Jan 08, 2009 2:02 pm
Location: hamilton
Contact:

Re: GQ project.

Postby vvega » Sat May 30, 2009 9:54 pm

lol @ woman pick .. now get back to work :D
Kiwi4x4

User avatar
flyingbrick
Hard Yaka
Posts: 1725
Joined: Sun Jan 18, 2009 7:36 pm
Location: Hamilton/Auckland
Contact:

Re: GQ project.

Postby flyingbrick » Thu Jun 04, 2009 7:23 pm

Spent an hour after work doing truck stuff 8) Pulled a D21 terano rear lsd down and put it into a spare 4.1 ratio front safari carrier.

Does anyone know what the tq specs are for these things? Mostly the 100 little bolts that hold the big gear onto the middle thing. :lol:

Have had a look through the workshop manual but cant find shit about it.

If i dont hear back i'll just ensure they are all f'n tight and forget about it.
phone Ross Bolus (secretary of the BOP club) He'll save you.

User avatar
muskie
Hard Yaka
Posts: 654
Joined: Mon Jul 10, 2006 12:00 pm
Location: Te Awamutu

Re: GQ project.

Postby muskie » Tue Jun 09, 2009 8:26 pm

hey flying brick, whats the full extension eye to eye on the rear shox, i want to order a set of those. thanks

User avatar
flyingbrick
Hard Yaka
Posts: 1725
Joined: Sun Jan 18, 2009 7:36 pm
Location: Hamilton/Auckland
Contact:

Re: GQ project.

Postby flyingbrick » Tue Jun 09, 2009 8:42 pm

Hey dude.

FS Extreme 45mm Bore Twin Tube Design. Max length: 750mm. Min length: 460mm. Top mount:EB2 - 19 ID. Bottom mount:EB2 - 19 ID. Purchase 2 for rear. Designed and valved for offroad touring and recreational vehicles EFS Extreme shocks have been tested on both short and long course race vehicles. EFS Extreme shock absorbers feature: *High Strength iron piston rings. *45mm Bore. *20mm hardened chromed piston rod. *2mm external casing wall thickness. *Large oil volume. *High strength Iron piston rings. *Special high temperature fluid to prevent fade under high temperature conditions. *Bonded rubber eye bushes for maximum articulation & comfort. *Special designed compliant pin bushes for carrying greater dynamic loads. *Quality multi-lip Viton seals. *High quality long life rubber & polyurethane bushes.


http://4wdbits.co.nz/ProductDetails.aspx?productID=450

They are certainly one of the most solid/large shocks that i've held before. :mrgreen:

No idea how its going to flex but then that wasn't a prerequisite.

Hopefully these are strong enough that I wont have to worry about them while I have the truck.

The 3 year warranty is pretty awesome too.

-Nathan
phone Ross Bolus (secretary of the BOP club) He'll save you.

User avatar
muskie
Hard Yaka
Posts: 654
Joined: Mon Jul 10, 2006 12:00 pm
Location: Te Awamutu

Re: GQ project.

Postby muskie » Tue Jun 09, 2009 10:44 pm

when you are next in hamilton give me a pm, would like to have a look around the suspension

User avatar
flyingbrick
Hard Yaka
Posts: 1725
Joined: Sun Jan 18, 2009 7:36 pm
Location: Hamilton/Auckland
Contact:

Re: GQ project.

Postby flyingbrick » Wed Jun 10, 2009 6:36 am

I live in Te Awamutu.. is that easier?
phone Ross Bolus (secretary of the BOP club) He'll save you.

User avatar
muskie
Hard Yaka
Posts: 654
Joined: Mon Jul 10, 2006 12:00 pm
Location: Te Awamutu

Re: GQ project.

Postby muskie » Fri Jun 12, 2009 5:42 pm

yep thats easier, wouldnt mind a look at the drop boxes and rear axle travel, before i order some rear shox and boxes..

User avatar
flyingbrick
Hard Yaka
Posts: 1725
Joined: Sun Jan 18, 2009 7:36 pm
Location: Hamilton/Auckland
Contact:

Re: GQ project.

Postby flyingbrick » Sun Jun 14, 2009 8:25 pm

Cut my guards out today and also started my snorkel.
Thanks to my buddy Shane for the use of his garage, air compressor and broom 8)

Was pretty funny as while cutting the vibrations shook out one of the sills drains which was plugged with soil. She dumped about half a litre of water out on the garage floor beside me..... and sooo much mud fell out of the guards and everywhere.

Worked out far better/was easier than expected. Simply used a cheap jigsaw with metal cutting blades.


Before (but with the fibreglass flares removed)
Image


conveniently got rid of this in the process
Image

during
Image

Image

first guard finished
Image

Snorkel marked out- shape is to allow the rubber elbow to sit right up close to the guard.
Image

Snorkel hole cut.
Image

Elbow in place (still can be pushed in about an inch.. 4" pipe is crushed to 3" to make it oval so it wont sit out this far)
Image

other guard finished.
Image

rear guard marked out
Image

Finished :-D
Image


This week the steel lips will be welded back in front and rear to enable flares rubber flares to be mountd. The rear inner skin will be beat out to touch the outer skin (its quite malleable...is that a word?) and bonded in place to seal.
phone Ross Bolus (secretary of the BOP club) He'll save you.

User avatar
Shane
Hard Yaka
Posts: 824
Joined: Thu Dec 29, 2005 12:00 pm
Location: Chch

Re: GQ project.

Postby Shane » Sun Jun 14, 2009 9:58 pm

Looking good

Two of my friends have just done the same,one has 37's like yours the other getting 36's.do you have a turbo?those 37" creepys obsorb power like theres no tomorro,esp with auto.

You should do a rear 1/4 cut while you'r there.

Shane

User avatar
flyingbrick
Hard Yaka
Posts: 1725
Joined: Sun Jan 18, 2009 7:36 pm
Location: Hamilton/Auckland
Contact:

Re: GQ project.

Postby flyingbrick » Sun Jun 14, 2009 10:08 pm

Turbo or v8 is on the list for once this is done :lol: its going to be a joke without it.

was going to cut the rear quarters too but decided it was time to come home for some dinner. 8)

Maybe next weekend if im allowed.
phone Ross Bolus (secretary of the BOP club) He'll save you.

User avatar
flyingbrick
Hard Yaka
Posts: 1725
Joined: Sun Jan 18, 2009 7:36 pm
Location: Hamilton/Auckland
Contact:

Re: GQ project.

Postby flyingbrick » Sun Jun 14, 2009 10:11 pm

Has anyone got a wrecked manual hub sitting around? I need a spare detent ball and spring. And those spacers for each side too actually.
phone Ross Bolus (secretary of the BOP club) He'll save you.

User avatar
flyingbrick
Hard Yaka
Posts: 1725
Joined: Sun Jan 18, 2009 7:36 pm
Location: Hamilton/Auckland
Contact:

Re: GQ project.

Postby flyingbrick » Mon Oct 26, 2009 12:47 pm

hmmmn. Its been a while :lol:

Thought I'd have a ramble about whats been happening (not a whole lot really i guess)

-wired in a TQ converter lockup switch ages ago. Awesome mod. Especially because of the extra go-go it has in 3rd gear with the TQ converter locked.

I HAVE BEEN FIGHTING with my GQ's electric windows. They have been the most unreliable part of this truck over the past 10 months or so that Ive owned it. Most recently the rubber isolator tore itself to pieces- I replaced it with a press fitted piece of nylon which has been reliable ever since :mrgreen:

-swapped the factory front winch bar with a custom made unit from another forum member here. I had to do a whole lot of cutting and grinding and drilling and thread tapping to make it work without a body lift....

Image
Image

And then fairly recently decided that I wanted something a little more pretty. Managed to pick up an aluminum winch bar for not much. Obviously will never be as strong as a steel bar- however the centre section/ hook mounts/part of wings has been thoroughly strengthened with thick steel plate and angle iron. More than good enough for me at this stage.

The gf's bro helping out with install
Image

Image

finished without winch.
Image

Image

And I've purchased some WRX STI seats which Skid will be taking possession of soon....and then hopefully we can get the ORE courier service to ferry them north to hamilton. I'm pretty much in love with them.
Image

The 37's and 4" lift still have not been installed. So many things to consider. I've investigated numerous ways of modifying the rear tubs/body to let them flex upwards and to allow me to move the axle back a bit (to give me clearance at the front of the guard) but that wasn't going to happen without shitloads of money spent on rear tubs etc and chances are it was still going to look shit.

So currently myself and a shop in town are researching the most legal way to cut it into a ute (with rear drop side tray). I'm sure it wont be too much of a problem as there are so many GQ shortys cut into utes all around the world. But just to make sure- will be talking to cert man this week.

Sub- Projects currently being worked on (I flip from one to the next to the next and then back again as time and my meagre attention span allow.)

-Ute conversion

-4 link rear end (researching viability- am i smart enough to make it work, etc)

-Endless air pump mods- Have stripped down and checked my AC compressor. Am rebuilding with teflon cap seats rather than steel piston rings and with a few other mods to reduce its oil consumption.

- Rear facing inlet plenum- Am wanting to turbo the vehicle eventually and run a W2A IC above the engine. Rear facing plenum will mean very short pipework and should be a whole lot more efficient than current design. Have milled off plenum and have been investigating trumpet/Bellmouth design and fabrication. Hopefully test forming a few trumpets this week.

-Manually shifted auto - loom + relays etc all done and finished last week but haven't had a chance to install in the truck yet due to visiting the in-laws. Cant wait for this to be in and if it works as it should (its tested fine so far) I wouldn't mind making and selling a few kits for people wanting to go the same route without the hassle.

-finish my snorkel :lol: :roll:

-Nathan.
phone Ross Bolus (secretary of the BOP club) He'll save you.

User avatar
DaveM
Hard Yaka
Posts: 3249
Joined: Tue Nov 02, 2004 12:00 pm
Location: Blenheim

Re: GQ project.

Postby DaveM » Mon Oct 26, 2009 3:28 pm

Be interested to see how the lift goes, my EFS lift ran 4" rear/5" front with 720mm extended shocks, and the passneger side rear coil would fall out at full flex :roll:
EFS shocks were on my list but were too long. If going down the ute track, might be worth looking at A framing the rear? Gets rid of the panhard rod, and might make it easier to extend the wheelbase?
Oh, and the 3 yr warranty is from the date of purchase on those shocks, so hurry up and fit em :wink:

User avatar
flyingbrick
Hard Yaka
Posts: 1725
Joined: Sun Jan 18, 2009 7:36 pm
Location: Hamilton/Auckland
Contact:

Re: GQ project.

Postby flyingbrick » Mon Oct 26, 2009 4:05 pm

thanks Dave. I think the triangulated four link rear is a better option than the A frame setup (i think i mentioned that up there).

Would lvoe to ditch that panhard for so many reasons.

LOL at the warranty. yeah i better hurry!
phone Ross Bolus (secretary of the BOP club) He'll save you.

User avatar
DaveM
Hard Yaka
Posts: 3249
Joined: Tue Nov 02, 2004 12:00 pm
Location: Blenheim

Re: GQ project.

Postby DaveM » Mon Oct 26, 2009 4:11 pm

flyingbrick wrote:thanks Dave. I think the triangulated four link rear is a better option than the A frame setup (i think i mentioned that up there).

Would lvoe to ditch that panhard for so many reasons.

LOL at the warranty. yeah i better hurry!


Four link is the way to go, if you have time on your hands to fine tune it I guess. Not many GQ owners out there bother going that far with the rear, so will be ineteresting to see how you get on

User avatar
Muzza
Hard Yaka
Posts: 107
Joined: Sun Jul 30, 2006 12:00 pm
Location: Central Hawkes Bay

Re: GQ project.

Postby Muzza » Tue Oct 27, 2009 8:06 am

Nice work on the truck Flyingbrick
With 2 mistresses ( GF and truck ) you sure have a full life.
I have low range reduction gears installed in my transfer case which I find are absolutely brilliant. The HOLD switch makes the auto start in second gear. I love the reduction gears as it takes a lot of that spongyness out of the drive, "You say drive - and it drives" but I suppose it does depend on what sort of of 4x4ing you do.
The power In my truck is put to the ground by a brilliant DTS turbo, reduction gears and an autolocker in the front.
If you are down my way anytime you are welcome for a drive and I will be interested to see how your "Darinz" auto mods go.
Carry on the good works

Cheers Murray

User avatar
darinz
Hard Yaka
Posts: 1265
Joined: Wed Nov 07, 2007 12:00 pm
Location: Whangarei

Re: GQ project.

Postby darinz » Tue Oct 27, 2009 9:45 am

DaveM wrote:
Four link is the way to go, if you have time on your hands to fine tune it I guess. Not many GQ owners out there bother going that far with the rear, so will be ineteresting to see how you get on


4 link is definitely better as you end up with quite a weak link with an 'A' frame. The axle end of the 'A' frame has the load in the wrong direction for the rod end you fit. One way around it (to a point) is to fit the rod end horizontally (so the bolt is vertical) but even that only helps a bit. With a 4 link the load is still tranfered the length of the arm rather than across it (if that makes sense???)

If you are really keen on designing your 4 link to work then I have a claculator that will check everything for you.
FYI I have my rear 4 link with 24" of travel and the pinion angles are well within acceptable limits for the entire travel. ie under 6* of change. I have slight roll oversteer but this can be designed out but my lower arms are parrallel which makes the geometry less than perfect. In my case the lower arms parrallel is vital to the design so the rest is a compromise. The antisquat increases the more you compress the suspesion. antisquat is slightly about neutral at ridehieght.
Obviously this is a little more extreme that what you'd do in a quick WB extension and ute cut but the principles are the same. If you design it right to start with then it shouldn't be too much changing afterwards. It isn't like you are doing anything new so the principles of how it works are out there if you do your homework.
Nissan Terrano coilovers, turboed VH45, Safari axles, and some other stuff.

User avatar
flyingbrick
Hard Yaka
Posts: 1725
Joined: Sun Jan 18, 2009 7:36 pm
Location: Hamilton/Auckland
Contact:

Re: GQ project.

Postby flyingbrick » Tue Oct 27, 2009 5:47 pm

Thanks all. Much appreciated.

Forgot to add that another reason for going ute is the significant rust back there.

Understand your comments on the 4 link vs A frame setup, Darin. The kits I've seen available all seem fairly messy and are bolt in so would not change the trucks geometry SFA for all the hassle.

Will give you some measurements over the next few weeks to run through that calc. Would be awesome of you :mrgreen:

-Nathan
phone Ross Bolus (secretary of the BOP club) He'll save you.

User avatar
Muzza
Hard Yaka
Posts: 107
Joined: Sun Jul 30, 2006 12:00 pm
Location: Central Hawkes Bay

Re: GQ project.

Postby Muzza » Tue Oct 27, 2009 7:46 pm

Sounds interesting !. Keep us all well informed.

User avatar
darinz
Hard Yaka
Posts: 1265
Joined: Wed Nov 07, 2007 12:00 pm
Location: Whangarei

Re: GQ project.

Postby darinz » Wed Oct 28, 2009 3:19 pm

flyingbrick wrote:Thanks all. Much appreciated.

Forgot to add that another reason for going ute is the significant rust back there.

Understand your comments on the 4 link vs A frame setup, Darin. The kits I've seen available all seem fairly messy and are bolt in so would not change the trucks geometry SFA for all the hassle.

Will give you some measurements over the next few weeks to run through that calc. Would be awesome of you :mrgreen:

-Nathan


I did mention that I preffer beer from a green bottle didn't I :?: :mrgreen:

Also you should be very careful with the bolt in kits as if you don't reinfore the chassis mounts they tend to rip them off!
Also unless you extend the WB you will end up with a very scary truck when it comes to hill climbs. The factory geometry once lifted and plus A frame it pretty bad!
How many lifted GQ's have you seen that wheel spin a lot but don't really go anywhere? Once you lift them you have so much anti squat that when you apply power they just lift the rear end and go nowhere. Good for a hillclimb (unless you have an A frame) but crap for almost anything else.

The measurements I need are
WB
tyre size
hieght either end of the upper and lower arms
length of arms
width of arm mounts at chassis and axle
amount of suspension travel up and down ie 4"+4" so total travel 8" This is to calculate pinion angle change.
centre of gravity or a rough guide is top of the bellhousing
weight
unsprung wieght front and rear.
Nissan Terrano coilovers, turboed VH45, Safari axles, and some other stuff.

User avatar
flyingbrick
Hard Yaka
Posts: 1725
Joined: Sun Jan 18, 2009 7:36 pm
Location: Hamilton/Auckland
Contact:

Re: GQ project.

Postby flyingbrick » Wed Oct 28, 2009 4:47 pm

Cripes! That's quite a list of data. I'll work my through it as soon as i can.

Forgot to mention. The plan has always been to move the diff backwards- which is another reason why the 4 linkmakes sense- I need new arms anyway.

Anyways.

UPDATE! :mrgreen:

Its now a manually shifted auto!!!

Thanks Darin for the solenoid vs gear information- however since you didn't give me the schematics I don't think i can call it the Darinz auto mod :lol: .

It has however given me a sense of achievement! I cant say I've read many automotive wiring diagrams and done much shit like this.

http://www.downunder4x4.net/holdswitch.jpg

Problems I had:
-I started too late. In a cramped garage. On a work night.

- My first attempt of a test drive last night (and this is how i drove to work this morning) had me able to select second, third, third, third gears. :lol:

-Above problem was caused by a SHITTY (but expensive, bastards) Jaycar plug which wont hold its pins tight enough- they always push out and don't make contact when you mate the halfs together.

-I have a problem with 3rd gear which i was hoping this mod would remedy.... Unsure exactly what it is or what is causing it- will get a trans flush and hope for the best.

-Working in any cars foot well is a complete ass hole.

Image

But forgetting all that- It drives very very well :mrgreen: :mrgreen: :mrgreen: and I'm very happy.

If anyone would like info on how to do the manual shifter circuit- or would like a ready to install manual shifter circuit (incl tq converter lockup switch if you want) feel free to pm or e-mail me.
phone Ross Bolus (secretary of the BOP club) He'll save you.

User avatar
flyingbrick
Hard Yaka
Posts: 1725
Joined: Sun Jan 18, 2009 7:36 pm
Location: Hamilton/Auckland
Contact:

Re: GQ project.

Postby flyingbrick » Thu Oct 29, 2009 6:34 pm

Thought I would post pics of the start of my custom intake. I forgot to take pics once i had finished. Our mill is just a little too small so I couldnt do any surface in one pass :-(

All the EGR shit has gone, brackets removed etc.. just has a nice flat surface to weld the plenum to. Will get pics of cardboard mockup plenum/templates tomorrow

Image

Image

Image
phone Ross Bolus (secretary of the BOP club) He'll save you.

User avatar
flyingbrick
Hard Yaka
Posts: 1725
Joined: Sun Jan 18, 2009 7:36 pm
Location: Hamilton/Auckland
Contact:

Re: GQ project.

Postby flyingbrick » Sat Oct 31, 2009 2:47 pm

Bugger you, hindsight.

So went into work today and finished off the milling work on the plenum.

Image shaved off a number of protrusions in there and did my best to make the ports the same size. ONE THING is pwning my ass tho- look at the left most runner in this pic. Its SUBSTANTIALLY smaller than the rest due (i guess) to the EGR bull shit that was all over it. I've compared it to my non-egr manifold and mines got fully formed runners all the way along.

So now i have to either start again (with a cheap NON egr plenum.. would be nice) or get the end of the manifold built up with weld so that i can then mill the port out square.
phone Ross Bolus (secretary of the BOP club) He'll save you.

User avatar
darinz
Hard Yaka
Posts: 1265
Joined: Wed Nov 07, 2007 12:00 pm
Location: Whangarei

Re: GQ project.

Postby darinz » Thu Nov 05, 2009 8:50 am

Flash, we just used an angle grinder to cut the one we did!

Are you putting a tappered plenum onto it with front entry or staying with the top entry?
Nissan Terrano coilovers, turboed VH45, Safari axles, and some other stuff.

User avatar
flyingbrick
Hard Yaka
Posts: 1725
Joined: Sun Jan 18, 2009 7:36 pm
Location: Hamilton/Auckland
Contact:

Re: GQ project.

Postby flyingbrick » Thu Nov 05, 2009 11:06 am

Front entry. Ive done no data crunching or simulation work to understand how its going to flow- but it looks correct in my mind and i figure if greddy/HKS/every other brand of performance car plenum can come up with intakes which look so vastly different to one another then there is not really any science to it. :lol:

At any rate it will flow a huge amount greater than stock.

On work PC atm but will post pics when i get home.

-Nathan

Oh and UPDATE.

Had been looking for 16x10" wheels for the past 12 months. This week i found two different wheels for sale at two different places. 16x10" steels (going to be very common on tm etc soon im told as a huge order has just been placed) and 16x10" alloys at 4wdbits. Would LOVe the alloys but the price is a little out of reach :( but atleast the wider steels will reduce crowning over what i have now (curve of tread surface.. think thats the name)

Had been looking for a stock ute body for the past 12 months. This week i found two for sale :lol: but more on that when the seller has time to send me pics and I've got one in my hot little hands.
phone Ross Bolus (secretary of the BOP club) He'll save you.

User avatar
PigFmr
Hard Yaka
Posts: 631
Joined: Sat Jun 17, 2006 12:00 pm
Location: Ashburton,Hinds
Contact:

Re: GQ project.

Postby PigFmr » Thu Nov 05, 2009 4:34 pm

[quote="flyingbrick"]Front entry. Ive done no data crunching or simulation work to understand how its going to flow- but it looks correct in my mind and i figure if greddy/HKS/every other brand of performance car plenum can come up with intakes which look so vastly different to one another then there is not really any science to it. :lol:

At any rate it will flow a huge amount greater than stock.

On work PC atm but will post pics when i get home.

-Nathan

Oh and UPDATE.


but atleast the wider steels will reduce crowning over what i have now (curve of tread surface.. think thats the name)

quote

you are running creepys that right?? if thats the case 10inch rims wont make any difference to crowning they do on 7's 8's 10's
vince,,,

doggoneit
Bush Crasher
Posts: 91
Joined: Sun Jun 14, 2009 2:46 pm

Re: GQ project.

Postby doggoneit » Thu Nov 05, 2009 7:33 pm

Hi, love what you are doing with the truck. Can you tell me please - did you have to adapt the sylvia steering wheel to fit? Is it non airbag? Cheers.

User avatar
darinz
Hard Yaka
Posts: 1265
Joined: Wed Nov 07, 2007 12:00 pm
Location: Whangarei

Re: GQ project.

Postby darinz » Fri Nov 06, 2009 9:03 am

I used a D21 terrano steering wheel as that bolted straight on as well. (to GQ that is)
Nissan Terrano coilovers, turboed VH45, Safari axles, and some other stuff.

Return to “Projects / Mod's”

Who is online

Users browsing this forum: No registered users and 41 guests