GQ project.
-
flyingbrick

- Hard Yaka
- Posts: 1725
- Joined: Sun Jan 18, 2009 7:36 pm
- Location: Hamilton/Auckland
Re: GQ project.
Its no secret that im a post whore, Tom.

phone Ross Bolus (secretary of the BOP club) He'll save you.
Re: GQ project.
Gu axles modded to take portals

portal reduction drive
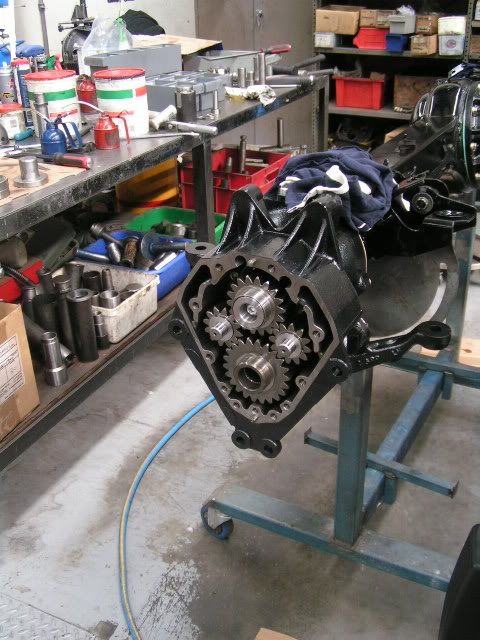
portal reduction drive
89 safari, pto winch, 33x15 simexs. sliders,75mm lift . turbo intercoolered
-
flyingbrick
- Hard Yaka
- Posts: 1725
- Joined: Sun Jan 18, 2009 7:36 pm
- Location: Hamilton/Auckland
Re: GQ project.
Had a good day today. Many thanks to Wayne @ cartune, Sean, Shane, Mike and Justin  you guys are beyond awesome.
First of all we finished off all of the loom stripping and pulled the loom through the firewall into the engine bay. I managed to keep everything intact except for about 7 color coded wires in the cabin - nothing was unplugged from the engine so it will be easy to get it all back together
Justin (rural here in the forums) came and collected the (very heavy!!) safari body once it was off the chassis.


which left us with

and

I couldn't be bothered test fitting it over and over so cut the tunnel out

Sean and I then lifted the body onto the chassis (yes just the two of us) and Vvega came out to help with the positioning.

The body is currently sitting around 3" too high at the rear and about 6" too high at the very front body mounts. It needs a little bit more trimmed from the firewall, some trimmed from the gussets at the rear of the cab and a little piece removed from the front wheel tub where its fouling the top of the steering box.
Since these pics the front fan has been removed and the loom etc pulled out from around the engine which dropped things a little.
It looks like the steering shaft and brake lines are going to be very easy to fit together.
The rest of the pics:


First of all we finished off all of the loom stripping and pulled the loom through the firewall into the engine bay. I managed to keep everything intact except for about 7 color coded wires in the cabin
Justin (rural here in the forums) came and collected the (very heavy!!) safari body once it was off the chassis.
which left us with
and
I couldn't be bothered test fitting it over and over so cut the tunnel out
Sean and I then lifted the body onto the chassis (yes just the two of us) and Vvega came out to help with the positioning.
The body is currently sitting around 3" too high at the rear and about 6" too high at the very front body mounts. It needs a little bit more trimmed from the firewall, some trimmed from the gussets at the rear of the cab and a little piece removed from the front wheel tub where its fouling the top of the steering box.
Since these pics the front fan has been removed and the loom etc pulled out from around the engine which dropped things a little.
It looks like the steering shaft and brake lines are going to be very easy to fit together.
The rest of the pics:
phone Ross Bolus (secretary of the BOP club) He'll save you.

Re: GQ project.
You must be stoked to get the Safari cab off and the Hilux one sitting on there, Did you get any more done today and any more pics bud.??
-
flyingbrick
- Hard Yaka
- Posts: 1725
- Joined: Sun Jan 18, 2009 7:36 pm
- Location: Hamilton/Auckland
Re: GQ project.
Man just typed a whole lot and lost it.
Today i trimmed shitloads out of the firewall and floor to get the body down low enough. Still have a bit more to go with the head is fouling- front can drop 2"ish and the rear a little too.. Looks FAR BETTER wth the body sitting way more level.
I also trimmed/sorted/re-connected the brake/vacuum/fuel lines so that they fit. The lux engine bay is much smaller than the saf one so everything is a little too long. There are a zillion very annoying hard lines which need to be shortened. Am not sure how i can put a nipple flare thing on the end of the pipe so that it does not slide out of the hose once back together. I may use a brake line flaring tool.
I NEED to find a stock 85ish hilux steering shaft and knuckle (between shaft and box)- if anyone has one sitting around that they could share with me that'd be great.
I sorted out the wiring in the engine bay. The engine bay was stripped down by mates of mine and they did a farking good job. Everything is as it should be and was easy to plug back together and get into the right place. I now just need a 90mm hole saw to make a hole in the firewall to accept the safari loom and grommet.
recent pics:


Today i trimmed shitloads out of the firewall and floor to get the body down low enough. Still have a bit more to go with the head is fouling- front can drop 2"ish and the rear a little too.. Looks FAR BETTER wth the body sitting way more level.
I also trimmed/sorted/re-connected the brake/vacuum/fuel lines so that they fit. The lux engine bay is much smaller than the saf one so everything is a little too long. There are a zillion very annoying hard lines which need to be shortened. Am not sure how i can put a nipple flare thing on the end of the pipe so that it does not slide out of the hose once back together. I may use a brake line flaring tool.
I NEED to find a stock 85ish hilux steering shaft and knuckle (between shaft and box)- if anyone has one sitting around that they could share with me that'd be great.
I sorted out the wiring in the engine bay. The engine bay was stripped down by mates of mine and they did a farking good job. Everything is as it should be and was easy to plug back together and get into the right place. I now just need a 90mm hole saw
recent pics:
phone Ross Bolus (secretary of the BOP club) He'll save you.
Re: GQ project.
flyingbrick wrote:I NEED to find a stock 85ish hilux steering shaft and knuckle (between shaft and box)- if anyone has one sitting around that they could share with me that'd be great.
You mean one of these?

I used one off a 94 Surf when that one broke, smaller unit than the standard one in ujoint width but same length and spline count. Probably easier to find. The older one I did manage to get get broke in the same place when reassembling, the casting seems quite thin on the older ones. Have looked at an LN106 hilux and they have the same as a surf.
85 Hilux single cab
02 Grand Vitara
02 Grand Vitara
-
flyingbrick
- Hard Yaka
- Posts: 1725
- Joined: Sun Jan 18, 2009 7:36 pm
- Location: Hamilton/Auckland
Re: GQ project.
yeah one of those. They definitely do not look as strong as the safari joints!
Kicking myself as I sent mine away with the body by accident (hi justin when are you next over this way and can i have it back?)
Also need the shaft from a hilux. The one i have is some custom VVEGA unit that is not mine to keep.
-Nathan
Kicking myself as I sent mine away with the body by accident (hi justin
Also need the shaft from a hilux. The one i have is some custom VVEGA unit that is not mine to keep.
-Nathan
phone Ross Bolus (secretary of the BOP club) He'll save you.
-
flyingbrick
- Hard Yaka
- Posts: 1725
- Joined: Sun Jan 18, 2009 7:36 pm
- Location: Hamilton/Auckland
Re: GQ project.
Spent another few hours on the truck tonight. Did i mention that the brake lines met straight up with the hilux master cylinder? The lines are a bit long and have had to be twisted around and made a bit poo so I'd like to buy some new hard line and a flare tool and make some new ones the right length ( tey just go down abut 300mm to a distribution block.
Also Earlier i think i mentioned the shitty factory hard lines which are too long. I want to replace all of them as tey are too long and have too many funky and un-necessary bends and zigzags all over the place.
So I need to buy one of those little hand tube benders- and some tube. Does anyone know where to buy various sizes of small diameter thin wall tube? Does anyone else know how you form the nipple flare thing on the end so that the pipe does not fly off?
Also I have done a drawing and will try use the remainder of my week (tomorrow and wednesday) to crank out a new steering column bearing support housing.
The safari just uses a steel tube that the ignition assembly and indicator/wiper arm switch assembly bolt to. A fairly simple assembly.
the hilux has a one pieces bearing support and ignition barrel assembly. I'm going to make myself a new housing which holds the bearings, bolts to the column, holds the shafts bearings and also holds the safari ignition barrel AND the safari's switch stalks.
Drawing is made and I'll try make it out of aluminum tomorrow.
I still have to make a 90mm hole through the firewall. It looks like my only option is a series of small holes which i'll cut through with a hack saw blade. not ideal but cheaper than buying a hole saw
Tomorrow if i get back early enough (lots on at work atm) I'll hole saw the tops of the strut towers and cut some more of the firewall out so tat things can be 100% level and ready for mounts.
Ooooh and my wheels arrived today (Thanks to Warren at 4wd bits...) and two of them + two tires got taken to hamilton wheel alignments (tony- green winch challenge truck) to fit the creepys and balance things.
I prefer taking things like this to tony because He understands off roaders needs a little more due to the fact he has his own truck. The last place i got tires fitted wouldnt even attempt balancing.
It should be noted that Warren is currently working on doing a special on the alloy 16x10's- They are bloody light and seem to be of great quality- I'd get in now while you can.
E-mail him and ask what the new price is if interested. I've not heard yet.
hmmn, Pics.
Drawing for the new steering column bearing support housing which will also hold the stalk switch assembly and the ignition from the safari (shitty cheap quick and drawings.)

and what i found when i snuck in home at 10pm thismorning while "working"


Funny because these rims have a great offset. Its quite huge. Its even larger than the 15 x10" steel wheels.
The saflux only JUST fit onto the car trailer with the stock 10.5 wide tires on skinny stock-ish wheels. No chance of it fitting on after these bad boys.
Also Earlier i think i mentioned the shitty factory hard lines which are too long. I want to replace all of them as tey are too long and have too many funky and un-necessary bends and zigzags all over the place.
So I need to buy one of those little hand tube benders- and some tube. Does anyone know where to buy various sizes of small diameter thin wall tube? Does anyone else know how you form the nipple flare thing on the end so that the pipe does not fly off?
Also I have done a drawing and will try use the remainder of my week (tomorrow and wednesday) to crank out a new steering column bearing support housing.
The safari just uses a steel tube that the ignition assembly and indicator/wiper arm switch assembly bolt to. A fairly simple assembly.
the hilux has a one pieces bearing support and ignition barrel assembly. I'm going to make myself a new housing which holds the bearings, bolts to the column, holds the shafts bearings and also holds the safari ignition barrel AND the safari's switch stalks.
Drawing is made and I'll try make it out of aluminum tomorrow.
I still have to make a 90mm hole through the firewall. It looks like my only option is a series of small holes which i'll cut through with a hack saw blade.
Tomorrow if i get back early enough (lots on at work atm) I'll hole saw the tops of the strut towers and cut some more of the firewall out so tat things can be 100% level and ready for mounts.
Ooooh and my wheels arrived today (Thanks to Warren at 4wd bits...) and two of them + two tires got taken to hamilton wheel alignments (tony- green winch challenge truck) to fit the creepys and balance things.
I prefer taking things like this to tony because He understands off roaders needs a little more due to the fact he has his own truck. The last place i got tires fitted wouldnt even attempt balancing.
It should be noted that Warren is currently working on doing a special on the alloy 16x10's- They are bloody light and seem to be of great quality- I'd get in now while you can.
E-mail him and ask what the new price is if interested. I've not heard yet.
hmmn, Pics.
Drawing for the new steering column bearing support housing which will also hold the stalk switch assembly and the ignition from the safari (shitty cheap quick and drawings.)
and what i found when i snuck in home at 10pm thismorning while "working"
Funny because these rims have a great offset. Its quite huge. Its even larger than the 15 x10" steel wheels.
The saflux only JUST fit onto the car trailer with the stock 10.5 wide tires on skinny stock-ish wheels. No chance of it fitting on after these bad boys.
phone Ross Bolus (secretary of the BOP club) He'll save you.
-
flyingbrick
- Hard Yaka
- Posts: 1725
- Joined: Sun Jan 18, 2009 7:36 pm
- Location: Hamilton/Auckland
Re: GQ project.
Tony at Hamilton wheel Alignments had his guys fit and balance the wheels and tires I took in. IIRC they took only 300 grams of weight to balance which he said was very good. He used stick on weights so there will be no problem with weights falling off if the bead comes free.

Had trouble with the fuel and vac hard lines simply being too long and too squigly for use in the lux engine bay + all the old hoses were rock hard and dry.
I went to supercheap and bought a whole lot of hose to join things up and also 2x powder coated steel battery trays (will take them back as they are too small and plastic battery boxes are a better idea IMO), 2x V belts and a nice rad oerflow bottle.


I'll zip tie the hoses to brackets on the firewall.
I also went to Jim Wright nissan in Hamilton and picked up a new water pump as the old one was leaking water and had a whooole lot of play in the bearing (I wondered what that noise was)

Have to get a new tensioner pully as the current one's bearings are shot (do people replace the whole thing or just the bearing?)
Oh yesterday I cut a hole in the firewall too to accept the nissan grommet. after buying mandrel and holesaw it became a farking expensive 90mm hole.
The up side is that my loom now tidily protrudes through into the cabin so I can start plugging stuff back into it. Gauges etc.
The day was finished off with a tripple cheese burger with 3x extra patties and cheese............fuggin fantastic.

Had trouble with the fuel and vac hard lines simply being too long and too squigly for use in the lux engine bay + all the old hoses were rock hard and dry.
I went to supercheap and bought a whole lot of hose to join things up and also 2x powder coated steel battery trays (will take them back as they are too small and plastic battery boxes are a better idea IMO), 2x V belts and a nice rad oerflow bottle.
I'll zip tie the hoses to brackets on the firewall.
I also went to Jim Wright nissan in Hamilton and picked up a new water pump as the old one was leaking water and had a whooole lot of play in the bearing (I wondered what that noise was)
Have to get a new tensioner pully as the current one's bearings are shot (do people replace the whole thing or just the bearing?)
Oh yesterday I cut a hole in the firewall too to accept the nissan grommet. after buying mandrel and holesaw it became a farking expensive 90mm hole.
The up side is that my loom now tidily protrudes through into the cabin so I can start plugging stuff back into it. Gauges etc.
The day was finished off with a tripple cheese burger with 3x extra patties and cheese............fuggin fantastic.
phone Ross Bolus (secretary of the BOP club) He'll save you.

Re: GQ project.
flyingbrick wrote:Tony at Hamilton wheel Alignments had his guys fit and balance the wheels and tires I took in. IIRC they took only 300 grams of weight to balance which he said was very good. He used stick on weights so there will be no problem with weights falling off if the bead comes free.
Ooooooooh, I see now, your building a "SHOW" truck
Ya gonna get set of proper steel rims for off road work right???
lax2wlg wrote:Is that like saying 'she's hot, for a crackwhore??
-
flyingbrick
- Hard Yaka
- Posts: 1725
- Joined: Sun Jan 18, 2009 7:36 pm
- Location: Hamilton/Auckland
Re: GQ project.
Nah I dont think so Eh. Will have a spare and hope I don't need more than one tire change.
I figure the creepys have farking stiff and huge sidewalls so the alloys will be relatively safe in there ...................... I hope
Mostly got them because they are so much lighter than steel (losing weight from this truck was a priority) and they are much stronger. Only downside as you know is that they cant be beat back straight once tey are bent.
guess we'll see how they last
I figure the creepys have farking stiff and huge sidewalls so the alloys will be relatively safe in there
Mostly got them because they are so much lighter than steel (losing weight from this truck was a priority) and they are much stronger. Only downside as you know is that they cant be beat back straight once tey are bent.
guess we'll see how they last
phone Ross Bolus (secretary of the BOP club) He'll save you.
Re: GQ project.
I Agree with DB, If its going to be used in the bush IMO sell those rims to a trials guy and buy some steel ones. Ive had to repair my rims 3 times due to rock damage. Mainly from rocks sticking out the side of ruts, the tyre slides down and the rim lip takes the full weight of the truck on the rock.
Steel rims give you the option of bead locks or center flip at a later date as well.
Are you running tubes?
Also have you checked that you haven't exceeded the maximum allowable offset for Certification? Alot of American rims aren't certifiable here.
Ive had drams with stick on weights as well , sticky kaimai mud and rocks cleaned all the the weights off 3 of my rims on just one trip, but didn't lose any normal weights even after pushing a tyre off the bead.
great lookers though , do they come in Chrome?
LR110 ..... LJ50 project 
Chris.
Chris.
-
flyingbrick
- Hard Yaka
- Posts: 1725
- Joined: Sun Jan 18, 2009 7:36 pm
- Location: Hamilton/Auckland
Re: GQ project.
UBZ wrote:
great lookers though , do they come in Chrome?
You nasty bastard
I'm not selling these. I do too much buying and selling (usually because someone offers more than i pay for something)
As i said- will see how these go for me. I'm not going back to steel without first screwing these up.
Fark im getting sun burnt.
went to town and bought a whole lot of 8.8 m6 and m8 bolts to do various things and also went to a plumbing store and got plugs to block up one heater outlet in the front of the engine as it interferes with the thermostat housing which im rotating 120 degrees to point in the same direction as the other orifice.
This morning i cut the chassis shorter at the front, cut steel guards down to just the outer frame, bolted trans coolers in place, cut a few brackets and drilled a few holes before the drill fucked itself big time. Gearbox has gone- Cheap Ozito tools suck
As mentioned earlier- the glass guards from 4wd bits fit like crap so he's going to trim them down for me (so i dont get itchy arms
Pics up tonight if anyone is interested in todays work. I like writing and keeping tabs on stuff ive done (just for my own satisfaction) but if I'm waffling on too much let me know and i'll stop
phone Ross Bolus (secretary of the BOP club) He'll save you.
-
Safari Swb
- Hard Yaka
- Posts: 273
- Joined: Fri Jan 02, 2009 1:49 pm
- Location: West Auckland
Re: GQ project.
looking good man. keep writing and posting up pics as I (and im sure many others are) enjoying watching this build.
89 safari swb-4.2 auto..for sale
96 safari swb-2.8t manual..stock
96 safari swb-2.8t manual..stock
Re: GQ project.
checked out nathan progress on this yesterday
looks all well at hand and hes making good steedy progress
quite impressed with how the concept is all panning out :d
looks all well at hand and hes making good steedy progress
quite impressed with how the concept is all panning out :d
Kiwi4x4
-
flyingbrick
- Hard Yaka
- Posts: 1725
- Joined: Sun Jan 18, 2009 7:36 pm
- Location: Hamilton/Auckland
Re: GQ project.
thanks wayne
FCUK I HATE BUNNINGS. Started with an Ozito hammer drill. Drilled one hole using the 92mm hole saw.........and the gearbox in the drill completely shit itself.
So I took it back and paid extra to get a ryobi one....................... and the bloody thing WILL NOT EVEN RUN!. Squeezed the trigger and it ran for about 2 seconds. BASTARD. To make it worse? Though the ryobi and the ozito drills look different externally........internally they are IDENTICAL. I've had them both open hoping for an easy fix so tat i could avoid each trip to bunnings.
So now its 7.43.. ive got like 3 hours of daylight and 50 holes planned for tonight and I CANT DO A FARKING THING.
Heres some pics from today.
Guards cut down to steel outer frames ready to accept glass:

random pic of the biggest grommet ive ever seen- not sitting in propper.

pump etc back on with new belts.

Oil cooler mounted

Before cutting the chassis shorter

After cutting the chassis shorter


LED tail lights, LED number plate lamp, battery isolating switch, battery post clamps, random stuff

FCUK I HATE BUNNINGS. Started with an Ozito hammer drill. Drilled one hole using the 92mm hole saw.........and the gearbox in the drill completely shit itself.
So I took it back and paid extra to get a ryobi one....................... and the bloody thing WILL NOT EVEN RUN!. Squeezed the trigger and it ran for about 2 seconds. BASTARD. To make it worse? Though the ryobi and the ozito drills look different externally........internally they are IDENTICAL. I've had them both open hoping for an easy fix so tat i could avoid each trip to bunnings.
So now its 7.43.. ive got like 3 hours of daylight and 50 holes planned for tonight and I CANT DO A FARKING THING.
Heres some pics from today.
Guards cut down to steel outer frames ready to accept glass:
random pic of the biggest grommet ive ever seen- not sitting in propper.
pump etc back on with new belts.
Oil cooler mounted
Before cutting the chassis shorter
After cutting the chassis shorter
LED tail lights, LED number plate lamp, battery isolating switch, battery post clamps, random stuff
phone Ross Bolus (secretary of the BOP club) He'll save you.
Re: GQ project.
Awsome build man! Way to go thinking out of the box!
What have you got planned for the back half. Dovetailed wellside would be sweet
What have you got planned for the back half. Dovetailed wellside would be sweet
There's gotta be some rocks round here SOMEWHERE!
-
flyingbrick
- Hard Yaka
- Posts: 1725
- Joined: Sun Jan 18, 2009 7:36 pm
- Location: Hamilton/Auckland
Re: GQ project.
Thanks bro The compliments really help. I've copped SO MUCH flack for this project (toyota with nissan, why didn't you just buy a hilux, bla bla bla) so its much appreciated
I just cannot decide about the back half. I have a rollbar for it already from vvega's last build but other than that I just do not know.
I do not want the work that comes with a cut down wellside- and plus a wellside will never give me the clearance i need unless I tub it.
I wouldnt mind a cut down drop-side tray with some nice stained ply or something as that'd atleast be practical- but then i'd have to have it stupidly high to give me tire clearance........unless I had the tray only the width of the chassis and ran truck guards over the wheels but hmmn.
cut down drop side tray might just be the final decision though... Cut down so it ends where my chassis ends. That would be nearly classed as being practical
phone Ross Bolus (secretary of the BOP club) He'll save you.
-
flyingbrick
- Hard Yaka
- Posts: 1725
- Joined: Sun Jan 18, 2009 7:36 pm
- Location: Hamilton/Auckland
Re: GQ project.
Went to work and did some machining.
Steering is done.
Scrounged a throttle cable off a 90's surf- quick compare says YES its going to fit onto my 4.2 and work mint. older lux cable thats in there has the wrong bobble bit on the end and is too long. This cab had a 1uz in it however so dont know how stock the cable is.
Special thanks to Vvega for providing some pretty welding that I will not have to ever worry about.
Fark its hot outside.
phone Ross Bolus (secretary of the BOP club) He'll save you.
-
flyingbrick
- Hard Yaka
- Posts: 1725
- Joined: Sun Jan 18, 2009 7:36 pm
- Location: Hamilton/Auckland
Re: GQ project.
Man I am just absolutely blazed. What a scorcher of a day.
Thanks to Sean for coming over and lending a hand with the steering column.

and the throttle cable

I must admit we (ok...me!!) made the most heat magnified stupid novice mistake ever. Couldn't get the lower knuckle over the spline of the steering box input shaft. Pissed with it for way too long before remembering that I had to take the bolt back out of the knuckle clamp bit first.....
Steve (4wd fibreglass) popped over to drop off the other front guard and investigate the fitment issues. He's going to be making alterations to the mold to sort those out for everyone in the future.
At basically the same time, Craig ( Nivapulledout) popped over to say hello and have a yarn. Nice to meet you. Next time you are over this way come say hello- I have a couple of meters of used (but good) flexi flare you can have for that bloody foreign thing of yours.
Throttle cable needs to be shortened 12" on the outer and 10.5" on the inner snake. Will get that done on monday- hopefully its not too expensive. Will need it done in Hamilton- Any advice?
Drilled a bunch of holes- mounted a bunch of electrical components and brackets within the engine bay.
put my guards and cf bonnet on and took a few poser shots-


then put one of my big wheels on and took a few more + checked how much clearance I have up front. Now that I have a steering wheel I can easily actually turn the front wheels to work this out.

As is obvious from the pic I was a little cautious with how far back I sat the cab- I'm going to slide it forwards a few inches to better center the wheels in the front guards and also so that I can reach the 4wd lever (although bending it is an easy option). I have tons of clearance at the back of the wheel for turning which rules - it was a major problem in the saf.
Sliding the cab back means more cutting of the firewall to let the engine more into the cab. this means that the driver has ended up with SFA room for his left foot. Its a good thing that im only a size 9.5.
I need to find a farking long metal ruler so that i can cut these glass guards. Steve was going to do it but I want them done now so i can rivet tomorrow.
On that note- does anyone have a nutsert gun that I could borrow within hamilton?
Thanks to Sean for coming over and lending a hand with the steering column.
and the throttle cable
I must admit we (ok...me!!) made the most heat magnified stupid novice mistake ever. Couldn't get the lower knuckle over the spline of the steering box input shaft. Pissed with it for way too long before remembering that I had to take the bolt back out of the knuckle clamp bit first.....
Steve (4wd fibreglass) popped over to drop off the other front guard and investigate the fitment issues. He's going to be making alterations to the mold to sort those out for everyone in the future.
At basically the same time, Craig ( Nivapulledout) popped over to say hello and have a yarn. Nice to meet you. Next time you are over this way come say hello- I have a couple of meters of used (but good) flexi flare you can have for that bloody foreign thing of yours.
Throttle cable needs to be shortened 12" on the outer and 10.5" on the inner snake. Will get that done on monday- hopefully its not too expensive. Will need it done in Hamilton- Any advice?
Drilled a bunch of holes- mounted a bunch of electrical components and brackets within the engine bay.
put my guards and cf bonnet on and took a few poser shots-
then put one of my big wheels on and took a few more + checked how much clearance I have up front. Now that I have a steering wheel I can easily actually turn the front wheels to work this out.
As is obvious from the pic I was a little cautious with how far back I sat the cab- I'm going to slide it forwards a few inches to better center the wheels in the front guards and also so that I can reach the 4wd lever
Sliding the cab back means more cutting of the firewall to let the engine more into the cab.
I need to find a farking long metal ruler so that i can cut these glass guards. Steve was going to do it but I want them done now so i can rivet tomorrow.
On that note- does anyone have a nutsert gun that I could borrow within hamilton?
phone Ross Bolus (secretary of the BOP club) He'll save you.
-
flyingbrick
- Hard Yaka
- Posts: 1725
- Joined: Sun Jan 18, 2009 7:36 pm
- Location: Hamilton/Auckland
Re: GQ project.
Nutsert/rivnut gun: turns out Vvega has one that i can borrow. Is there anything that guy does not have?
I sat outside and had a good look at the cab where it sits and visualised where the wheels will move around to and also recieved advice from a few others. Its good to have a fresh perspective on things once in a while.
The cabs being left where it is and instead I have cut away steel to make clearance for the tire up front which is a MUCH better option and virtually ensures that I'll have no clearance issues at the back of the tires when im at full lock with a wheel pushed up.
Will trim the front of the glass flare off too just has Jafa did with his guards (if you are reading this, Jafa, how well did your glass guards fit?)
Spot the difference, Before:

After:

Its possible I'll need to cut away and plate a section on both sides infront of the tub (where the battery sits on the RHS) to give additional clearance but I'll sort this later once I can get it flexing.
And yes its about to fall off the jack.
Fuel filter mounted with new hoses- Note the thermostat housing has been spun around.

Taped my overalls round my wrists and cut the shit out of my glass guards. The good news is that they will pull down very nicely onto steel guards and will fit well without gaps. The bad news is that the only way I can make it look decent is to cut them down to just the flare + a lip so that they end up looking like a traditional bolt on flare. This is good- but whats bad is that ive already cut down my steel guards...........too much  . Will have to find another set of decent steel guards in the waikato which will fit (any help much appreciated!)
Also- the way things are done I can not run stock indicators. I'll be running little aftermarket LED jobbies as per that guy with the safari (cheers for the idea!)
I sat outside and had a good look at the cab where it sits and visualised where the wheels will move around to and also recieved advice from a few others. Its good to have a fresh perspective on things once in a while.
The cabs being left where it is and instead I have cut away steel to make clearance for the tire up front which is a MUCH better option and virtually ensures that I'll have no clearance issues at the back of the tires when im at full lock with a wheel pushed up.
Will trim the front of the glass flare off too just has Jafa did with his guards (if you are reading this, Jafa, how well did your glass guards fit?)
Spot the difference, Before:
After:
Its possible I'll need to cut away and plate a section on both sides infront of the tub (where the battery sits on the RHS) to give additional clearance but I'll sort this later once I can get it flexing.
And yes its about to fall off the jack.
Fuel filter mounted with new hoses- Note the thermostat housing has been spun around.
Taped my overalls round my wrists and cut the shit out of my glass guards. The good news is that they will pull down very nicely onto steel guards and will fit well without gaps. The bad news is that the only way I can make it look decent is to cut them down to just the flare + a lip so that they end up looking like a traditional bolt on flare. This is good- but whats bad is that ive already cut down my steel guards...........too much
Also- the way things are done I can not run stock indicators. I'll be running little aftermarket LED jobbies as per that guy with the safari (cheers for the idea!)
phone Ross Bolus (secretary of the BOP club) He'll save you.
Re: GQ project.
Hey man good progress and shit those tyres look big  I find if buying tools to actually use for any length of time always get Makita/Bosch etc but in saying that ive got a cheap Ozito as a second grinder and its got a 3yr warrenty and so far its cut alot of 4-5mm plate and it has as much power as my 810w makita grinder so its impressed me.
Ryobi stuff is cheap and no better than Ozito etc
If trade type tools ever break they have to get sent away to the service agent and often dont get fixed or replaced as they put it down to user error etc but the cheaper stuff just gets replaced no questions asked so that's worth thinking about..
Anyway keep up the good work and keep the pics coming, I do agree with the wheel comments and think the alloys wont last long, They cant hack the rocks etc and always crack but as you say you see how you get on and go from there eh
Cheers
hayden
Re: GQ project.
Don't worry about the alloys Nathan, this is the second truck that these alloys of mine have been on and they have seen some serious stuff.
Matt
2011 FJ Cruiser, few mods, more to come
2011 FJ Cruiser, few mods, more to come

-
flyingbrick
- Hard Yaka
- Posts: 1725
- Joined: Sun Jan 18, 2009 7:36 pm
- Location: Hamilton/Auckland
Re: GQ project.
Thanks guys.
Yeah I have an ozito grinder and its pretty good IMO. Has the lock button to change wheels and spare brushes - so far has not missed a beat. Only beef I have is that it has a smaller shaft size that I have not come across before- Means I can not use any wheels from the grinders at work
Shortened the filler assembly.


flipped the towbar to the top of the chassis to improve departure and give me a solid hook mounting point- will finish tomorrow when grinding wont wake people.
Worked out how to raise the factory tank up above the chassis rails.
Yeah I have an ozito grinder and its pretty good IMO. Has the lock button to change wheels and spare brushes - so far has not missed a beat. Only beef I have is that it has a smaller shaft size that I have not come across before- Means I can not use any wheels from the grinders at work
Shortened the filler assembly.
flipped the towbar to the top of the chassis to improve departure and give me a solid hook mounting point- will finish tomorrow when grinding wont wake people.
Worked out how to raise the factory tank up above the chassis rails.
phone Ross Bolus (secretary of the BOP club) He'll save you.
Re: GQ project.
i spun a up an addapter so i could run the workshop small discs on my grinder
89 safari, pto winch, 33x15 simexs. sliders,75mm lift . turbo intercoolered
-
flyingbrick
- Hard Yaka
- Posts: 1725
- Joined: Sun Jan 18, 2009 7:36 pm
- Location: Hamilton/Auckland
Re: GQ project.
Thats a real good idea actually! I'll try rip one out during lunch tomorrow
Lifted the tank about 2.5" this morning. Those big bolts are unfriendly- I should have baked them with a torch first to release the loctite.
I've seen this lift suggested a few times in different forums and everyone suggested it was fairly simple. It is simple- but unless you take the body off or have a ute there is just no way its going to happen.
Also ground off some dangly bits that didn't need to be there.
Before:

After:


-Nathan
Lifted the tank about 2.5" this morning. Those big bolts are unfriendly- I should have baked them with a torch first to release the loctite.
I've seen this lift suggested a few times in different forums and everyone suggested it was fairly simple. It is simple- but unless you take the body off or have a ute there is just no way its going to happen.
Also ground off some dangly bits that didn't need to be there.
Before:
After:
-Nathan
phone Ross Bolus (secretary of the BOP club) He'll save you.
Re: GQ project.
flyingbrick wrote:Will trim the front of the glass flare off too just has Jafa did with his guards (if you are reading this, Jafa, how well did your glass guards fit?)
yeah mine fitted like shit too, bit o cutting here and there, lots of grinding and thinning here and there, and they still don't fit that well, but I didn't really care too much as they don't last that long with the abuse I give them
'85 Hilux crawler, 3rz, duals, 4.7's, 4.88's, ARB's, 30 spline Longfields, 6 stud SNR4x4 Histeer, Airshocks up front, coiled rear, 40" Iroks.
^^^this shite is all about to change....^^^
021 273 9942
jafa@inspire.net.nz
^^^this shite is all about to change....^^^
021 273 9942
jafa@inspire.net.nz
Re: GQ project.
I love the fact that this whole build started because the 37's were the cheapest tyre 4sale at the time, but wouldn't fit under the Safari cab with out far to much work
Rad, the ultimate make the truck fit the tyres thread
Rad, the ultimate make the truck fit the tyres thread
lax2wlg wrote:Is that like saying 'she's hot, for a crackwhore??
-
flyingbrick
- Hard Yaka
- Posts: 1725
- Joined: Sun Jan 18, 2009 7:36 pm
- Location: Hamilton/Auckland
Re: GQ project.
Jafa wrote:flyingbrick wrote:Will trim the front of the glass flare off too just has Jafa did with his guards (if you are reading this, Jafa, how well did your glass guards fit?)
yeah mine fitted like shit too, bit o cutting here and there, lots of grinding and thinning here and there, and they still don't fit that well, but I didn't really care too much as they don't last that long with the abuse I give them
DB wrote:I love the fact that this whole build started because the 37's were the cheapest tyre 4sale at the time, but wouldn't fit under the Safari cab with out far to much work
Rad, the ultimate make the truck fit the tyres thread
phone Ross Bolus (secretary of the BOP club) He'll save you.