Mutt build up re-thread :)

Starting a project or modification? Then post it's progress here and show us some pic's.
User avatar
rokhound
Hard Yaka
Posts: 2558
Joined: Sat Apr 22, 2006 12:00 pm
Location: Christchurch

Mutt build up re-thread :)

Post by rokhound »

DIAL UP BEWARE!

Well I have started the new rig (August 09), so here is the progress so far:


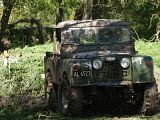
New donor chassis just water blasted and ready to start on.

Image

mocking up rear axle location:

Image

Shaved off the rear pumpkin:

Image

It gained a fair bit:

Image

Cut out all bar 1 cross member, plated chassis rails and made up some new ones, then fabbed the brackets and made up new links. They are heim joints on axle end and bushed at the frame end:

Image


Trussed up the rear axle housing and relocated the filler bung:

Image


Good shot of the double triangulated 4 link rear end:

Image

Mid mounted a 12000 pound winch which will sit under the rear seat recess. Put in another cross member and mounted the coils and shocks on it:

Image

Fabbed another new cross member for the rear and mounted a new 60 series cruiser fuel tank:

Image


Rear axle housing with all brackets and coil buckets on:

Image


Mid mount winch needed a small fairlead to direct cable to the back. Winch cable is then mounted on a removable 10t snatch block and the cable runs back up the inside of the passengers side chassis rail to the front:

Image


Front end stripped out and all the excess BS cut off:

Image


Front axle housing also all stripped of excess crap:

Image


Front end is 3 link with panhard and 15" coil over's. It took a bit of head scratching so not too many pics of the progress, but here it is all mounted at absolute full stuff waiting for all the bits to come together so I can fab up the coil overs:

Image


Front axle housing has had similar trussing as the rear (a real PIA to do because you can only do small welds at a time to stop warping the housing. I also made a jig so I could check the housing movement while welding):

Image


That's where it is at the moment. Hope to get coil overs sorted over the next few days and fit the 304 next week some time (fingers crossed)
I'll try to keep this thread updated.

2nd post


Ok, some more pics of progress.


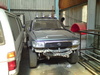
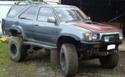
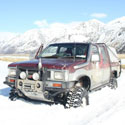
This is how it all sat in the old rig.

Image


One of the new front shocks with a stocko job beside it. Small height variation ;)

Image


One of the new coil overs I have made up. Still needs sliders and I will need to muck about with spring rates a fair bit. The towers are ugly as, but have over 150mm of built in adjustment. I eventually will hook hydro rams up to these to make forced articulation units.

Image


Engine, auto, and duals all mounted. I kept the rear mount well up to allow for exhaust system to go in.

Image


Rear mount

Image


Steering box is all mounted

Image


Steering geometry seems to be perfect, You can just make out the panhard bar behind the draglink. We will see when it is all driveable I guess.

Image


3rd post

Okay small update.

New donor body truck stripped, front inner guards cut off, and ready for lift off:

Image

Image

Number two body has lift off:

Image

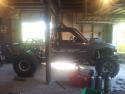
It lined up just right in the shitty old garage so I can lift the front or back or both ends of the body up and down to work underneath. Makes life much easier for running fuel, brake, powersteer and auto trans cooler lines. Also makes it easier to sort the mid mount winch and battery box etc:

Image

Just like a flip top head:

Image

New alloy radiator and auto cooler mounted. Can't see it here, but I have made a power steer cooler line that runs across the bottom of the radiator. (changed this now, but you will see it later on)
There was a fair bit of plasma work on the factory front cowl to get the rad to mount in as far forward as I could get it. Also had to french the lower mounts into the front cross member. Heaps of pissing about, but the result seems to be worth it.

Image

Almost finished the trademark "Mutt" exhaust exit:

Image

Underside facing forward shot as it sits at the moment. Still have some work to do on spring rates, so I have substituted the coil overs for wooden blocks at the mo. Should make the road handling much better, but the ride will probably be a bit harsh :lol:

Image

Post 4

Image

Line of cut for new flared gaurds. The 39.5's need a fair bit of room. No shots of the finished gaurds yet, but they came out alright.

Image

Body off again. You can just see the tunnel alterations where I have cut the tunnel and belt mounts out of the way so that the drive train can be mounted upwards.

Image

12mm plate cross members for auto and transfer cases. Transfer case mount was made so exhaust could go underneath.


Image

Image

Brake lines have been run and all the annoying little clips and brackets have been fabbed and welded on.

Image

60 series fuel tank mounted properly with tank straps etc.

Image

Hole required for filler neck. Decided to move the rear body mounts up 50mm to make running the filler neck lines easier.

Image

Auto cooler lines and powersteer lines fitted and bracketed.

Image

A concession to blinging bits underneath. SNR steering drag link, tie rod and pitman arm adapter.

Image

Image

Bump stops fabbed on both sides.


Image

Bare chassis hanging and waiting for primer. Was going to get it sandblasted, but the wait was too long.


Image

Image

And top coated waiting to be put back together.

Seats have also been mounted (using cut down original 'lux seat rails, and some bits), and new fuel filler cap has been fitted. Underside of body has also been painted, and once rolling chassis is back together, more work will be done on that end of things.


Post 5

Quick update of the putting it all back together.

Rear axle with subby calipers

Image


Front axle with 30 spline longfields (one new cv to replace the one I buggered :oops: ), SNR highsteer arms and tie rod and rock rings, rebuilt calipers (as that was the main cause the last rig went nato )
and still have the longfield hub gears to go on yet when I replace the broken bits on the free wheel hubs.

Image


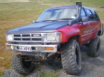
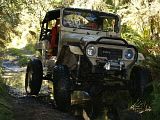
Sitting on its biggest boots.

Image

From the front

Image


And the rear

Image


Post 6

Okay let the blinging begin :chucknorris :chucknorris :chucknorris

Image


Image


Image


How sacrilegious is that? A holden that is painted Yellow :chucknorris :chucknorris


Post 7

time for a quick update as I'm not going to be any where near finished for xmas break :P

Rear axle all sorted with brake lines, coils, shocks and even handbrake cable. You can also see the winch cable looped before I have the rear snatch block mounted.
Image

Hand brake cables run down lower arms and brake line runs along upper arm at the rear. had to #### with them a fair bit, I guess time will tell if it has worked :?
Image

Centre mount winch and hawse fairlead where cable goes into chassis rail. Fairled is made up from 6mm plate and a chain link
Image

Front brake lines run on top of lower arms.
Image


Winch cable exit. There is another chain link fairlead mounted on the front bar that the wire will run in.
Image


60 series tank is nice and slimline, and will be farking expensive to fill with petrol I guess :evil:
Image

Splashed some paint around under the new body shell
Image

Starting to come together as I imagined it (just as bloody well :lol: )
Image

New seats are mounted on butchered Surf rails. Mr Toyota certainly didn't want us to use his seat rails for any other seats. Once off the Toy seats, I had to slice thme down to a straight line then weld some flat bar on top at a right angle so it could mount to seat base.
Image


This is how the winch sits with the body on. There is a cover that also goes over it and I will attempt to seal it up as good as I can to stop mud and shit giving it arseholes.
Image

Tunnel chopped and new one fabbed. I put 6mm plate through to replace where I cut out the standard seat belt mounts, cert guy reckoned 3mm was heaps, so I doubled it.
Image


Body sitting back on. The rear guards have been done, exhaust exit is done and rear fuel flap is in, but needs a bit more work, although it does work as is. I will use the original fuel flap for welding leads and compressor fittings access.
Image


Post 8

Okay this work thing has been a real PIA (but after going down over $2m in the last 2 years, I will not complain that it is getting busy again ;) :lol: )

So any way, here's an update of some progress

Got a radiator shroud made up and fitted, It now has some fans attached as well
Image

Shot of front guard which has been reshaped at the front, The axle is so far forward now that I don't have to even flatten the seam in the wheel arch which you normally have to do just to fit 33"s
Image

Rear guard reshaped with new fuel filler in and exhaust exit flushed off
Image


Painted all the door shuts and inner guards, and interior etc. This is a major job :roll:
Image

Image

Transmission oil cooler lines for the auto
Image

Holden air con pump for OBA in. It is a sanden but not an SD unit, so I have fitted an oiler etc and we shall see how it goes I guess
Image

It is getting quite full in here now, I have also put a power steer cooler in the front
Image

Made up a steering column out of an IFS surf, beam axle surf and 70 series cruiser
Image

My new (2nd hand) 120a alternator
Image

Have a guess what has started now!
Image

Relocated main fuse box and new frenched in box for extra fuses and relays
Image

This is what is swallowing heaps of time, making all the clips etc to keep all the wiring and plumbing tidy and out of the way
Image

I have chopped out a fair old chunk from here to allow for the snorkel to fit in between the inner and outer guard
Image

Snorkel on and attached to the inner guard. I didn't want the snorkel attached to the A pillar so I can get the front clip off in one piece, complete with air filter.
Image

And with outer guard on. I reckon it looks way better than having a fark off ugly pipe hanging on the outside
Image

Righto, that's where we are at at the mo (well with pics etc anyways). All updates will be posted here (at the beginning) with a note to get the page at the top of the treads viewed :wink: :wink:
Ugly is a state of mind..... and the state of my truck!
User avatar
rokhound
Hard Yaka
Posts: 2558
Joined: Sat Apr 22, 2006 12:00 pm
Location: Christchurch

Re: Mutt build up re-thread :)

Post by rokhound »

ot the heater unit, ducting and wiring loom back in. The air con element has been removed and I may find a use for the big empty space it has left, but that will be later on

Image

Rad with fans fitted, heaps of room.....

Image


I fabbed a bracket that holds the heater valve, coil, map sensor and ignitor pack. Keeps it all in one place as there are no inner guards to mount stuff on. On the left you can see the filter and oiler for the OBA system.

Image


Time for more small updates.

This is an air manifold for for pressurising the transfers and auto.
It only runs at 4 psi, but that is enough in most instances to keep the water out.

Image


Fuel pump was mounted on the cross member, but I have decided that it is so much easier to work on stuff with the body lifted off that I would mount as much stuff as I could in positions that don't need to be disturbed when I do lift things up.

Image

It actuallu doesn't look it in these pics, but there have been quite a few mods made to the wiring and clips to make it nice and clean in here. When the body is back down, there isn't much room in here at all.

Image


And finally a motivation vid. We started the engine 3 weeks or so ago, but it ran like shit. Went through the full process of thinking that some sensors were playing up and send dud codes to the brain. So we hooked up the engine code check light and all sensors were good. After stripping inlet manifold off and redoing all the static timing, I sussed out that the fuel pressure reg was faulty. So there is now a sexy as adjustable fuel pressure reg with gauge hooked up. This was the first start with the new bits fitted.

Image
Last edited by rokhound on Sun Aug 29, 2010 5:25 pm, edited 3 times in total.
Ugly is a state of mind..... and the state of my truck!
User avatar
Dace
Hard Yaka
Posts: 981
Joined: Fri May 04, 2007 12:00 pm
Location: Te Horo, Kapiti

Re: Mutt build up re-thread :)

Post by Dace »

okee....

lookin good, Maybe I should do some work on mine....
Got a Daihatsu Something, hasn't got a Daihatsu engine.... or diffs.... and it doesn't have windows.... or doors.... but its got tyres.... :)
User avatar
J_Dub
Hard Yaka
Posts: 1673
Joined: Fri Oct 24, 2008 10:02 am
Location: Pukekohe

Re: Mutt build up re-thread :)

Post by J_Dub »

lovin the fuel tank and the snorkel. having the tank there would make a huge difference to a standard lux with clearance and having even weight over the ass end. Shaving the diff sint something ive thought of, you done a nice job, how much can ya get away with safely on lux diffs?
User avatar
rokhound
Hard Yaka
Posts: 2558
Joined: Sat Apr 22, 2006 12:00 pm
Location: Christchurch

Re: Mutt build up re-thread :)

Post by rokhound »

Not sure yet Jdub, I'll let ya know if it works or not (if it doesn't you'll probably hear me shouting nasties at it in Aucks anyway :lol: )
Ugly is a state of mind..... and the state of my truck!
User avatar
J_Dub
Hard Yaka
Posts: 1673
Joined: Fri Oct 24, 2008 10:02 am
Location: Pukekohe

Re: Mutt build up re-thread :)

Post by J_Dub »

how much did ya end up shaving, looks about 15-20mm?
User avatar
Lynx
Hard Yaka
Posts: 600
Joined: Tue Jan 20, 2009 9:55 pm

Re: Mutt build up re-thread :)

Post by Lynx »

looks good rok, thumbs up
User avatar
vvilly
Hard Yaka
Posts: 1134
Joined: Mon Dec 29, 2008 11:57 am
Location: Rangiora

Re: Mutt build up re-thread :)

Post by vvilly »

AGHHHHH PORN
LIFT YOUR TRUCK FAT CHICKS CANT JUMP
User avatar
Nivapulledout
Hard Yaka
Posts: 316
Joined: Sat Nov 07, 2009 6:53 pm
Location: High seas or Te Awamutu

Re: Mutt build up re-thread :)

Post by Nivapulledout »

yeah yeah cant wait to see this beast in action, good to see it on a fresh slate as well. keep up the good work.
User avatar
SMOKEY
Hard Yaka
Posts: 1011
Joined: Thu Oct 14, 2004 12:00 pm
Location: CHRISTCHURCH

Re: Mutt build up re-thread :)

Post by SMOKEY »

Thanks Rock, I've already said how much I enjoy your thread,

GIVE UP YOUR DAY JOB,

FITZY.
User avatar
rokhound
Hard Yaka
Posts: 2558
Joined: Sat Apr 22, 2006 12:00 pm
Location: Christchurch

Re: Mutt build up re-thread :)

Post by rokhound »

Nivapulledout wrote:yeah yeah cant wait to see this beast in action, good to see it on a fresh slate as well. keep up the good work.


You and me both :mrgreen:
Sure hope it isn't a total failure, but time will tell I guess :P
Ugly is a state of mind..... and the state of my truck!
User avatar
petefj40
Ms Daisy
Posts: 4218
Joined: Mon May 01, 2006 12:00 pm
Location: The Mainland

Re: Mutt build up re-thread :)

Post by petefj40 »

Good to see your build thread back up on a clean slate.
Now this thread IS porn willy! :shock: :mrgreen:

What ECU are you using for the 308 rok?
User avatar
rokhound
Hard Yaka
Posts: 2558
Joined: Sat Apr 22, 2006 12:00 pm
Location: Christchurch

Re: Mutt build up re-thread :)

Post by rokhound »

just the standard one at this stage Pete. The lux drive train won't handle the same sort of power as cruisers or patrols, so I don't want to tax it out the very limit.
As long as it sounds like 8 cylinders and not a wankel that all the boy ricers seem to like :mrgreen:
Ugly is a state of mind..... and the state of my truck!
User avatar
petefj40
Ms Daisy
Posts: 4218
Joined: Mon May 01, 2006 12:00 pm
Location: The Mainland

Re: Mutt build up re-thread :)

Post by petefj40 »

rokhound wrote:just the standard one at this stage Pete. The lux drive train won't handle the same sort of power as cruisers or patrols, so I don't want to tax it out the very limit.
As long as it sounds like 8 cylinders and not a wankel that all the boy ricers seem to like :mrgreen:


Sweet.
I wondered that's all. The stock Delphi ECU is reliable enough. There's more fuss in altering it though, compared to a Dicksmith ECU. But they have come along way in recent years.

For a domestic home builder you're freaking me out with the stuff you're doing on your own here. :shock: Man, you got a few clues there!
Well done. :mrgreen:

You've uploaded this all via dial up? That modem of yours must of been red hot starting this thread. :shock:
User avatar
rokhound
Hard Yaka
Posts: 2558
Joined: Sat Apr 22, 2006 12:00 pm
Location: Christchurch

Re: Mutt build up re-thread :)

Post by rokhound »

No dial up here. adsl2 only.


Had a small ply on the pig today....

Got the heater unit, ducting and wiring loom back in. The air con element has been removed and I may find a use for the big empty space it has left, but that will be later on

Image

Rad with fans fitted, heaps of room.....

Image


I fabbed a bracket that holds the heater valve, coil, map sensor and ignitor pack. Keeps it all in one place as there are no inner guards to mount stuff on. On the left you can see the filter and oiler for the OBA system.

Image

I have to get a bit of a wriggle on as we are supposed to demolishing the garage and house early next year to build new,and all my stuff will have to go elsewhere, but I am a builder and that plan has been in limbo for 8 years or more now, so who farkin knows :mrgreen: :mrgreen: :mrgreen:
I figure I break the stereo type as most chippies never finish their own places (took 6 years on the last one I built :oops: ), but this time I haven't started yet, so all is good :lol: :lol:
Ugly is a state of mind..... and the state of my truck!
User avatar
DMcCready
Hard Yaka
Posts: 279
Joined: Thu Feb 18, 2010 2:40 pm
Location: Wellington

Re: Mutt build up re-thread :)

Post by DMcCready »

Sweet build. Keep up the awsome work!
There's gotta be some rocks round here SOMEWHERE!
User avatar
SMOKEY
Hard Yaka
Posts: 1011
Joined: Thu Oct 14, 2004 12:00 pm
Location: CHRISTCHURCH

Re: Mutt build up re-thread :)

Post by SMOKEY »

Rock, hope your radiator/fan set up works better than mine did, I had a similar set up with one big 18" electric fan and when the going got tough the heat went up, it handled most situations but a hot day and a hard slog and the old smokey six would beat it and it probably has only half the power of the bent eight :oops: .

DOESN'T BULLETPROOF HAVE A SAYING ABOUT SIX'S AND EIGHT'S :roll:

FITZY.
User avatar
rokhound
Hard Yaka
Posts: 2558
Joined: Sat Apr 22, 2006 12:00 pm
Location: Christchurch

Re: Mutt build up re-thread :)

Post by rokhound »

Yeah I hope it works as well Smokey. It has 2 fans on a 4 core alloy rad with full shroud.
I didn't have a lot of joy with the radiator setup last time so I had to put a rear mount in as well as the front one. I don't really want to go through all that again, so fingers crossed I guess :wink:
Ugly is a state of mind..... and the state of my truck!
User avatar
muddyhilux
Hard Yaka
Posts: 1307
Joined: Wed Oct 04, 2006 12:00 pm
Location: auckland

Re: Mutt build up re-thread :)

Post by muddyhilux »

waitin an hour for this to load up was worth it :lol: ,very clean job
1990 surf 350 chevy jacked up and currently under construction again
User avatar
Steve_t647
Hard Yaka
Posts: 998
Joined: Wed May 17, 2006 12:00 pm
Location: Christchurch City, In front of the computer

Re: Mutt build up re-thread :)

Post by Steve_t647 »

rokhound wrote:Yeah I hope it works as well Smokey. It has 2 fans on a 4 core alloy rad with full shroud.
I didn't have a lot of joy with the radiator setup last time so I had to put a rear mount in as well as the front one. I don't really want to go through all that again, so fingers crossed I guess :wink:


If it is only a occasional thing where it can heat up you can use a water sprayer down the radiator like used on intercoolers to cool things down pretty quick.

May be worth setting something up for the first run :)

The shock towers are removeable is this just to allow the front clip to be removed and how are you reattaching the front clip to the rest of the body?

One more question what are the roof braces made off that you are hanging everything off? I am going to have to mount a pully block on mine.
Legal disclaimer: Any information I may have provided is worth exactly what you paid me for it.
User avatar
niblik
Sausage Shack
Posts: 3305
Joined: Wed May 03, 2006 12:00 pm
Location: erm.. out in the shed for a mo...

Re: Mutt build up re-thread :)

Post by niblik »

i remember the last time ya had a radiator malfunction.. great trip..

Image

this one will have a few more cubes though huh guy.. :?: :wink: lookin forward to it..
ImageImage
User avatar
rokhound
Hard Yaka
Posts: 2558
Joined: Sat Apr 22, 2006 12:00 pm
Location: Christchurch

Re: Mutt build up re-thread :)

Post by rokhound »

The infamous "ski field" trip. That was a good drive, especially driving down a thawed out ski field. Easy as eh Nibz?
Unfortunatly that wasn't the last time I had issues with heat, it was recurring theme that was a bloody nuisance.


Steve, I will put up some pics on how the clip is done later, but essentially it is held on by the guard at the drivers end and bolts to the front cowl which is mounted on std rubber body blocks.
Don't ask what bracing is holding up roof in the shed, as I could not recommend them to anyone (as I said earlier, it is all being bowled, so I don't care how much it gets butchered :wink: )
Ugly is a state of mind..... and the state of my truck!
User avatar
Bolo
2XL
Posts: 697
Joined: Mon Mar 31, 2008 8:00 pm
Location: Welly

Re: Mutt build up re-thread :)

Post by Bolo »

Well done Mate , keep up the great work and keep the pics coming . I am getting really excited to see the end resut :twisted: . 8)
Your name is Bolo and it will stay that way until you have earnt the right to be called your real name........................ Bolo
phraza
Hard Yaka
Posts: 898
Joined: Thu Oct 15, 2009 8:44 am
Location: North Shore, Auckland
Contact:

Re: Mutt build up re-thread :)

Post by phraza »

*Subscribes Topic*

Nice build! Cant wait for the end result!
2WD 06 Hilux... for now
User avatar
shortylux
Hard Yaka
Posts: 563
Joined: Sat Jan 27, 2007 12:00 pm
Location: Christchurch

Re: Mutt build up re-thread :)

Post by shortylux »

Looking good Rok. Been wondering what to do with my snorkel and I think you answered it for me. Appreciate you taking the time to do all the photos and the write up. Cheers.
User avatar
rokhound
Hard Yaka
Posts: 2558
Joined: Sat Apr 22, 2006 12:00 pm
Location: Christchurch

Re: Mutt build up re-thread :)

Post by rokhound »

New pics added at the beginning of the thread, and a start up vid :D
Ugly is a state of mind..... and the state of my truck!
User avatar
DieselBoy
Hard Yaka
Posts: 4568
Joined: Sun Nov 14, 2004 12:00 pm

Re: Mutt build up re-thread :)

Post by DieselBoy »

Keen to see if those fans are up to the job with the sexy shroud :D :D

They are normally useless mounted straight to radiator, they just don't move enough air :evil: :evil:

Also keen to see how the steel rope goes running through the chassis!!!

I can't help imagining it carving the shit out of the guides and chassis :evil: :evil:

Looks so kool, wanna be there when You and Nibz finally these things out of the shed and up a valley somewhere!!!!
lax2wlg wrote:Is that like saying 'she's hot, for a crackwhore??
User avatar
niblik
Sausage Shack
Posts: 3305
Joined: Wed May 03, 2006 12:00 pm
Location: erm.. out in the shed for a mo...

Re: Mutt build up re-thread :)

Post by niblik »

db.. lock it in eddie... :mrgreen:

good shiat rok.. good to hear her running.. keep at it bruv.. 8)
ImageImage
User avatar
rokhound
Hard Yaka
Posts: 2558
Joined: Sat Apr 22, 2006 12:00 pm
Location: Christchurch

Re: Mutt build up re-thread :)

Post by rokhound »

DieselBoy wrote:Keen to see if those fans are up to the job with the sexy shroud :D :D

They are normally useless mounted straight to radiator, they just don't move enough air :evil: :evil:

Also keen to see how the steel rope goes running through the chassis!!!

I can't help imagining it carving the shit out of the guides and chassis :evil: :evil:

Looks so kool, wanna be there when You and Nibz finally these things out of the shed and up a valley somewhere!!!!


Yeah I hear ya Pete. The 10" is rated to 1200 cubic ft which is not huge, but was the best of the aftermarket units, and the 7" is 750. 4 core alloy rad and I'll put a high pressure cap on as well, so I hope it works.

Not sure how long I'll keep the steel on, but there is no difference running through those guides versus a hawse fairlead.

After using some of the wonder rope on Petes buggy last week, it beats the hell out of wire.

Best you book some time down here for a session when we are both ready by the sound of it (should probably bring fanta pants down as well :wink: )
Ugly is a state of mind..... and the state of my truck!
User avatar
kbjj
Sausage Shack
Posts: 712
Joined: Sat Apr 10, 2010 3:51 pm
Location: Rangiora

Re: Mutt build up re-thread :)

Post by kbjj »

Can't help thinking, 3 months have passed since last post, so must be getting close to completion maybe?
If you break it... build it stronger.
Post Reply

Return to “Projects / Mod's”