that blanking plate above looks like where the EGR valve would bolt up. and id say the little plug is for an EGR sensor.
take the plate off and see if their is a gallery going down to the little plug with the leak.
If so , just drill out the little plug , tap and fit a bolt to block the hole , problem solved.
Zuki Build
Re: Budget Zuk Build - (hopefully anyway)
LR110 ..... LJ50 project 
Chris.
Chris.
Re: Budget Zuk Build - (hopefully anyway)
That blank plate is where the mechanical fuel pump usually goes I thought.
Re: Budget Zuk Build - (hopefully anyway)
yeah you might be right, id forgot you had removed the mech fuel pump.
LR110 ..... LJ50 project
Chris.
Chris.
Re: Budget Zuk Build - (hopefully anyway)
Nah the swift just didn't have one to begin with.
Re: Budget Zuk Build - (hopefully anyway)
Ok so I've had a few people harassing me as to what progress I've made so thought I'd do a couple hours on it last night. Body is having rust taken out of it that I don't want to do due to location ie the hole in the middle of the roof lol. So am only doing chassis stuff at the moment.

This is the current state of the chassis. Fuel and brake lines all done, tank in, started diff breathers and prop shaft rebuilding, front calipers rebuilt with new pads and rotors.

Still need:
410 TC
rear prop shaft
Gearbox mount
main seal on motor
maybe a new clutch.
Would like both rear upper pillars from a tin-top actually if anyone has one from a ute chop or roll-over close to hamilton that would be excellent. Running out of people to ask haha.
Is there any advantage gained by moving the upper rear shock attachment points closer together?? I've seen it done on a couple trucks and wondered if anything was gained from it.
This is the current state of the chassis. Fuel and brake lines all done, tank in, started diff breathers and prop shaft rebuilding, front calipers rebuilt with new pads and rotors.
Still need:
410 TC
rear prop shaft
Gearbox mount
main seal on motor
maybe a new clutch.
Would like both rear upper pillars from a tin-top actually if anyone has one from a ute chop or roll-over close to hamilton that would be excellent. Running out of people to ask haha.
Is there any advantage gained by moving the upper rear shock attachment points closer together?? I've seen it done on a couple trucks and wondered if anything was gained from it.
-
niblik

- Sausage Shack
- Posts: 3307
- Joined: Wed May 03, 2006 12:00 pm
- Location: erm.. out in the shed for a mo...
Re: Budget Zuk Build - (hopefully anyway)
only to gain a bit in length when at full droop i believe.. other than that, vertical is gooderested.. 
Re: Budget Zuk Build - (hopefully anyway)
Thought I'd stick up some more pics.


This is all the rust removed so far.
Have also sourced
2x 410 transfers
extra drive shafts
spare gearbox
410 grill
Thanks to lilpigzuk for helping sort parts
This is all the rust removed so far.
Have also sourced
2x 410 transfers
extra drive shafts
spare gearbox
410 grill
Thanks to lilpigzuk for helping sort parts
Re: Budget Zuk Build - (hopefully anyway)
Looking good, wasn't to bad rust wise for it's age
LR110 ..... LJ50 project
Chris.
Chris.
Re: Budget Zuk Build - (hopefully anyway)
Yeah doing the guard chop is saving me taking a bunch of rust out anyway so about the same amount of work. There was nothing in the sills which was good.
I was thinking of doing a one inch body lift but the clearance it has just with the body work alone may mean I don't need it. Obviously it will sit lower with a tank full of gas and all the drive components in it but with a couple mates to simulate the extra weight standing on the front of the chassis its looking good.
The wheel offset has been more than expected to which is good. This is the first time the chassis has seen the body in a while.
Will start doing the rear main seal tomorrow and hopefully have it all back together with a new clutch.
Re: Budget Zuk Build - (hopefully anyway)
More pics:
Rear Guard

Started cutting the front guards but am trying something different. Hopefully it works all good.

With the outer only cut to fit.


Passengers side pretty much complete

As it stands now.
Rear Guard
Started cutting the front guards but am trying something different. Hopefully it works all good.
With the outer only cut to fit.
Passengers side pretty much complete
As it stands now.
Re: Budget Zuk Build - (hopefully anyway)
Virtual lift is more work than you expect ah.
Rear is looking sweet.
Couple of ? About the front .
Will you be able to remove the front guards ?
What are you doing about the accellorator pedal, if you tub out the drivers side the same?
Rear is looking sweet.
Couple of ? About the front .
Will you be able to remove the front guards ?
What are you doing about the accellorator pedal, if you tub out the drivers side the same?
LR110 ..... LJ50 project
Chris.
Chris.
Re: Budget Zuk Build - (hopefully anyway)
Front guards are removable. Same bolts as before.
The original idea was to leave the gas pedal where it is but space it back a bit to allow for the normal amount of travel but will have to make sure thats still possible. Kinda ballsed up the passenger side so ended up taking a bit more out of it. Just have to make it work I guess.
Virtual lift has been ok but the front looked like it was going to suck so I'm just going to run conveyor belt flares which cover the big gap in the pics.
Now that one of my other projects is completed I can do more on this again. Was planning to have it done in 6months when i started
Re: Budget Zuk Build - (hopefully anyway)
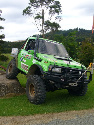
Havn't posted much for a while so heres some pics of recent progress. Front virtual lift completed, 410 grill fitted and bonnet fixed and fitted.
Finally looks like a truck again but its gonna come to bits again for paint woot.
Currently doing seat mounts and making sure the seats I want to use will actually fit.


Finally looks like a truck again but its gonna come to bits again for paint woot.
Currently doing seat mounts and making sure the seats I want to use will actually fit.
-
Dr_PC
- Hard Yaka
- Posts: 797
- Joined: Thu Feb 13, 2003 12:00 pm
- Location: Moerewa Bay of Islands
- Contact:
Re: Budget Zuk Build - (hopefully anyway)
Always good to see a wagon coming together
-
flyingbrick

- Hard Yaka
- Posts: 1725
- Joined: Sun Jan 18, 2009 7:36 pm
- Location: Hamilton/Auckland
Re: Budget Zuk Build - (hopefully anyway)
looks great doug!
phone Ross Bolus (secretary of the BOP club) He'll save you.
Re: Budget Zuk Build - (hopefully anyway)
cheers man. Still a crap load of work to do though. Doors are fitted now and all good so its almost time for teardown and panel prep. Its final re-assembly can't come soon enough.
-
suzookyman
- Hard Yaka
- Posts: 649
- Joined: Fri Mar 05, 2004 12:00 pm
- Location: Whangarei
Re: Budget Zuk Build - (hopefully anyway)
gotta love that 410 grill, did the same thing to my old 413, best visual mod i did!.Nice truck mate, im heading down a similar path soon too so watch this space!
Al
Al
"It's a Suzuki thing - you wouldn't understand !"
-
flyingbrick
- Hard Yaka
- Posts: 1725
- Joined: Sun Jan 18, 2009 7:36 pm
- Location: Hamilton/Auckland
Re: Budget Zuk Build - (hopefully anyway)
did it have the ugly plastic grille before?
phone Ross Bolus (secretary of the BOP club) He'll save you.
Re: Budget Zuk Build - (hopefully anyway)
Yeah it did have a plastic one. I still have the original grill. I just need some 410 light surrounds now otherwise will make somthin up. I more wanted the metal one as its heeeaps tougher but its ended up looking good too.
Re: Budget Zuk Build - (hopefully anyway)
Made a little bit of progress.
FTO seats mounted all good.
Drivers door still needs a bit of persuasion to fit correctly dammit.


FTO seats mounted all good.
Drivers door still needs a bit of persuasion to fit correctly dammit.
Re: Budget Zuk Build - (hopefully anyway)
Got the pedal assembly done. Heres some pics for ya UBZ


-
suzukisport
- Hard Yaka
- Posts: 439
- Joined: Fri Apr 16, 2010 8:08 pm
- Location: Whangarei
- Contact:
Re: Budget Zuk Build - (hopefully anyway)
Once your finished you wont want to get it dirty, looks a great job you are doing.
Comp rig: Suzuki Vitara, L67 Supercharged V6 Commie and auto, Prado chassis and diffs. Gigglepin 8274 twin motor rear mounted winch, air free spools, 35" Silverstones, ect
Re: Budget Zuk Build - (hopefully anyway)
I only want to do shit once haha. Plan is to exo it once everything else is done.

Re: Budget Zuk Build - (hopefully anyway)
Swamped wrote:Plan is to exo it once everything else is done.
Nooooooooooooo
lax2wlg wrote:Is that like saying 'she's hot, for a crackwhore??
-
suzukisport
- Hard Yaka
- Posts: 439
- Joined: Fri Apr 16, 2010 8:08 pm
- Location: Whangarei
- Contact:
Re: Budget Zuk Build - (hopefully anyway)
Swamped wrote: Plan is to exo it once everything else is done.
How would you get your cross brase in without going through the body for its strength?
Comp rig: Suzuki Vitara, L67 Supercharged V6 Commie and auto, Prado chassis and diffs. Gigglepin 8274 twin motor rear mounted winch, air free spools, 35" Silverstones, ect
Re: Budget Zuk Build - (hopefully anyway)
Thing only weighs 800kg or thereabouts. A decent exo will work with it. Was gonna cross brace over the back door and make it removable and maybe the same over the windscreen
My neighbours exo'd jimny goes fine and has been on its roof a few times. Takes it easy as. May still go internal yet but decent sliders with a cage on it would be fine.
What I don't like is that debris and shit gets caught between the cage and body and has torn bloody great holes in the body of my friends truck before. Also means more weight up high too hence the internal still being on the cards possibly....long way to go before anything happens in that department though
Have to complete the driveline ie rocklobster tc, rebuild driveshaft unis, power steering (I like my creature comforts) and all the bodywork/panelprep left to do before paint
Re: Budget Zuk Build - (hopefully anyway)
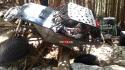
Had the body blasted a wee while ago now and just found some pics.
Had to wrap the body in that industrial gladwrap cos of course it decided to rain the day we did it. And then it turned out not to rain on the way between towns grrr. Kept all the road crap off it though which was good.
Its now been primed and just needs a bit more bodywork to fix some problems the blasting uncovered and then be looking to paint.
Re: Budget Zuk Build - (hopefully anyway)
Body looks way too straight for a 4wd! keep up the good work
Gotta love the zooks!
Gotta love the zooks!
There's gotta be some rocks round here SOMEWHERE!
-
flyingbrick
- Hard Yaka
- Posts: 1725
- Joined: Sun Jan 18, 2009 7:36 pm
- Location: Hamilton/Auckland
Re: Budget Zuk Build - (hopefully anyway)
thats cool man.
Who did the blasting? What kinda $$? What did they blast it with?
looks great. No warped pannels?
Who did the blasting? What kinda $$? What did they blast it with?
looks great. No warped pannels?
phone Ross Bolus (secretary of the BOP club) He'll save you.
Re: Budget Zuk Build - (hopefully anyway)
Smicko as!
Decided on a color yet?
LR110 ..... LJ50 project
Chris.
Chris.