Love it! Thats Awesome!
Although I think the slogan is "One Life Live It" not "One Life Live IN It!"
D.B's Defender 110
Re: D.B's Defender 110
1988 Range Rover Classic
2010 Discovery 4 HSE 5.0 V8
[img]http://i251.photobucket.com/albums/gg303/eastw77/2_zpse514cc6c.gif[/img]
2010 Discovery 4 HSE 5.0 V8
[img]http://i251.photobucket.com/albums/gg303/eastw77/2_zpse514cc6c.gif[/img]

Re: D.B's Defender 110
DieselBoy wrote:WJW - Alloy angle is usually just a dress piece or to protect the edges, the "guts" is in the ply. Look closely at the pic below and you can see how the ply is joined at the corners with a 20mm square block. Screw through the ply into the block. The Alloy is doing slightly more work on the top cupboards, but they are only taking a minimal amount of loading.
Thanks for that, are you using marine ply or are you sealing it? Are you attaching it to the floor pan?
Cheers,
Bill
-----------------------
Who knew Prados could fly?
Who knew Prados could fly?

Re: D.B's Defender 110
NJV6 wrote:Your not finding your rear springs popping out? When Dad did the rear shock mod he needed relocation cones...
I haven't managed to get it to full flex yet, so better give it a go in that case!! Might need a couple of hose clamps to hold the top of the springs in for the next WOF
lax2wlg wrote:Is that like saying 'she's hot, for a crackwhore??
Re: D.B's Defender 110
wjw wrote:DieselBoy wrote:WJW - Alloy angle is usually just a dress piece or to protect the edges, the "guts" is in the ply. Look closely at the pic below and you can see how the ply is joined at the corners with a 20mm square block. Screw through the ply into the block. The Alloy is doing slightly more work on the top cupboards, but they are only taking a minimal amount of loading.
Thanks for that, are you using marine ply or are you sealing it? Are you attaching it to the floor pan?
Cheers,
Bill
Hey, mostly just 3ply were I can get away with it like cupboards and things to keep the weight down, but sleeping surfaces and big long spans need at least 6 ply.
I stained this one black and then polyurethaned over it with a satin finish. I wish I had used gloss as the satin looks worn already. Other times I have built stuff it just gets a quick coat of gloss polyurethane and thats enough.
As for fixing to the floor, Alloy angle and Rivnuts are you friends
Just keep the weight down is my best advice
lax2wlg wrote:Is that like saying 'she's hot, for a crackwhore??
Re: D.B's Defender 110
My Issue will be fitting it round the seats & belts....
-----------------------
Who knew Prados could fly?
Who knew Prados could fly?
Re: D.B's Defender 110
Was just reading back through my thread and realised that the Spring Platform Spacers didn't come from http://www.landroverspares.co.nz !!!!
If your interested in a set of those get in touch LR90NZ (Ashley Lucas), he also supplied the pinion flange kit for the rear axle swap

If your interested in a set of those get in touch LR90NZ (Ashley Lucas), he also supplied the pinion flange kit for the rear axle swap
lax2wlg wrote:Is that like saying 'she's hot, for a crackwhore??
Re: D.B's Defender 110
Thought I might do a little update 
In order to stream line things and reduce set up and pack down time, we decided to ditch the thermo electric chilli bin and get something more permanent.
There's not a lot out there when your available space is restricted to inflexible dimensions.
But we did find this:

Its still thermo electric, but that's all you need for NZ touring. A bit of shuffling around and I found a home for it

Tried it out the other weekend and it works a treat!!!
In order to stream line things and reduce set up and pack down time, we decided to ditch the thermo electric chilli bin and get something more permanent.
There's not a lot out there when your available space is restricted to inflexible dimensions.
But we did find this:
Its still thermo electric, but that's all you need for NZ touring. A bit of shuffling around and I found a home for it
Tried it out the other weekend and it works a treat!!!
lax2wlg wrote:Is that like saying 'she's hot, for a crackwhore??
Re: D.B's Defender 110
So when you have a fridge in the back of your truck, it really needs to be running all the time. We were leaving it running during the day and turning it off at night.
So with a weekend free, I went on the scrounge and scored a freebee 2nd hand optima deep cycle, blew the moths outa the wallet and brought a Hyper Start VSR dual battery isolator thingy from Supercheap and got creative.
I memptied all the spares out of the battery box and managed to squeeze the optima in there and leave the standard 730cca battery in its factory position.
Also decided to mount the compressor in there and wire that into the AUX battery too.
Its pretty snug in the battery box now!!
And this is the final result with a plastic cover over the batteries, the air hose jammed in there, radiator blind squeezed in there, and I think I managed to find a spot for a bottle of Bars Leaks and some brake fluid.
Unfortunatly, these are all the spares that used to live in the battery box and they now need a new home.

There was this space in the other tool box left behind when I moved the compressor
But it was filled quickly. Dread having to get stuff out of here in a hurry now Least the ring spanners are on top
The oil bottles got sneaked into the engine bay and tucked down beside the brake booster
So with a weekend free, I went on the scrounge and scored a freebee 2nd hand optima deep cycle, blew the moths outa the wallet and brought a Hyper Start VSR dual battery isolator thingy from Supercheap and got creative.
I memptied all the spares out of the battery box and managed to squeeze the optima in there and leave the standard 730cca battery in its factory position.
Also decided to mount the compressor in there and wire that into the AUX battery too.
Its pretty snug in the battery box now!!
And this is the final result with a plastic cover over the batteries, the air hose jammed in there, radiator blind squeezed in there, and I think I managed to find a spot for a bottle of Bars Leaks and some brake fluid.
Unfortunatly, these are all the spares that used to live in the battery box and they now need a new home.
There was this space in the other tool box left behind when I moved the compressor
But it was filled quickly. Dread having to get stuff out of here in a hurry now
The oil bottles got sneaked into the engine bay and tucked down beside the brake booster
lax2wlg wrote:Is that like saying 'she's hot, for a crackwhore??
Re: D.B's Defender 110
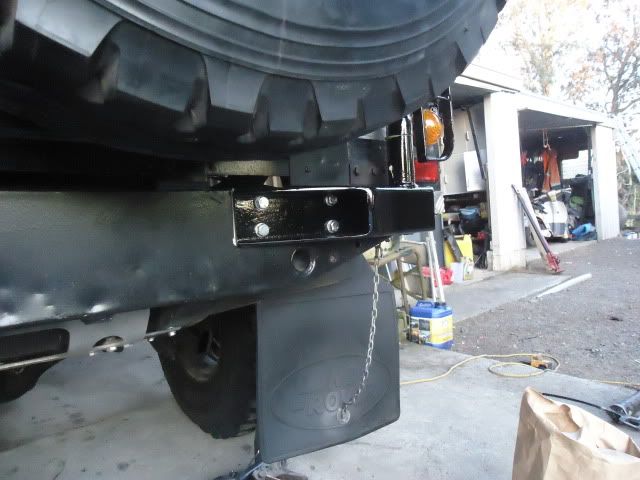
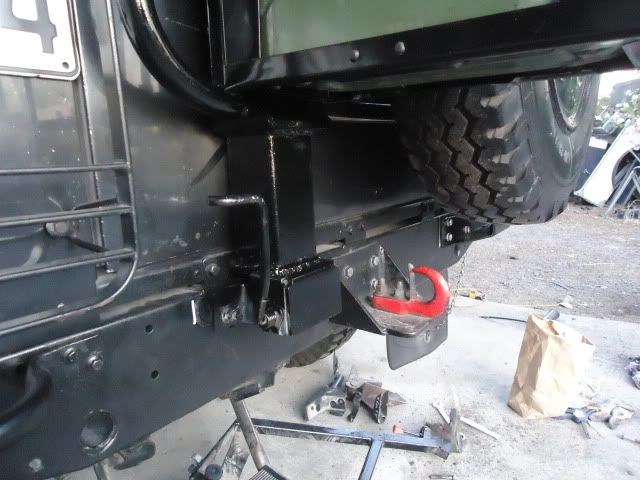
Also have a bit more bling underneath too
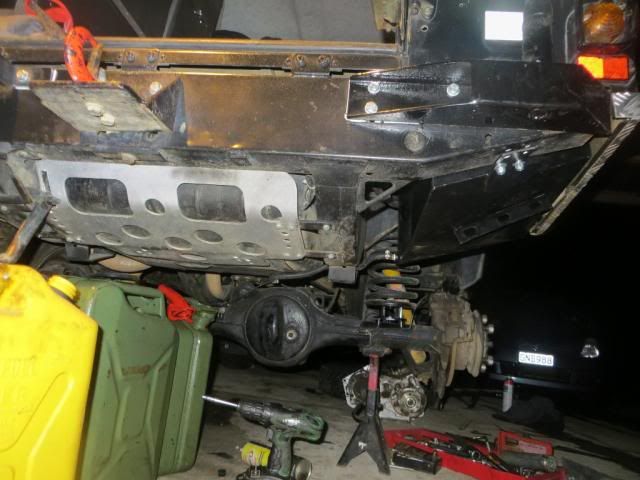
I got a Track rod guard from LR90NZ (Ashley) before we went to the Sth Island as I have already badly bent the steering once and had to winch it all back straightish. I carry a complete set of steering linkages and panhard rod now
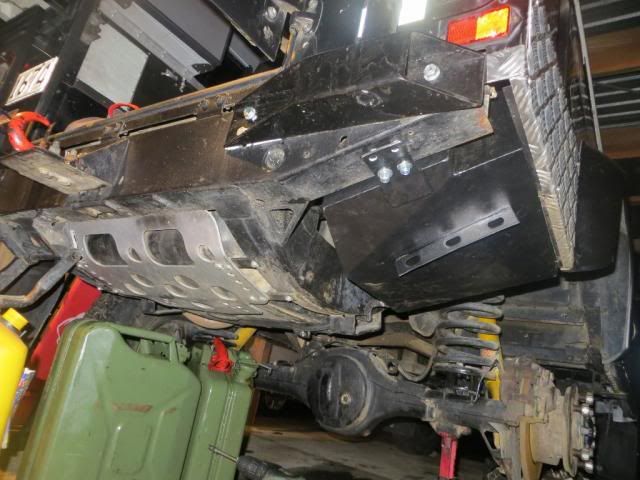
My favourite place landrovespares.co.nz supplied me with a nice piece of armour for the front diff to hide the dents
Hopefully now I won't get stuck on rocks in rivers with the front wheels pointing in opposite directions due to bent stuff
I got a Track rod guard from LR90NZ (Ashley) before we went to the Sth Island as I have already badly bent the steering once and had to winch it all back straightish. I carry a complete set of steering linkages and panhard rod now
My favourite place landrovespares.co.nz supplied me with a nice piece of armour for the front diff to hide the dents
Hopefully now I won't get stuck on rocks in rivers with the front wheels pointing in opposite directions due to bent stuff
lax2wlg wrote:Is that like saying 'she's hot, for a crackwhore??
Re: D.B's Defender 110
A while back I was looking over Ashleys Defender 90 and took a liking to his tyres.
A bit of research and it seems all the Aussies are running the same size also.
Using the fact that the S1 is now in bits in the shed as an excuse and before long was going to require its rims back which I had been using, I decided to sell the 235 Pirelli Scorpions and another set of rims and tyres and sort my self a new set of rims and tyres.
I got a set of standard steel Disco rims, 16 X 7 and dropped them at the Steel Surgeon to have the centers reversed and set to a 98mm back spacing.
The end result was exactly the same off set as the rims i had been borrowing
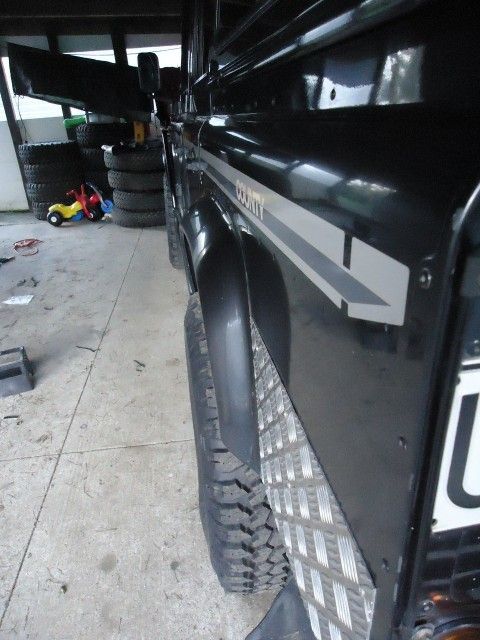
So she now rides on a set of 255 85 16 Maxxis Bighorn MT762's. (33.3 X 10.5 for those that need everything in inches )
Best thing is that its only a 3.7% increase in tyre size over standard so it hardly affects the gearing and the speedo still reads 1kph fast
A bit of research and it seems all the Aussies are running the same size also.
Using the fact that the S1 is now in bits in the shed as an excuse and before long was going to require its rims back which I had been using, I decided to sell the 235 Pirelli Scorpions and another set of rims and tyres and sort my self a new set of rims and tyres.
I got a set of standard steel Disco rims, 16 X 7 and dropped them at the Steel Surgeon to have the centers reversed and set to a 98mm back spacing.
The end result was exactly the same off set as the rims i had been borrowing
So she now rides on a set of 255 85 16 Maxxis Bighorn MT762's. (33.3 X 10.5 for those that need everything in inches
Best thing is that its only a 3.7% increase in tyre size over standard so it hardly affects the gearing and the speedo still reads 1kph fast
lax2wlg wrote:Is that like saying 'she's hot, for a crackwhore??
Re: D.B's Defender 110
Carrying water annoyed me when we down south. I had a 20L container with a hand pump on it that did the job, but it was a pain in the ass unsecuring it moving it from inside the truck to outside everytime you wanted to get in the back.
I thought hard about fitting a permanent tank inder the truck, but decided against it. The reason being you are limited to how you can fill it. You have to get the truck to with in a few meters of a tap and you then need a hose.
With a 20L drum you can wip it off the truck and carry it to the stream or river, stealth around the back of some shops, hop over some ones fence you get the drift
Again, I had very tight dimensions to work with and only one place it could go so the hunt for a container of the right size was tricky. Everything was to bloody wide.
Once a contaner was sourced, I wipped up a frame for it to sit innand the finished result:
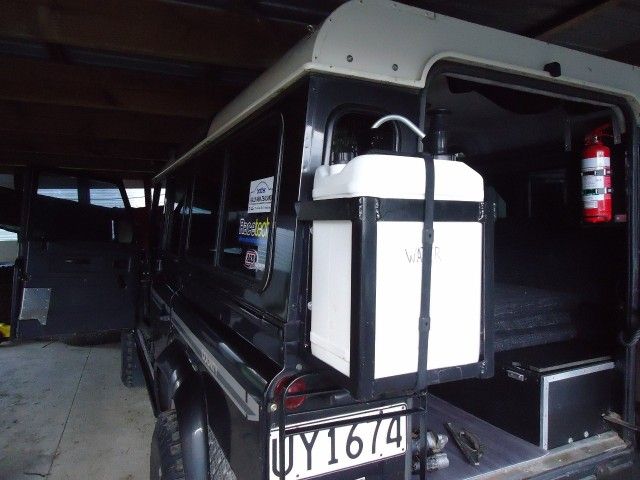
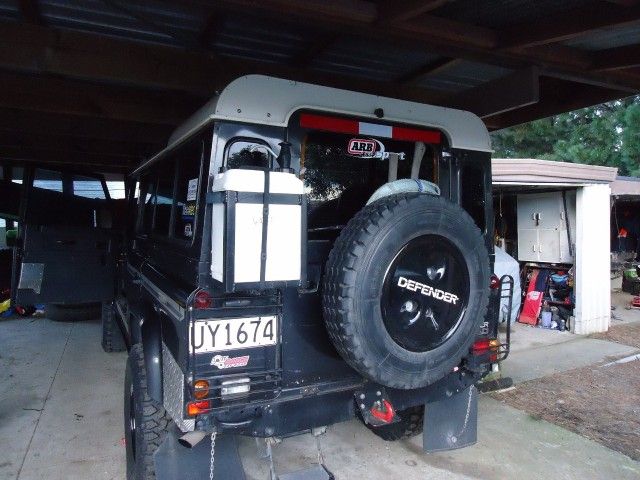
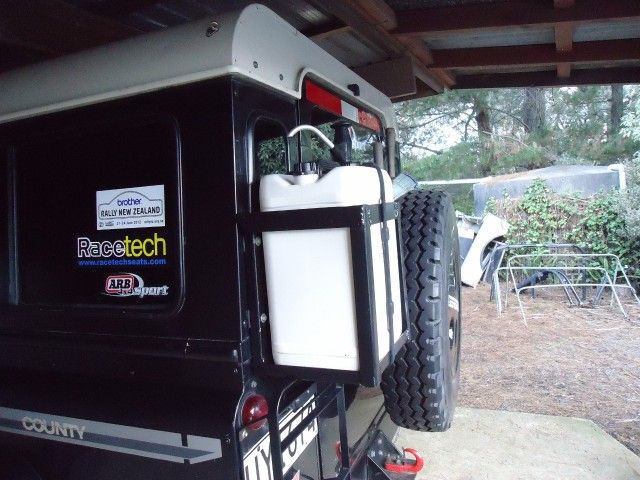
Its just hanging off 4 M6 bolts and some big panel washers, so will see how it goes
I thought hard about fitting a permanent tank inder the truck, but decided against it. The reason being you are limited to how you can fill it. You have to get the truck to with in a few meters of a tap and you then need a hose.
With a 20L drum you can wip it off the truck and carry it to the stream or river, stealth around the back of some shops, hop over some ones fence you get the drift
Again, I had very tight dimensions to work with and only one place it could go so the hunt for a container of the right size was tricky. Everything was to bloody wide.
Once a contaner was sourced, I wipped up a frame for it to sit innand the finished result:
Its just hanging off 4 M6 bolts and some big panel washers, so will see how it goes
lax2wlg wrote:Is that like saying 'she's hot, for a crackwhore??

Re: D.B's Defender 110
Looking great, love the fridge, where does the horn fit? new tyres look mean! Whens the next trip!
92 SWB Nissan Safari
94 SWB Toyota Prado -------For sale
95 LWB Toyoa Landcruiser VX
94 SWB Toyota Prado -------For sale
95 LWB Toyoa Landcruiser VX
Re: D.B's Defender 110
Next trip Ohakune area, 25 & 26th August, Dave, Chris, UBZ and you??
lax2wlg wrote:Is that like saying 'she's hot, for a crackwhore??

Re: D.B's Defender 110
Been a bit slack on my up date recently
On a trip up the mountain around labour weekend, I noticed she was pumping out more blue smoke on cold start and under engine breaking than normal. It was starting to smoke like those bloody 80 Series Land cruisers do. I have had the engine apart and the bores are mint, so it wasn't the rings.
I went shopping around and the best i could get my injectors overhauled for was $1150!!!
I got a new set of Bosch injectors shipped to my door from the UK via ebay, $NZ430 to my door. Hell yes!!!!
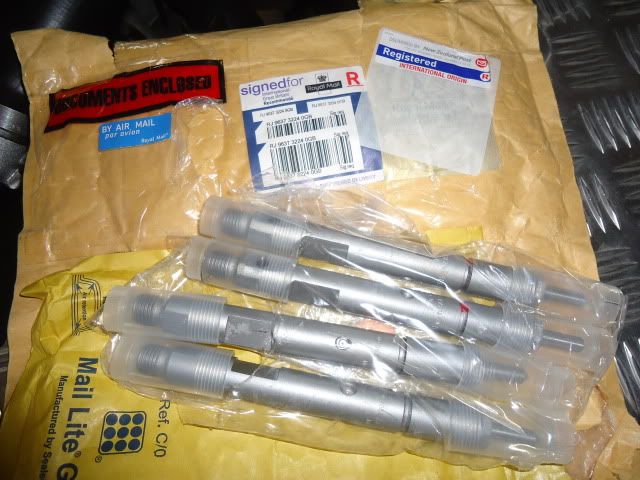
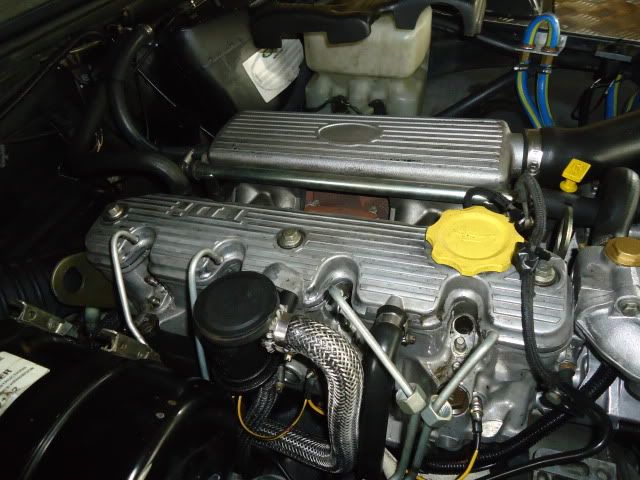
As usual Land Rover made them nice and easy to pull out and change
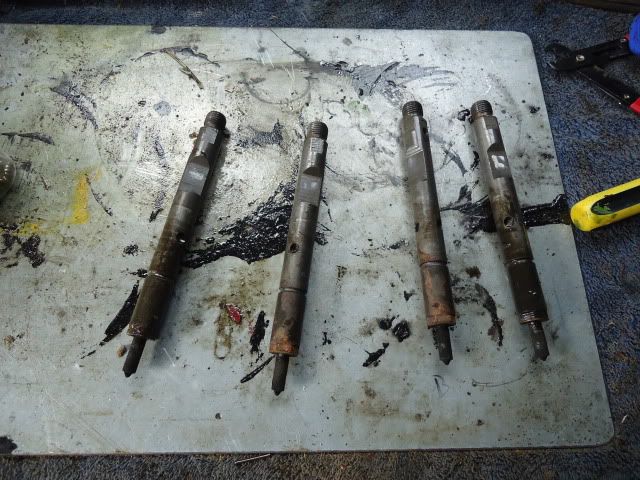
The old ones were dirty, so imagine they weren't atomising the fuel particularly well
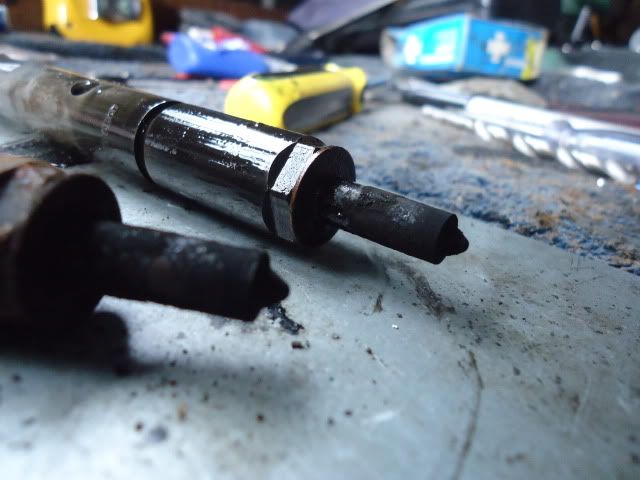
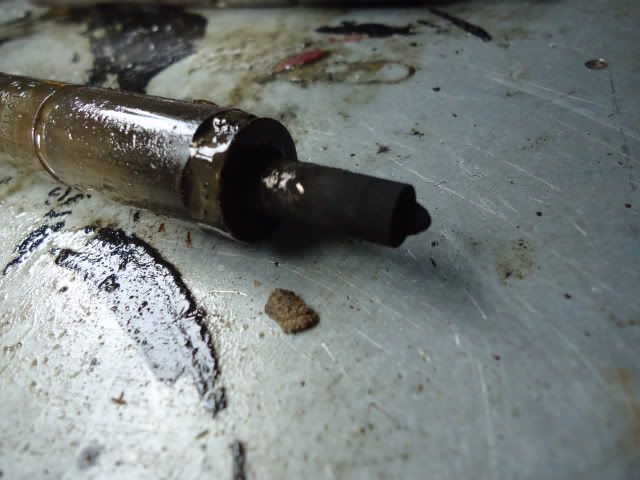
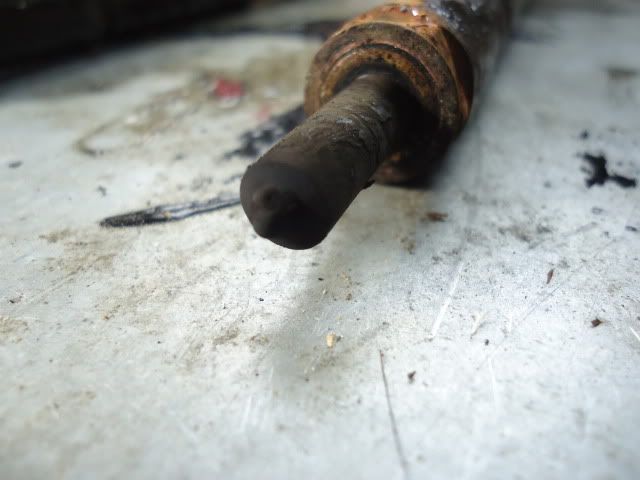
A quick adjustment/correction of the pump timing as well, and the blue was pretty much gone!!!
On a trip up the mountain around labour weekend, I noticed she was pumping out more blue smoke on cold start and under engine breaking than normal. It was starting to smoke like those bloody 80 Series Land cruisers do. I have had the engine apart and the bores are mint, so it wasn't the rings.
I went shopping around and the best i could get my injectors overhauled for was $1150!!!
I got a new set of Bosch injectors shipped to my door from the UK via ebay, $NZ430 to my door. Hell yes!!!!
As usual Land Rover made them nice and easy to pull out and change
The old ones were dirty, so imagine they weren't atomising the fuel particularly well
A quick adjustment/correction of the pump timing as well, and the blue was pretty much gone!!!
Last edited by DieselBoy on Sun Dec 16, 2012 11:34 pm, edited 1 time in total.
lax2wlg wrote:Is that like saying 'she's hot, for a crackwhore??
Re: D.B's Defender 110
Finally got around to reconditioning the front seats
An email or two to http://www.Landroverspares.co.nz and we had some material samples to look at and choose from, then before you know it I had full re upholstery kit for the front seats on their way!!
The kits, new foam, new covers, fitting hardware, glue and a CD on how to do it. I ended up hating the dude on the CD, bastard made everything look to bloody easy!!!
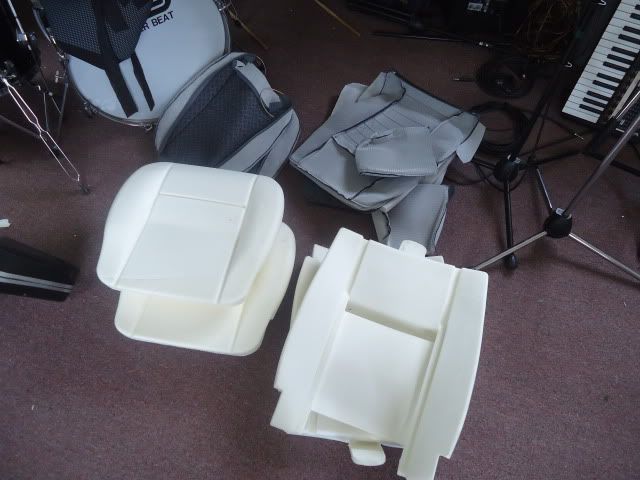
Old seats getting stripped:
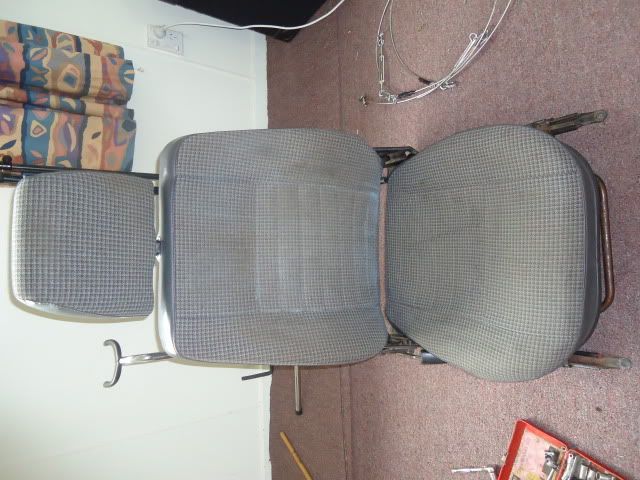
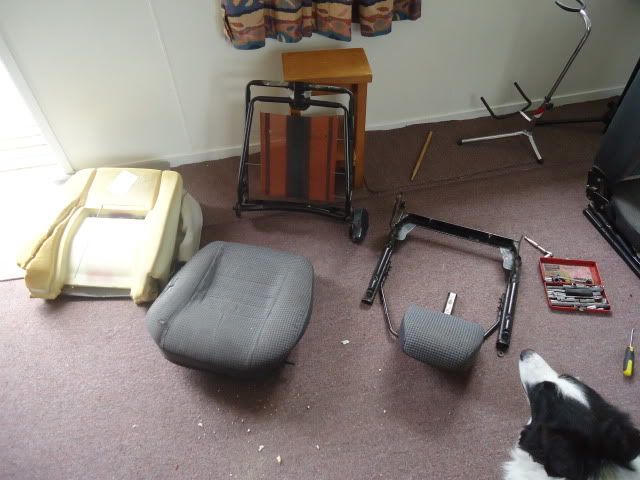
The main reason for the job, a rooted back rest on the passengers seat:

Back rests and head rests done:

Seat bases done:

Back in the truck, bling as!!!!

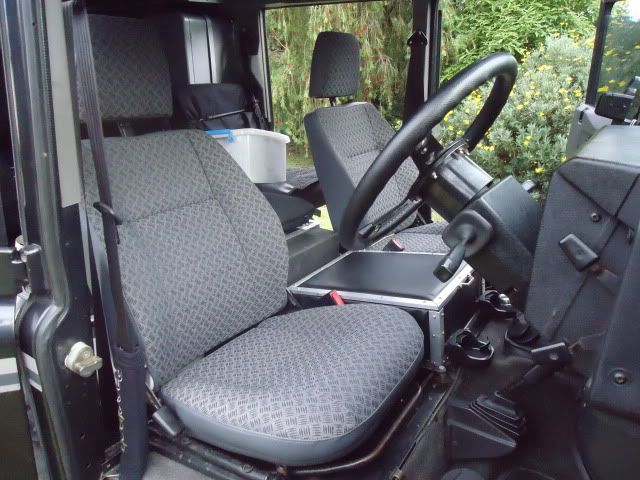
The kit was awesome, well made covers, the CD was really handy, especially to watch how the dude did things and copy!! Recommend this to anyone who has tatty old seats in their Defender!!!
An email or two to http://www.Landroverspares.co.nz and we had some material samples to look at and choose from, then before you know it I had full re upholstery kit for the front seats on their way!!
The kits, new foam, new covers, fitting hardware, glue and a CD on how to do it. I ended up hating the dude on the CD, bastard made everything look to bloody easy!!!
Old seats getting stripped:
The main reason for the job, a rooted back rest on the passengers seat:
Back rests and head rests done:
Seat bases done:
Back in the truck, bling as!!!!
The kit was awesome, well made covers, the CD was really handy, especially to watch how the dude did things and copy!! Recommend this to anyone who has tatty old seats in their Defender!!!
lax2wlg wrote:Is that like saying 'she's hot, for a crackwhore??
Re: D.B's Defender 110
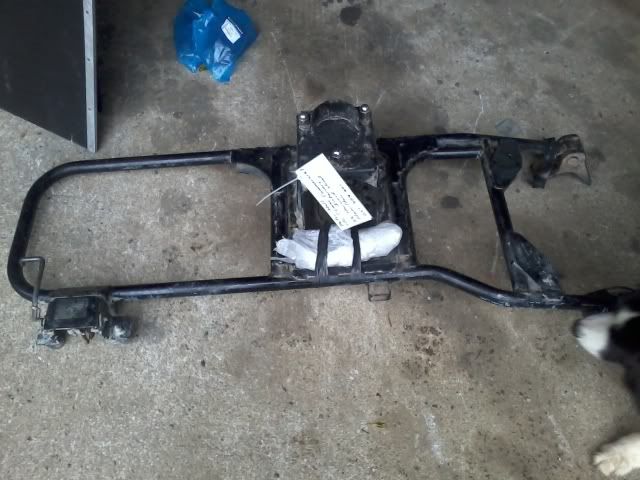
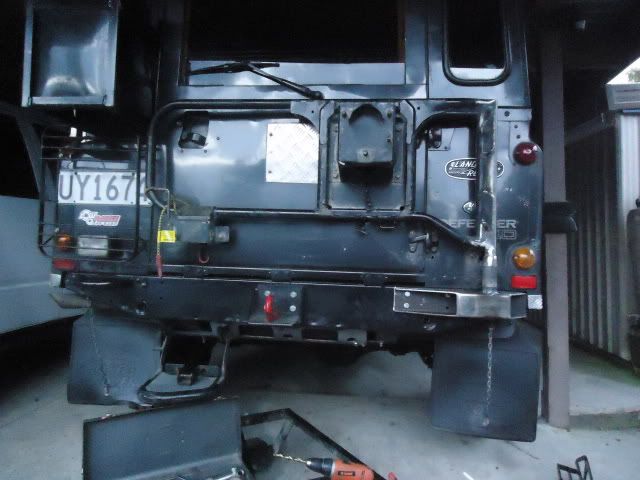
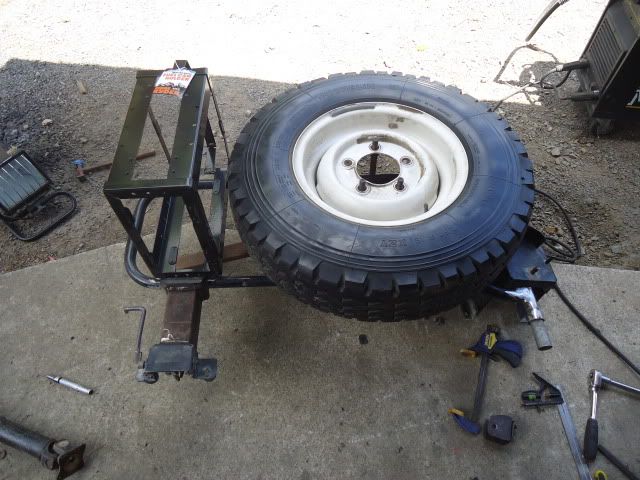
I got sick of the pivlock spare wheel carrier, and decided I could do better
I found a D21 Terrano spare wheel carrier on Tardme for $30
Scrounged up some steel, galve pipe from my junk pile, box i found lying out in the paddock at my folks place, and round bar in off cut bin at work
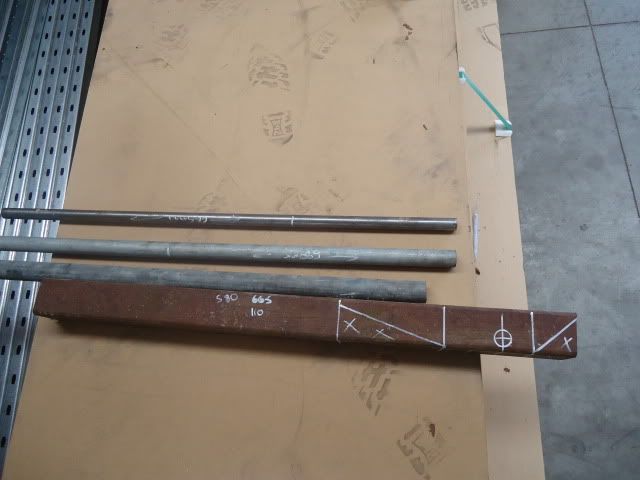

Played with the new saw at work and got creative:

Chassis mounting made
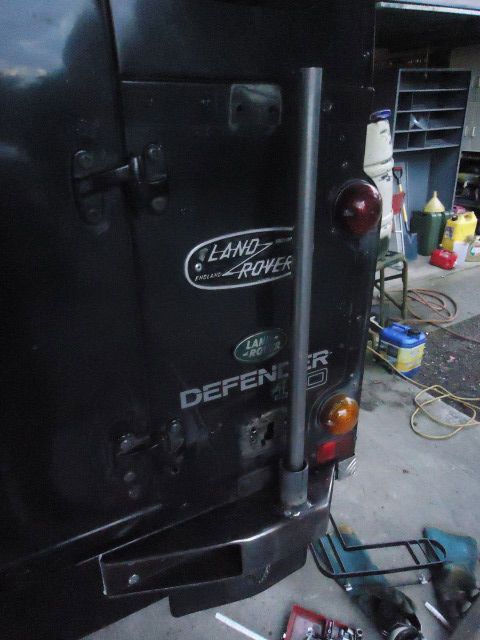
End of carrier cut off and new mounting post glued on

First Test fit
More mounting pics
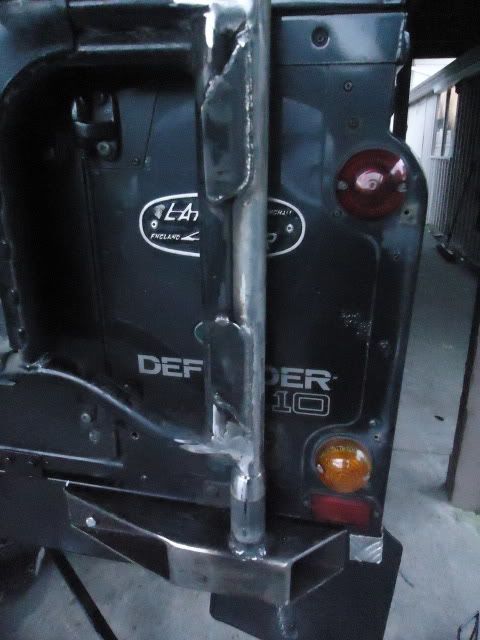

Mocked up with jerry can and dummy spare wheel

Back on the ground and making every thing permanent. I didn't get a pic, but I used the original Defender spare mounting piece off the rear door and bolted that on, rather than reconfiguring the 6 stud mount to 5 stud.
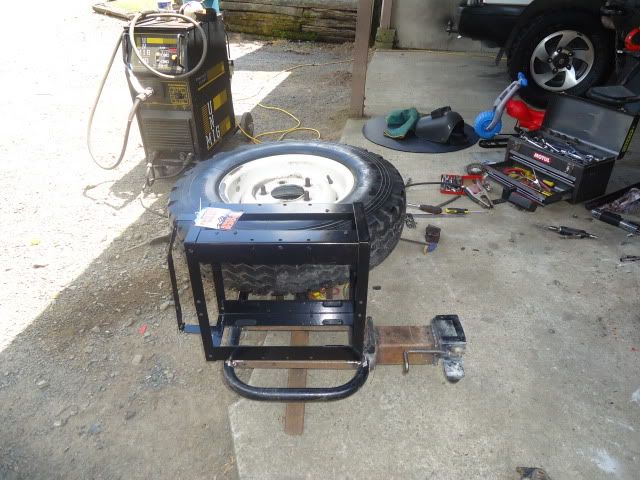
The finished result
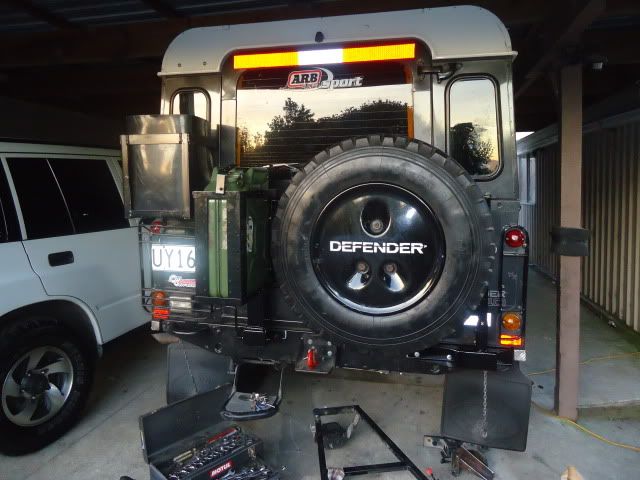
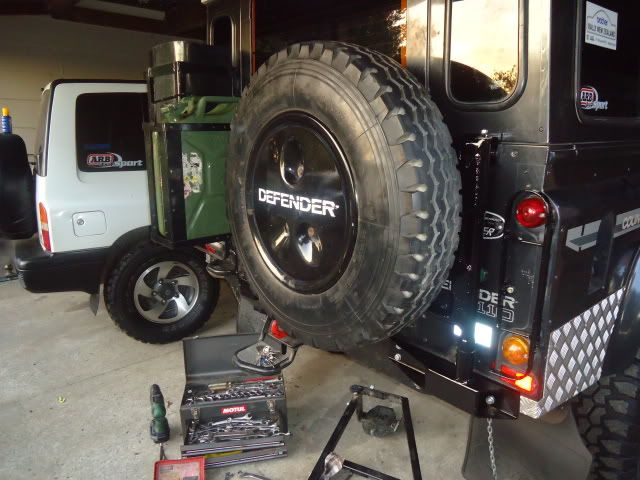
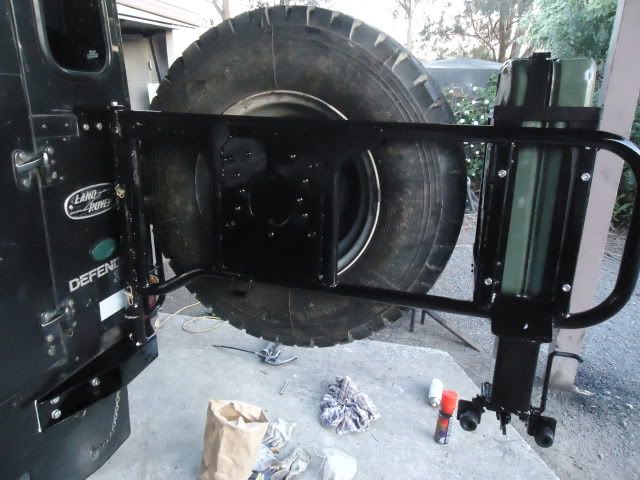

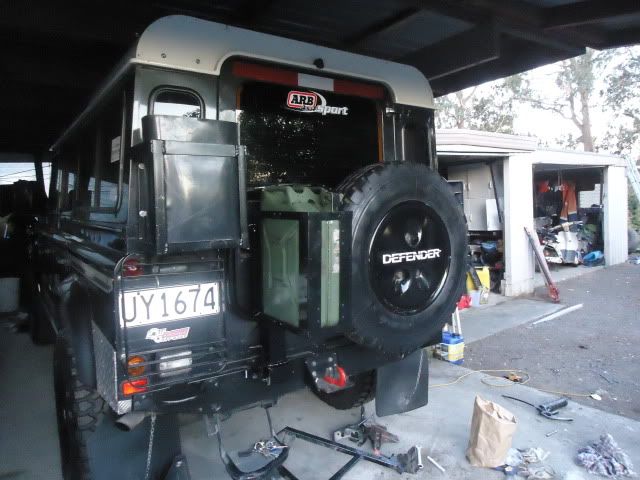
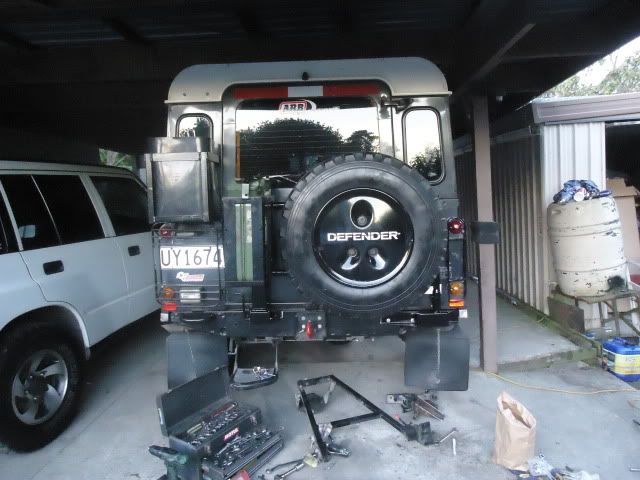
Rough as guts as usual, but I'm stoked as with it
I found a D21 Terrano spare wheel carrier on Tardme for $30
Scrounged up some steel, galve pipe from my junk pile, box i found lying out in the paddock at my folks place, and round bar in off cut bin at work
Played with the new saw at work and got creative:
Chassis mounting made
End of carrier cut off and new mounting post glued on
First Test fit
More mounting pics
Mocked up with jerry can and dummy spare wheel
Back on the ground and making every thing permanent. I didn't get a pic, but I used the original Defender spare mounting piece off the rear door and bolted that on, rather than reconfiguring the 6 stud mount to 5 stud.
The finished result
Rough as guts as usual, but I'm stoked as with it
lax2wlg wrote:Is that like saying 'she's hot, for a crackwhore??


Re: D.B's Defender 110
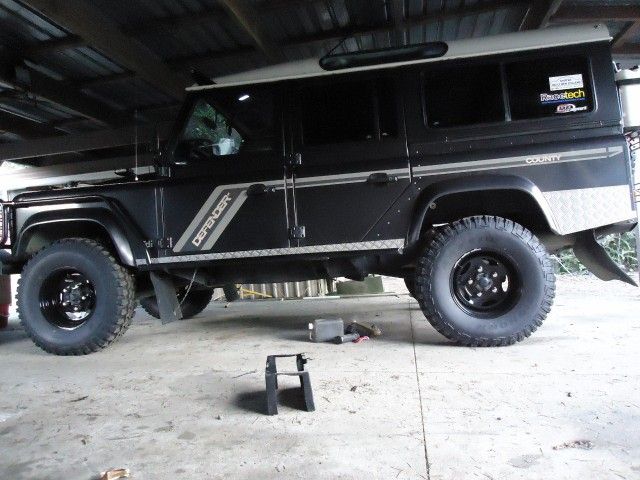
Still just a dirty ol' Defender
lax2wlg wrote:Is that like saying 'she's hot, for a crackwhore??
Re: D.B's Defender 110
this is true..... but for what it is, its chur mechie bro
i used to Cruise, now i PATROL
-
mike

- Last minute Mike
- Posts: 3545
- Joined: Fri Dec 06, 2002 12:00 pm
- Location: Christchurch - The place I'd like to be
Re: D.B's Defender 110
DieselBoy wrote:Still just a dirty ol' Defender
so true! if your not happy with it you could always swap it for my mint, not a dent on it, never been offroad surf
1973 SWB Land Rover V8 Hybrid
1994 Toyota Surf
1994 Toyota Surf

Re: D.B's Defender 110
mike wrote:so true! if your not happy with it you could always swap it for my mint, not a dent on it, never been offroad surf
Do you know where to find one of those Mike?
Ugly is a state of mind..... and the state of my truck!

Re: D.B's Defender 110
fantastic job man, been going through your build the last three nights, been an awesome read, would love to go out on a tour with you at some point (After the patrol gets a diesel engine)
Re: D.B's Defender 110
I have been slack with keeping this thread updated!!!
So a few months back I got creative and decided to swap the 15L Waeco thermo-electric fridge for a 42L Isotherm fridge freezer.
It used to look like this with the Waeco:
The above layout is a compromise as always, especially when space is a premium. I was trying to keep the sleeping area as wide as possible, keep the back door entrance clear and easy to climb in and out of, and have good sounds
Fail
I sleep on the side by the fridge, and that little 50mm over hang is such a pain in the ass. Its just annoying, and it looks funny. When i tested the layout i thought it was fine. Until i spent a week sleeping in there.........
So to fix the issue, i got a bigger fridge
The specs on the fridge are: (cut n pasted off website)
Isotherm CR42
Built in compressor (Danfoss BD35)
Fridge has one shelf, door has two shelves
Equipped with inner light
Magnetic rubber seal on door to keep it firmly closed
Safety locking device which prevents the door from being opened accidentally
Door hinged on the right hand side but can easily be changed to the left
Grey door panels
Freezer cools to approx -6 degC
Compressor unit at the back of the fridge can be easily removed and mounted in a vertical position up to 1.5m away.
Total capacity 42L
Fridge capacity 38L
Freezer capacity 4L
Overall dimensions (mm) 380W x 510D x 535H
Recess required (mm) 385W x 475D (or 350D if compressor is relocated elsewhere) x 525H
Input voltage options 12V or 24V
Average power consumption (avg) 8W
Weight 16kg
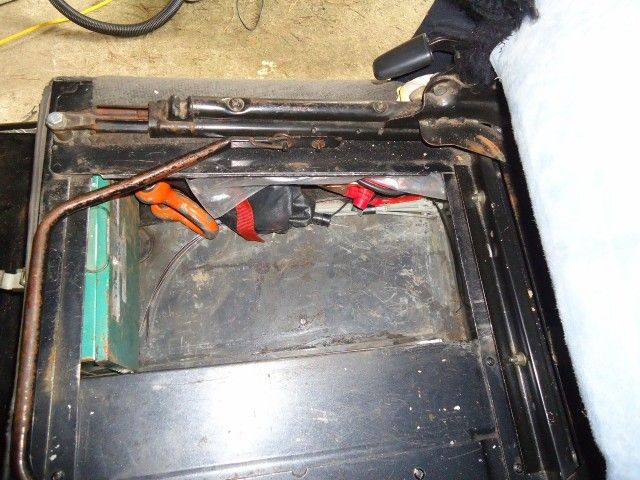
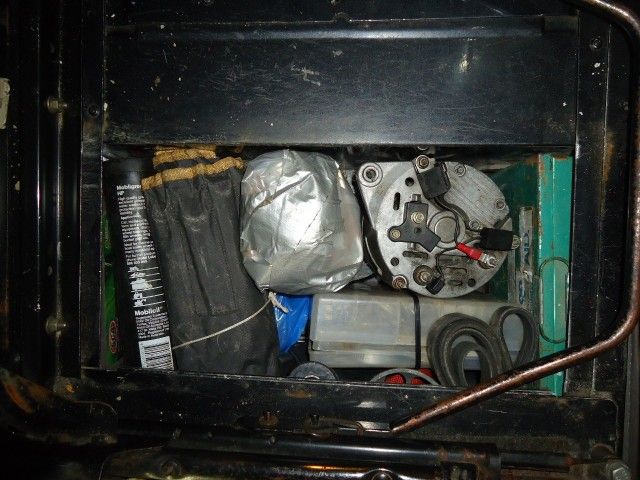
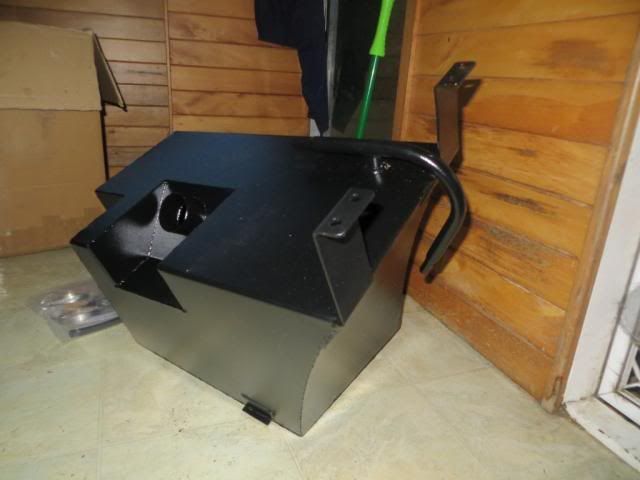
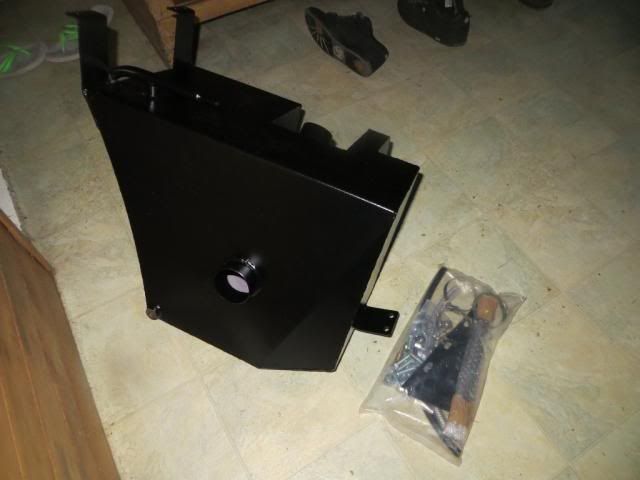
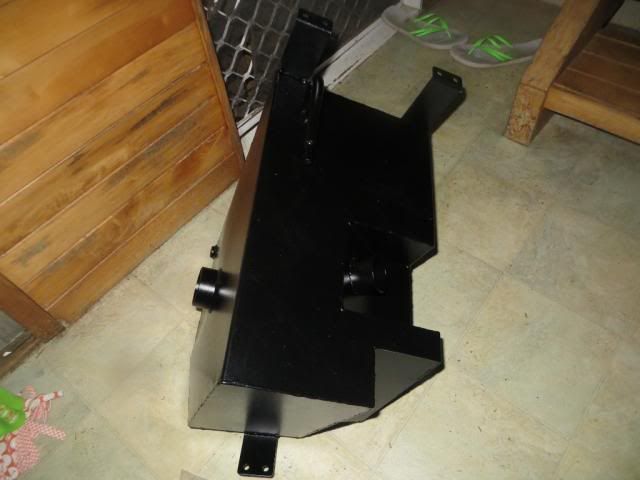
To fit the bigger fridge, the 6x9's and the amp got binned, the whole set up on the passengers side was puled out, the bottom cabinet strengthened with heaps of extra bracing to take the weight of the fridge and the top cupboards removed and altered. I took photo's of the job but they have disappeared.
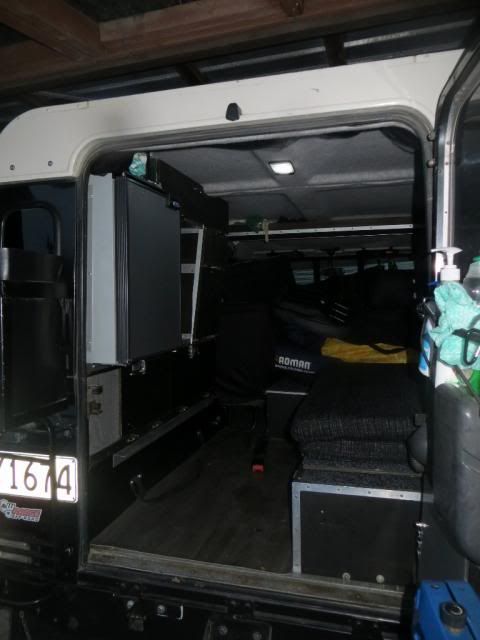
The end result is:
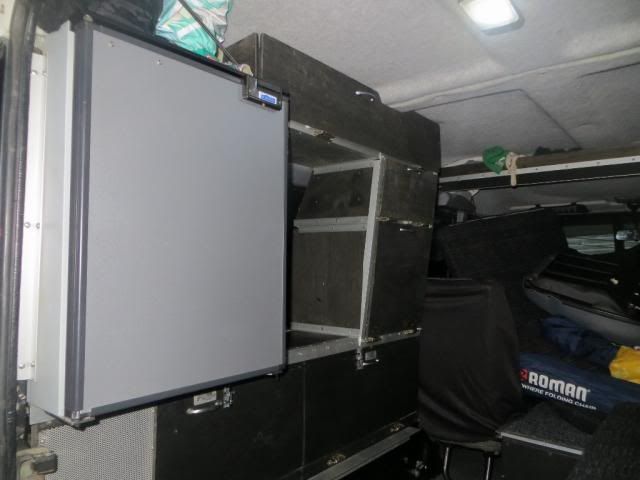
Its a big unit. It hangs out into the door way by 80mm and looks funny. The overhang is not ideal but what do you do?? The over hang being down by your feet when sleeping goes unnoticed, and it doesn't effect anything other than having to be a little careful when climbing in.
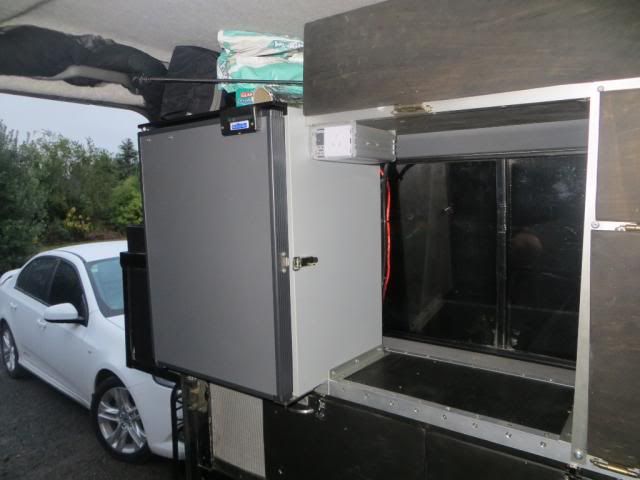
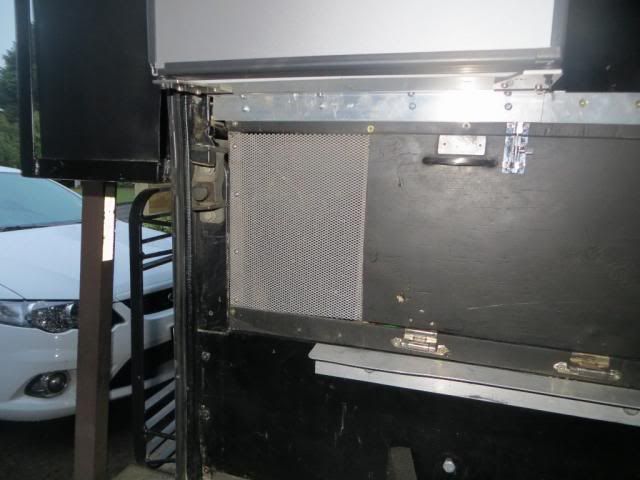
The compressor is mounted underneath it behind the alloy mesh. Its got its own little cooling fan and everything!!
42L = Heaps of room in side
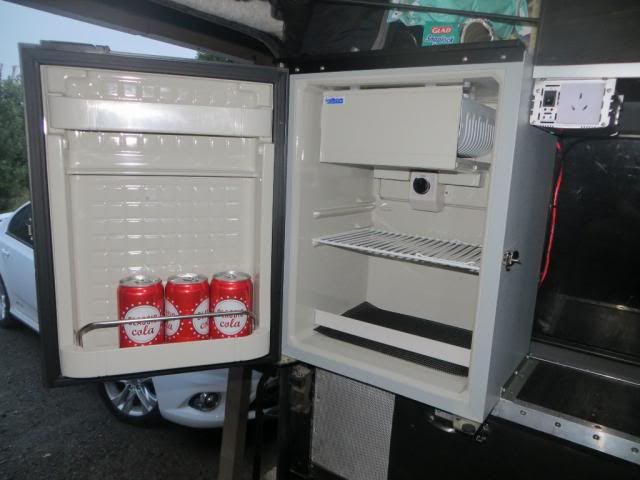
Excuse the jumble in there, there's other alterations going on at the moment....
We did two weeks round the south island with the fridge recently, in temperatures up to 38 degrees and it performed flawlessly. Same can't be said for the Waeco in the other vehicle that was with us
So a few months back I got creative and decided to swap the 15L Waeco thermo-electric fridge for a 42L Isotherm fridge freezer.
It used to look like this with the Waeco:

The above layout is a compromise as always, especially when space is a premium. I was trying to keep the sleeping area as wide as possible, keep the back door entrance clear and easy to climb in and out of, and have good sounds
Fail
I sleep on the side by the fridge, and that little 50mm over hang is such a pain in the ass. Its just annoying, and it looks funny. When i tested the layout i thought it was fine. Until i spent a week sleeping in there.........
So to fix the issue, i got a bigger fridge
The specs on the fridge are: (cut n pasted off website)
Isotherm CR42
Built in compressor (Danfoss BD35)
Fridge has one shelf, door has two shelves
Equipped with inner light
Magnetic rubber seal on door to keep it firmly closed
Safety locking device which prevents the door from being opened accidentally
Door hinged on the right hand side but can easily be changed to the left
Grey door panels
Freezer cools to approx -6 degC
Compressor unit at the back of the fridge can be easily removed and mounted in a vertical position up to 1.5m away.
Total capacity 42L
Fridge capacity 38L
Freezer capacity 4L
Overall dimensions (mm) 380W x 510D x 535H
Recess required (mm) 385W x 475D (or 350D if compressor is relocated elsewhere) x 525H
Input voltage options 12V or 24V
Average power consumption (avg) 8W
Weight 16kg
To fit the bigger fridge, the 6x9's and the amp got binned, the whole set up on the passengers side was puled out, the bottom cabinet strengthened with heaps of extra bracing to take the weight of the fridge and the top cupboards removed and altered. I took photo's of the job but they have disappeared.
The end result is:

Its a big unit. It hangs out into the door way by 80mm and looks funny. The overhang is not ideal but what do you do?? The over hang being down by your feet when sleeping goes unnoticed, and it doesn't effect anything other than having to be a little careful when climbing in.

The compressor is mounted underneath it behind the alloy mesh. Its got its own little cooling fan and everything!!

42L = Heaps of room in side

Excuse the jumble in there, there's other alterations going on at the moment....

We did two weeks round the south island with the fridge recently, in temperatures up to 38 degrees and it performed flawlessly. Same can't be said for the Waeco in the other vehicle that was with us
lax2wlg wrote:Is that like saying 'she's hot, for a crackwhore??
Re: D.B's Defender 110
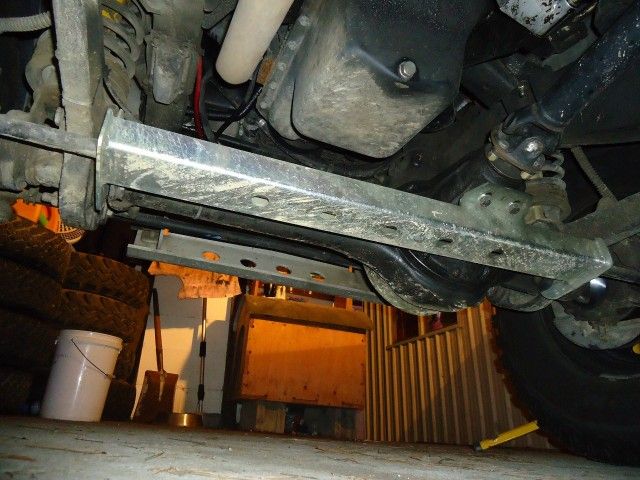
UBZ and I had our Defenders parked on our front lawn one day over summer, and I was moseying around under his and noticed that his transfer case had a different number on it to mine.
We did some research and it turned out someone had swapped in a 1.22:1 ratio LT230 transfer case from a Discovery into mine. The standard Defender LT230 t.case is 1.410:1. That would explain the slightly high gearing I always thought it had.
So i went on the hunt for a standard Defender LT230 T.case. I new it would be a hard task, and probably expensive if I could find one. LR90NZ came to the party with a suitable candidate "just kicking around in the shed" for the right price, so I grabbed it!! Cheers Ashley
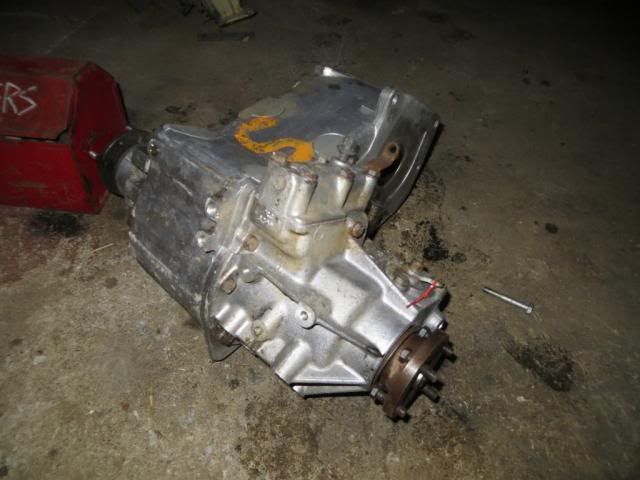
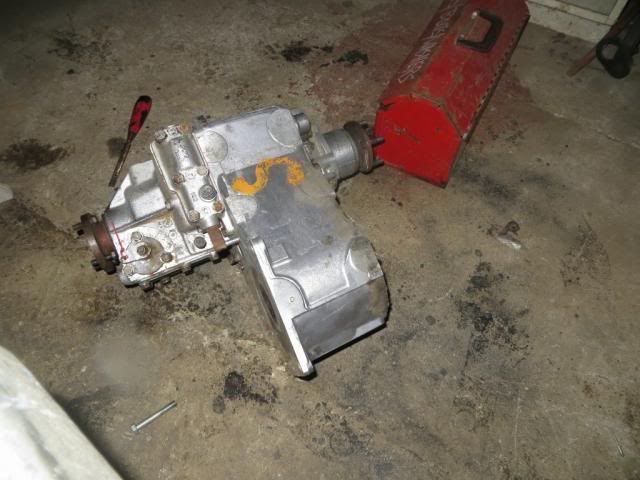
Its an earlier model T.Case than what mine would have come with. A "Suffix B" T.case to those in the know. The major difference is some of the gear profiles are different to the later LT230 cases, which they changed in order to try and make them quieter.
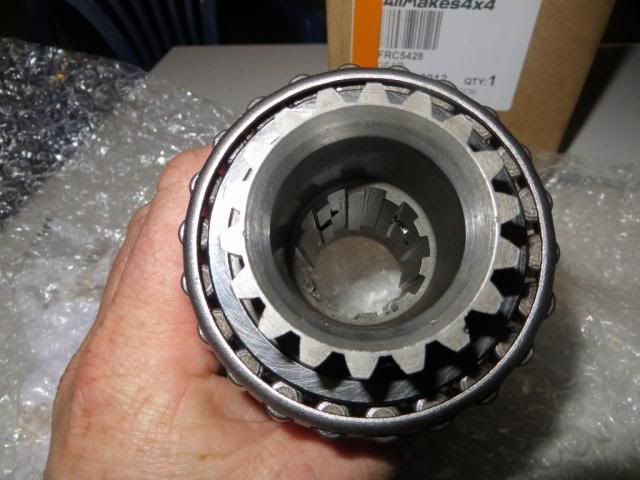
The major thing affecting me with this t.case that was changed on the later cases was the input gear. The later input gear has cross drilled splines where they mate with the gearbox output splines. This is to provide lubrication to the splines and prevent premature wear. The earlier gear isn't available cross drilled, so Ashley hooked me up with a new gear and i got the new gear cross drilled. Apparently it was a mission, really really hard with a tiny soft bit on the middle!! I'm guessing I owe someone a BIG favour now
The finished result ready with new bearings fitted:
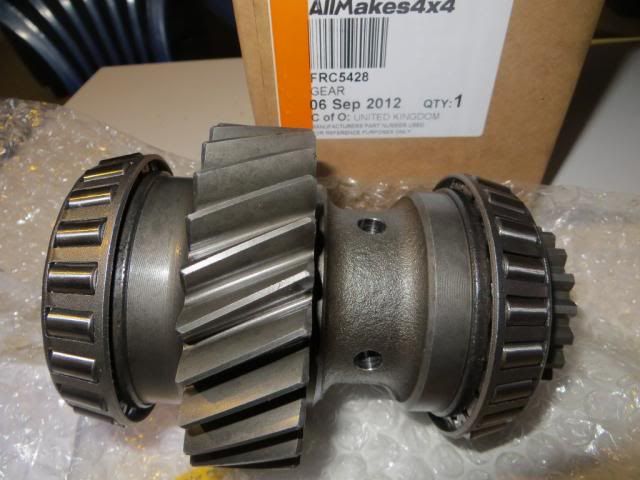
Splines all cleaned up inside:
Hopefully get it fitted tomorrow!!!
We did some research and it turned out someone had swapped in a 1.22:1 ratio LT230 transfer case from a Discovery into mine. The standard Defender LT230 t.case is 1.410:1. That would explain the slightly high gearing I always thought it had.
So i went on the hunt for a standard Defender LT230 T.case. I new it would be a hard task, and probably expensive if I could find one. LR90NZ came to the party with a suitable candidate "just kicking around in the shed" for the right price, so I grabbed it!! Cheers Ashley


Its an earlier model T.Case than what mine would have come with. A "Suffix B" T.case to those in the know. The major difference is some of the gear profiles are different to the later LT230 cases, which they changed in order to try and make them quieter.
The major thing affecting me with this t.case that was changed on the later cases was the input gear. The later input gear has cross drilled splines where they mate with the gearbox output splines. This is to provide lubrication to the splines and prevent premature wear. The earlier gear isn't available cross drilled, so Ashley hooked me up with a new gear and i got the new gear cross drilled. Apparently it was a mission, really really hard with a tiny soft bit on the middle!! I'm guessing I owe someone a BIG favour now
The finished result ready with new bearings fitted:

Splines all cleaned up inside:

Hopefully get it fitted tomorrow!!!
lax2wlg wrote:Is that like saying 'she's hot, for a crackwhore??
-
mike
- Last minute Mike
- Posts: 3545
- Joined: Fri Dec 06, 2002 12:00 pm
- Location: Christchurch - The place I'd like to be
Re: D.B's Defender 110
Pretty cool fridge their db and great compressors those, we have them on the boat. To keep the cycle time down for the fridge there are 3 things you can do. 1) water cool the condensor-huge difference. 2) more insulation and the thicker the better (we have 5 inches) and 3) don't open the fridge if you can help it, or convert to top lid. Yours probably isnt a problem but as soon as you open a small underpowered fridge it can take up to 6 hours to bring it back up to temperture in hot environments, even our top mount suffered from this a little in the islands. Where your drinks are you can make a small door to get to the drinks and just the drinks so when you open it your not replacing the cool air inside the main fridge area with warm. Probably more useful on the smaller underpowered fridges.
But then again if your operating yours with the engine running most of the time none of the above matters. We try to live on the boat just off wind and solar for weeks at a time running a fridge and freezer in 35 degree cabin temps and 27 degree water temps so cycle time is SOOO important to keep power consumption down.
But then again if your operating yours with the engine running most of the time none of the above matters. We try to live on the boat just off wind and solar for weeks at a time running a fridge and freezer in 35 degree cabin temps and 27 degree water temps so cycle time is SOOO important to keep power consumption down.
1973 SWB Land Rover V8 Hybrid
1994 Toyota Surf
1994 Toyota Surf

Re: D.B's Defender 110
Still the best equipped touring wagon on this site
my 4wd is not a truck
old mercedes never die but sometimes they do need some love
older cars are good,mercedes are better,older mercedes are the best
old mercedes never die but sometimes they do need some love
older cars are good,mercedes are better,older mercedes are the best
Re: D.B's Defender 110
Dumped the transfer case out again. Its amazing how quick you can do a job the second time round!!
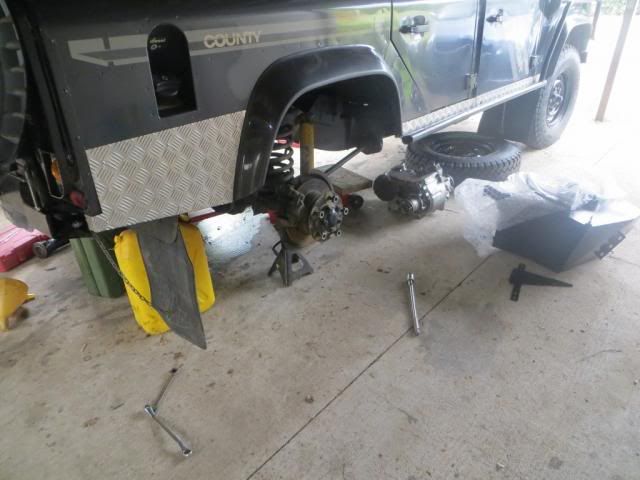
Just ordered this kit from Ashcrofts in the UK, bet its here by the end of the week
http://www.ashcroft-transmissions.co.uk ... ductId=154
So what to do with the rest of the day??

Just ordered this kit from Ashcrofts in the UK, bet its here by the end of the week
http://www.ashcroft-transmissions.co.uk ... ductId=154
So what to do with the rest of the day??
lax2wlg wrote:Is that like saying 'she's hot, for a crackwhore??
Re: D.B's Defender 110
I have had this sitting in the living room for a week or so:
It goes in here
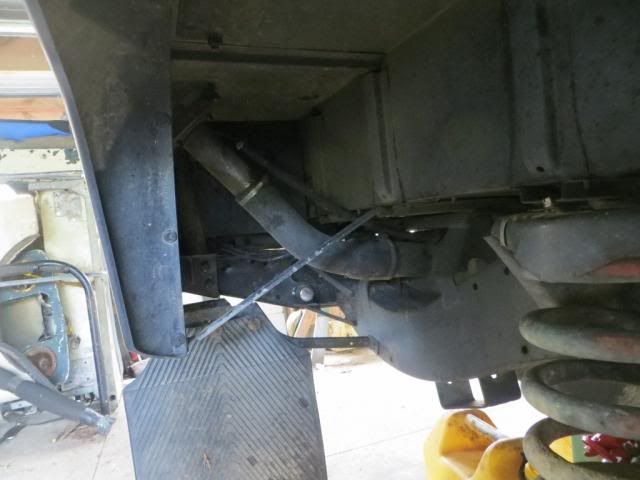
Its a 45 Litre Long Range Fuel Tank, courtesy of our man at www.landroverspares.co.nz.
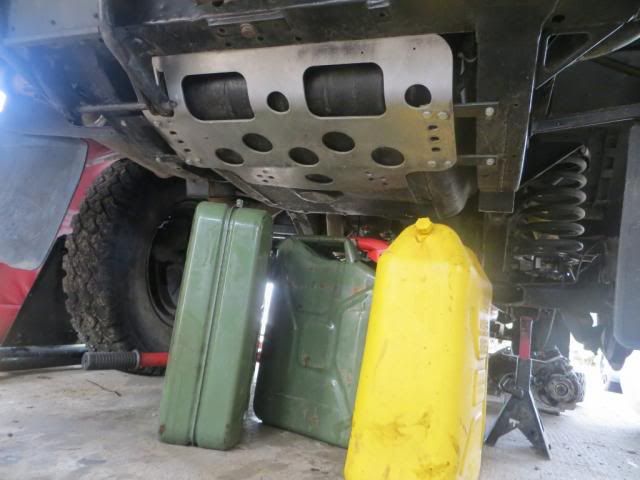
So first up was to dump the fuel out of the tank. How many stock vehicles can you stand a 20L Jerry can up underneath??
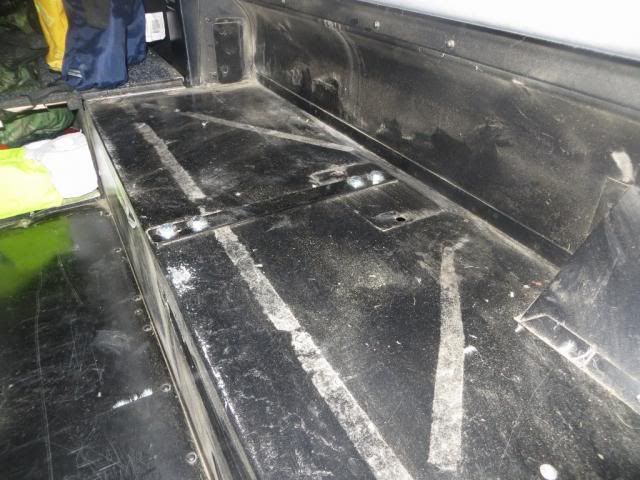
As there are some mounting brackets that go insde the truck, I had to remove part of the bed, and open up the spare parts compartment. Havn't been in there for a while, its full of dust from the Clarence river trip!!
Radiator hoses, Heater hoses, Power Steering Pump, Lift Pump, CV Joint, UJ, Ball Joints, Clutch slave, Clutch master, Water Pump spare fuel hose etc live in there.
Time for test fit number 1:
Underneath
From the front
The space on top, fuel filler neck goes in there;
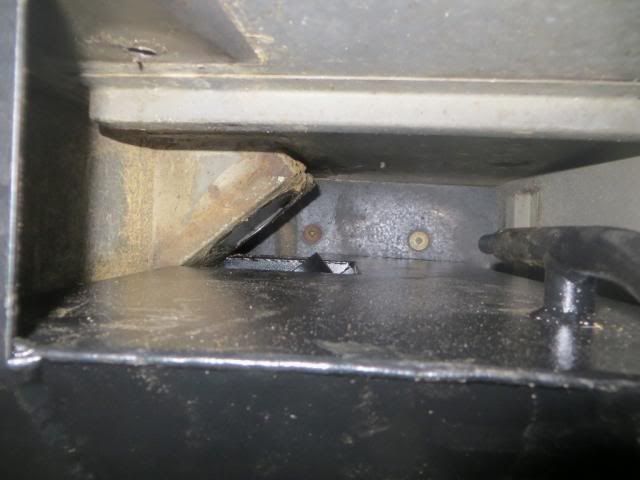
The junction between the two tanks, which don't quite line up, but pretty close:
The filler lines up which is good
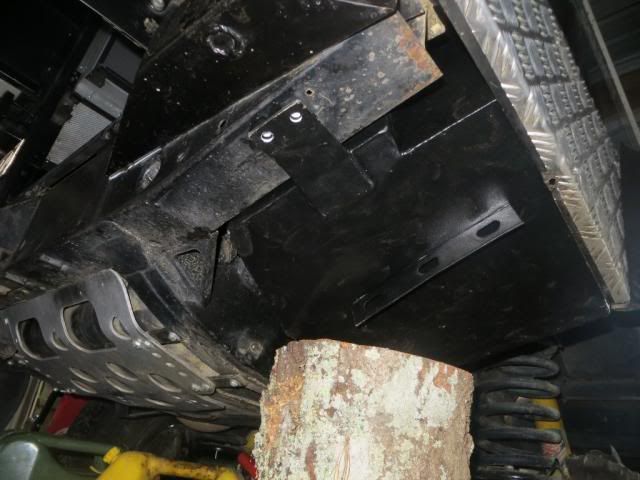
Strengthening support goes across the guard. Hope its not going to effect the bed to much!!
A few hours of fawking around later, fitting and removing it 3 or four times, its finally bolted in and plumbed up:
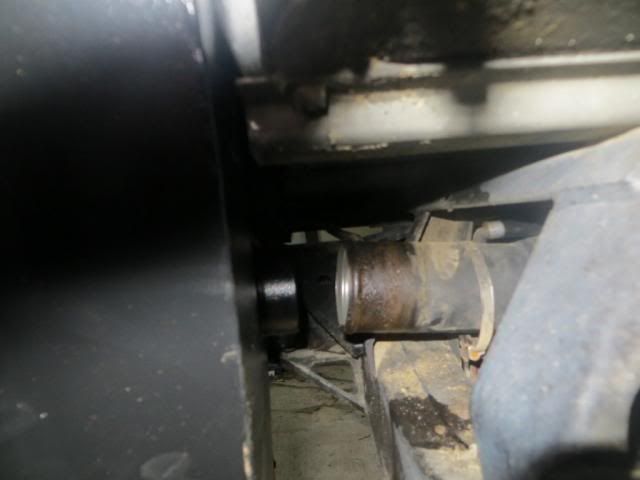
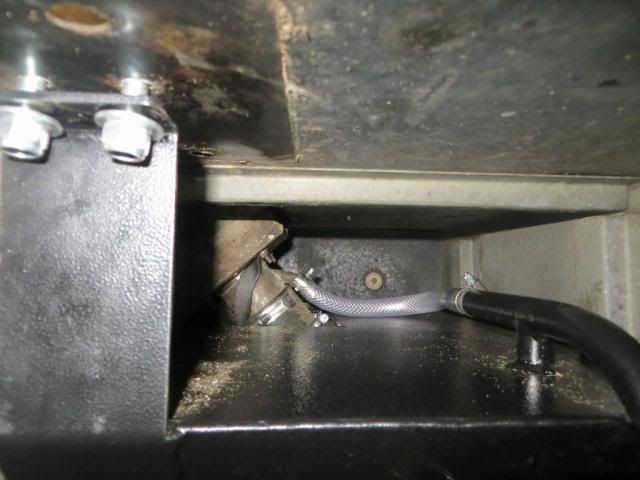
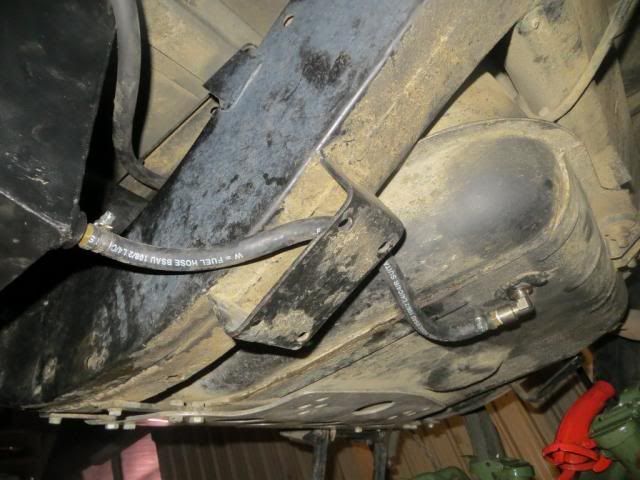
From inside the gaurd, the hose is the breather line coming from the existing tank. I intend to put a rubber guard over the front of the tank:
The reason for the space up there. Was bloody hard going playing contortionist to do up the hose clamps and the bolts securing the filler neck to the truck!!
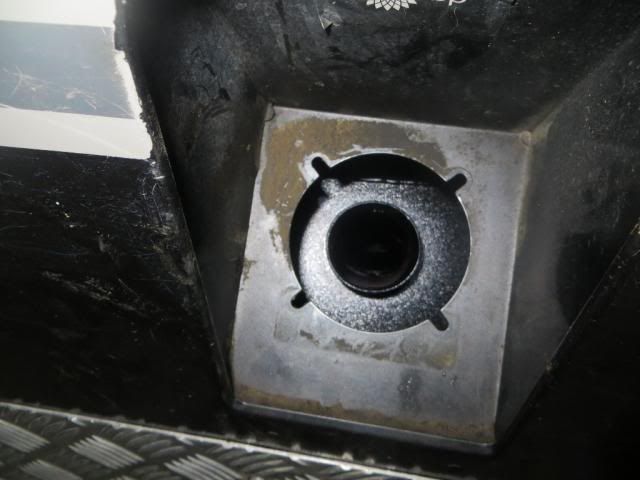
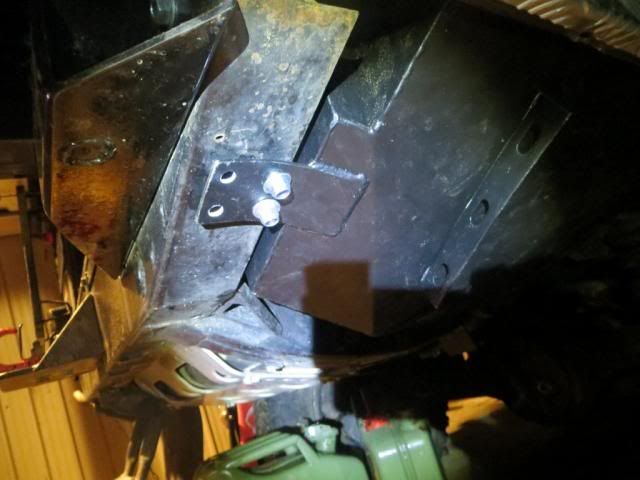
The rear mount was all good, but buggered if I could work out how i was expected to get the nuts or bolts inside the chassis?? So i made my own holes in a place I could get to with a spanner. Might chop the rest of the bracket off
The join between the two tanks is ok, I want to put better hose clams on it, this is the most likely place for a leak i think:
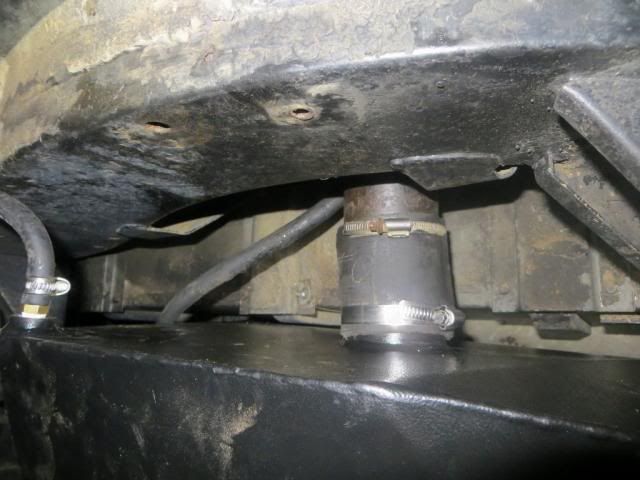
The hose that links it all together. I didn't like the elbow off the main tank and wanted to replace it with a banjo, but now seeing it all fitted up, the elbow will be fine
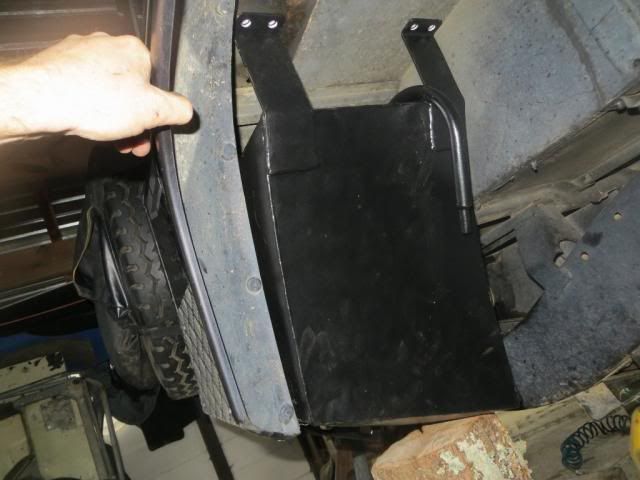
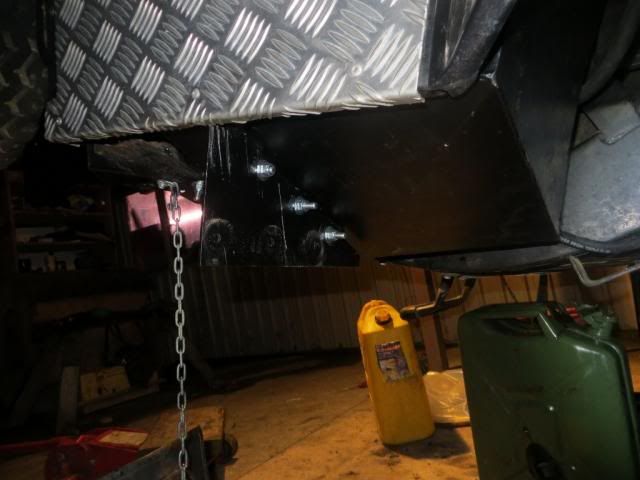
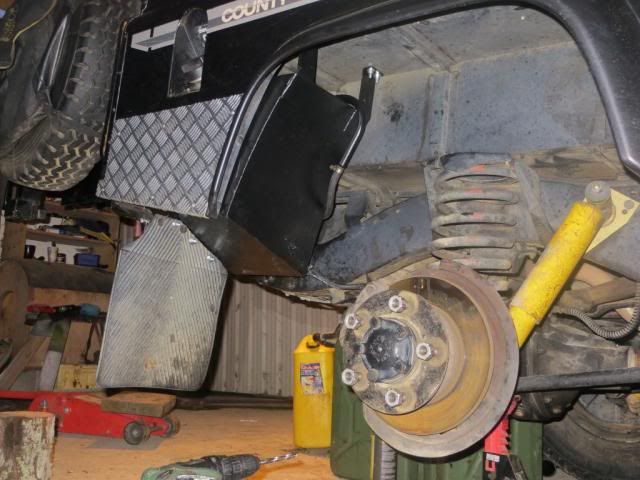
The whole thing is tucked up neatly inside the guard, it looks good
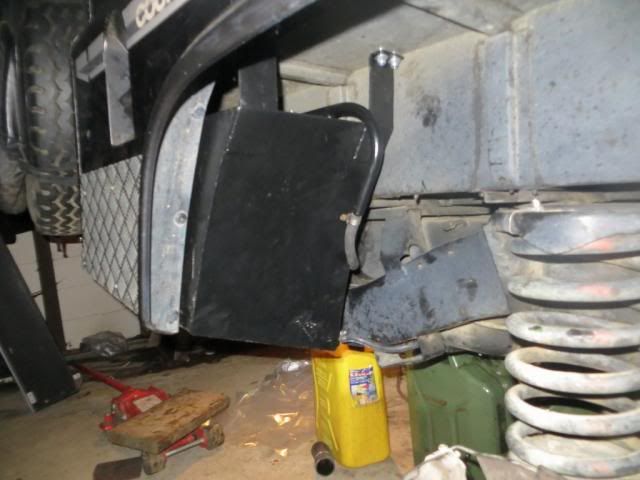
......until I bolted the mud flap bracket up. Yuck, why would you have the tank tucked away neatly, then bolt on a big hoary bracket that screams HIT ME, which you would, and then tear the ass out of the tank:
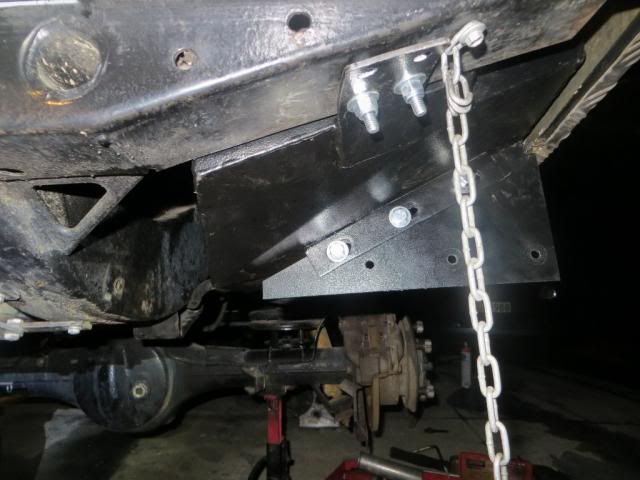
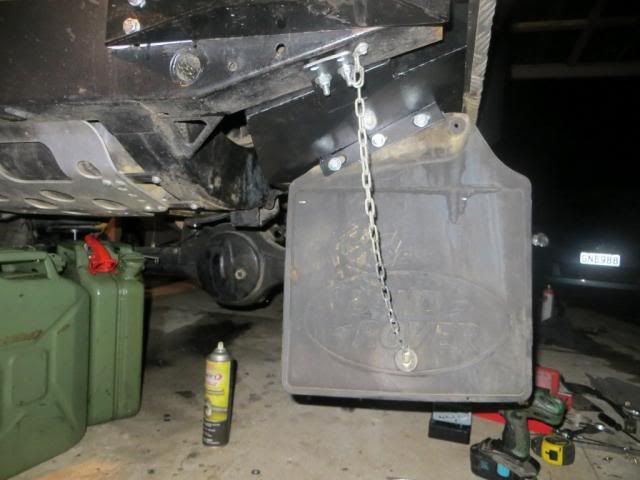
So i binned it and put the mudflap straight on to the tank. Much better, it even sits at the same height and position as the other side:
Its ready to be filled and tested, but I want to swap out a hose clamp on the joiner between the two tanks as the ones supplied were to small, so have had to restrain myself. Will load it up tomorrow night. Then Its time to try and refit the bed over the strengthening bracket on the inside of the guard and make up a rubber shield to go over the front of the tank to stop it getting peppered with stones thrown up by the wheel. Fun times


It goes in here

Its a 45 Litre Long Range Fuel Tank, courtesy of our man at www.landroverspares.co.nz.
So first up was to dump the fuel out of the tank. How many stock vehicles can you stand a 20L Jerry can up underneath??

As there are some mounting brackets that go insde the truck, I had to remove part of the bed, and open up the spare parts compartment. Havn't been in there for a while, its full of dust from the Clarence river trip!!

Radiator hoses, Heater hoses, Power Steering Pump, Lift Pump, CV Joint, UJ, Ball Joints, Clutch slave, Clutch master, Water Pump spare fuel hose etc live in there.
Time for test fit number 1:
Underneath

From the front

The space on top, fuel filler neck goes in there;

The junction between the two tanks, which don't quite line up, but pretty close:

The filler lines up which is good

Strengthening support goes across the guard. Hope its not going to effect the bed to much!!

A few hours of fawking around later, fitting and removing it 3 or four times, its finally bolted in and plumbed up:
From inside the gaurd, the hose is the breather line coming from the existing tank. I intend to put a rubber guard over the front of the tank:

The reason for the space up there. Was bloody hard going playing contortionist to do up the hose clamps and the bolts securing the filler neck to the truck!!

The rear mount was all good, but buggered if I could work out how i was expected to get the nuts or bolts inside the chassis?? So i made my own holes in a place I could get to with a spanner. Might chop the rest of the bracket off

The join between the two tanks is ok, I want to put better hose clams on it, this is the most likely place for a leak i think:

The hose that links it all together. I didn't like the elbow off the main tank and wanted to replace it with a banjo, but now seeing it all fitted up, the elbow will be fine

The whole thing is tucked up neatly inside the guard, it looks good


......until I bolted the mud flap bracket up. Yuck, why would you have the tank tucked away neatly, then bolt on a big hoary bracket that screams HIT ME, which you would, and then tear the ass out of the tank:


So i binned it and put the mudflap straight on to the tank. Much better, it even sits at the same height and position as the other side:


Its ready to be filled and tested, but I want to swap out a hose clamp on the joiner between the two tanks as the ones supplied were to small, so have had to restrain myself. Will load it up tomorrow night. Then Its time to try and refit the bed over the strengthening bracket on the inside of the guard and make up a rubber shield to go over the front of the tank to stop it getting peppered with stones thrown up by the wheel. Fun times
lax2wlg wrote:Is that like saying 'she's hot, for a crackwhore??