Toughening up Terrano WD21 Front End

For all Nissan related topics

Moderator: Mark

User avatar
lax2wlg
Hard Yaka
Posts: 1437
Joined: Sat May 12, 2012 8:33 pm
Location: Various areas

Re: Toughening up Terrano WD21 Front End

Post by lax2wlg »

Cheers, I'm Pro-Isuzu :D
IMO 1st Generation Trooper probably the most underrated 1980s 4x4, rock solid IFS, you can sleep in em, and they can look cool:
Image

The rear coils are .57" (wire diameter), 9 coils tall. Just standard Jeep Grand Cherokee front coils. But they must be from a V8 and they must be from the front to work in a Terrano.
TOYOTA - The Official Vehicle of ISIS!
And makers of the '92 Camry, where you got your first backseat handjob.
User avatar
Hamz
Hard Yaka
Posts: 168
Joined: Thu Nov 24, 2011 9:00 pm
Location: Perth

Re: Toughening up Terrano WD21 Front End

Post by Hamz »

[quote="lax2wlg"]Ok some interesting notes on front diff setup.

I've set it up using 4.875 gears from the C200 rear diff & C200 LSD.

To install the 4.8 pinion I used the sleeve from the R200A front pinion then got a small depth spacer machined. This allowed me to get the mesh pattern within factory specs. I used the good old freezer method to seat the pinion bearing.

Image

i see you using LSD, and how much per pound are you paying for you crystal meth? we get some good prices up here in rotorua, good market for it...
User avatar
Hamz
Hard Yaka
Posts: 168
Joined: Thu Nov 24, 2011 9:00 pm
Location: Perth

Re: Toughening up Terrano WD21 Front End

Post by Hamz »

lax2wlg wrote:Cheers, I'm Pro-Isuzu :D
IMO 1st Generation Trooper probably the most underrated 1980s 4x4, rock solid IFS, you can sleep in em, and they can look cool:
Image

The rear coils are .57" (wire diameter), 9 coils tall. Just standard Jeep Grand Cherokee front coils. But they must be from a V8 and they must be from the front to work in a Terrano.


On a more serious side, i see that your/whoever's that trooper is, has the round front lights. is that the front grill ff a older landrover? saw one today on the way to work and recalled this picture in my head, seem remarkably similar
User avatar
lax2wlg
Hard Yaka
Posts: 1437
Joined: Sat May 12, 2012 8:33 pm
Location: Various areas

Re: Toughening up Terrano WD21 Front End

Post by lax2wlg »

LSD rebuild parts arrived during the week so I installed them over 2 nights. I managed to remove the front diff without even removing the front wheels. This may be helpful if you need to access your front diff, it makes it a lot easier.

The 4 bolts in red - for some reason they installed 2 of them in reverse from the factory. Get a thin cutting disc and cut those ones out. Support diff, remove crossmember bolts and 2x bolts in green. Get your 3lb club hammer and knock the crossmember off.

Image

Now remove the shocks. Unbolt the CVs and push them to the side. Remove the short side stub axle and set aside. Pull the long axle about 2 inches and support it so the inner seal doesn't get damaged.
Image

Now you can pull the front cover off.
Image
Unlike many Dana/Salisbury diffs, you don't need an expensive case spreader to remove/install the center:
Image
So mark bearing caps and remove:
Image
Now the fun part - split the case (8xbolts).
Note this is a 4-pin diff which is a nice thing to have in the front. In my case, preload rings were split. This was not helping.
Image
Image
New clutches please. Instead of just jamming shims in there, I also put a thick stack of new clutches. These had much more material on the grooves than the old ones. The idea here is to obviously make it clamp hard but also to increase the breakaway torque (point at which it reverts to open). According to the FSM the factory breakaway for WD21 LSD is already something insanely high like 260lb/ft.
Image
And then to reassemble the center, put it in the vice.
Image
Now you can reinstall the center, and put bearing caps/shims back in place exactly as they were. Put cover back on, reinstall CVs, fill with oil.
Image
Grease up every mating surface on the crossmember, grab your clubhammer and massage it back into place.
Image
The front crossmember bolts can be replaced with new ones mounted the correct way around.

Now to test it
User avatar
hamboy
Hard Yaka
Posts: 286
Joined: Sun Aug 12, 2012 10:27 pm
Location: Blenheim

Re: Toughening up Terrano WD21 Front End

Post by hamboy »

Awesome, that's some top notch tech there josh
User avatar
lax2wlg
Hard Yaka
Posts: 1437
Joined: Sat May 12, 2012 8:33 pm
Location: Various areas

Re: Toughening up Terrano WD21 Front End

Post by lax2wlg »

I tested the modified LSD at Rallywoods and its crazy tight, the steering is heavy like a locker at low speeds and it behaves like its locked... fine with me!

I also did the idler arm replacement mod. Good writeup in Hamboys thread about this. Basically since mine is a 1988 it has the older steering box, so it was literally a case of finding another pre-92 steering box, clock the pitman arm, remove worm gear, notch mounting holes and install.
Image
Now the steering linkage looks like a Humvee steering system:
Image

Also put in these fender liners
Image
Image
Made these from an old tube, cut to shape and clipped into the factory holes with trim clips

Also have added EGT gauge and volt gauge to the panel to the right of the driver
Image
If the EGTs get too hot it will trigger the red LED on the main panel
Image

Tyres: My favorite manufacturer and my favorite size: BFGoodrich KM 33x10.5 on standard 15x7 Nissan alloys. These are a true 33" in diameter and a very lightweight but strong combo.
Image
Image

I'm still trying to chase down an Isuzu hoodscoop at a reasonable price, so if anyone knows of one, please let me know
TOYOTA - The Official Vehicle of ISIS!
And makers of the '92 Camry, where you got your first backseat handjob.
User avatar
hamboy
Hard Yaka
Posts: 286
Joined: Sun Aug 12, 2012 10:27 pm
Location: Blenheim

Re: Toughening up Terrano WD21 Front End

Post by hamboy »

That looks F^%$#N SWEET!! I think its time you bring it south Really get it stuck :lol: :lol:
User avatar
lax2wlg
Hard Yaka
Posts: 1437
Joined: Sat May 12, 2012 8:33 pm
Location: Various areas

Re: Toughening up Terrano WD21 Front End

Post by lax2wlg »

Cheers! Actually I will be heading down South early-mid Dec, Trying to do a mini safari so keen to meet up in your area for some 4x4 action on the way

Gotta say I'm real happy with the steering. I've had the system on for bout 9 months with plenty of offroad use, including beating it up rockfaces with the front spooled together, and zero play in any of the joints.

The Calmini steering kit for these is a very good product but its too expensive for what it is and it still leaves tierod angles too steep for my liking. And why do they include a 'proprietary Calmini pitman arm?' Has anyone ever bent a pitman arm on one of these vehicles?! :shock:
User avatar
slide
Hard Yaka
Posts: 895
Joined: Sun May 15, 2011 9:04 pm
Location: Nelson

Re: Toughening up Terrano WD21 Front End

Post by slide »

Why you worried about toughening up the front end? This video clearly shows its the rear end thats weak in wd21 :lol: :lol:
http://www.youtube.com/watch?v=_hEcT4-ap8g
User avatar
lax2wlg
Hard Yaka
Posts: 1437
Joined: Sat May 12, 2012 8:33 pm
Location: Various areas

Re: Toughening up Terrano WD21 Front End

Post by lax2wlg »

In terms of durability, that was impressive.
1980s/early 1990s really were the golden era for Japanese build quality.
wax
Hard Yaka
Posts: 510
Joined: Sat Nov 26, 2011 5:42 pm

Re: Toughening up Terrano WD21 Front End

Post by wax »

He gave it a good go. I cant believe the front end stayed in it
User avatar
hamboy
Hard Yaka
Posts: 286
Joined: Sun Aug 12, 2012 10:27 pm
Location: Blenheim

Re: Toughening up Terrano WD21 Front End

Post by hamboy »

I cant believe he only snapped the chassis :shock:
User avatar
lax2wlg
Hard Yaka
Posts: 1437
Joined: Sat May 12, 2012 8:33 pm
Location: Various areas

Re: Toughening up Terrano WD21 Front End

Post by lax2wlg »

hamboy wrote:I cant believe he only snapped the chassis :shock:


Dunno if he did... may have just bent the rear trailing arms...

Speaking of which, cast iron rear links are a good mod. They are about a million times stronger than the standard ones and go straight in.
Image

These can be found as standard equipment on the C200 rear Pathfinders. Pretty sure thats transaxle code CA48 only... '87-89 4-cyl trucks.

Wonder if they would fit in a Y60 Safari...it shares the same 5-link rear end... so its possible. Seems like rear links are a pretty popular trail spare for Safari drivers.
wax
Hard Yaka
Posts: 510
Joined: Sat Nov 26, 2011 5:42 pm

Re: Toughening up Terrano WD21 Front End

Post by wax »

Thats alot of cool info in there, if you were wanting to build a touch terrano you could do a lot worse then read this thread thats for sure
User avatar
slide
Hard Yaka
Posts: 895
Joined: Sun May 15, 2011 9:04 pm
Location: Nelson

Re: Toughening up Terrano WD21 Front End

Post by slide »

lax2wlg wrote:These can be found as standard equipment on the C200 rear Pathfinders. Pretty sure thats transaxle code CA48 only... '87-89 4-cyl trucks.

Wonder if they would fit in a Y60 Safari...it shares the same 5-link rear end... so its possible. Seems like rear links are a pretty popular trail spare for Safari drivers.


Length would be the question for safari fitment?
I'm pretty sure all pre '93 wd21 have the cast arms, with '93- having the pipe type
User avatar
hamboy
Hard Yaka
Posts: 286
Joined: Sun Aug 12, 2012 10:27 pm
Location: Blenheim

Re: Toughening up Terrano WD21 Front End

Post by hamboy »

slide wrote:
Length would be the question for safari fitment?
I'm pretty sure all pre '93 wd21 have the cast arms, with '93- having the pipe type


I can confirm as both of mine have cast arms
User avatar
lax2wlg
Hard Yaka
Posts: 1437
Joined: Sat May 12, 2012 8:33 pm
Location: Various areas

Re: Toughening up Terrano WD21 Front End

Post by lax2wlg »

Hmmm interesting... if thats the case then bravo, they are a very good piece of factory kit! Although My Feb '87 VG30i had pipe type trailing arms, 2-pin factory H233B too, interestingly. Maybe a JDM vs USDM thing..?

Cheers wax, appreciate that.
Attachments
SUPER EFFORT, THAT.jpg
User avatar
lax2wlg
Hard Yaka
Posts: 1437
Joined: Sat May 12, 2012 8:33 pm
Location: Various areas

Re: Toughening up Terrano WD21 Front End

Post by lax2wlg »

Firstly, I don't know what the cert. requirements are with this. I haven't asked the guy who certed the control arms. I need some clarification on this.

The steering system is good but I don't like this.

Image

I have a feeling that with the front LSD, in high torque scenarios, they bow inwards a bit. Some tie rod deflection is unavoidable in an IFS setup, but not of the body of the joint itself! Besides, I dont like how its bent.

So started playing around with different combinations
Image
This particular one was just two standard adjusters screwed together. Good for measuring up but unalignable.

Then I realized that the 2wd outer rod end joint taper is the same taper as the 2wd draglink. The joint is shorter and stubbier (18 vs 16mm) than both the 4wd and 2wd inner.
Image
So I have used it as the inner joint, with custom adjusters made from 1" 4140 high tensile bar, custom 18x1.5 LH locknnuts, and stock standard Nissan 4wd outer rod ends as outers.

As you can see they are a lot beefier and cover as much thread as possible while obviously still allowing toe alignment. I tried cycling the suspension/steering and everything clears.
Image
ie 2wd outer as inner + 4wd outer as outer.
Image
Image

Image

Image

The machining is done to a very high standard and they swap right in to any vehicle running the 2wd draglink, using off the shelf rod ends. We are trying to work out the cost to produce more sets. Economies of scale (higher quantity, lower price) so if anyone is interested and its not infringing the ORE vendor rules, please express interest on the other thread.

http://www.offroadexpress.co.nz/Forums/ ... =4&t=39552
User avatar
lax2wlg
Hard Yaka
Posts: 1437
Joined: Sat May 12, 2012 8:33 pm
Location: Various areas

Re: Toughening up Terrano WD21 Front End

Post by lax2wlg »

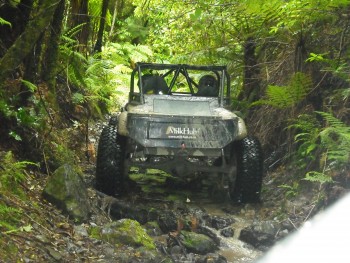
Some minor tinkering to get the front end to 'work' as much as possible. I have gone back to 2-door torsion bars which are a smaller diameter and therefore have a softer spring rate. In order to get the torsion springs to deflect as much as possible I want minimal preload on them... ie make the ride height as low as possible without smashing panels too much, so have removed 1.5mm of material from the spindles. This brings the camber back into spec with the longer a-arms.
Image

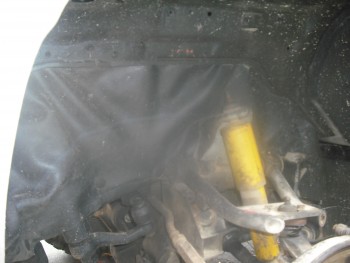
This is the static ride height
Image

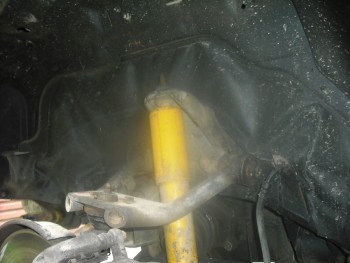
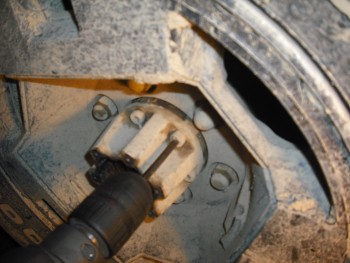
Also trimmed bumpstop to allow more uptravel
Image

Image
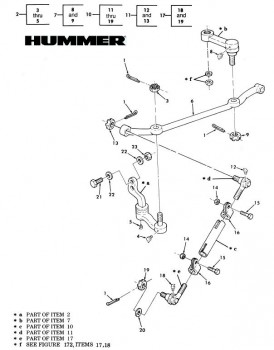
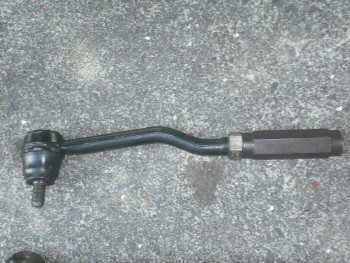
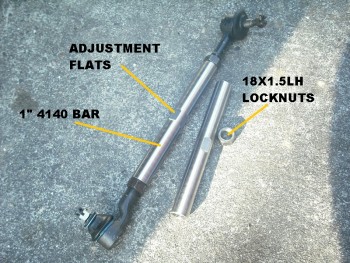
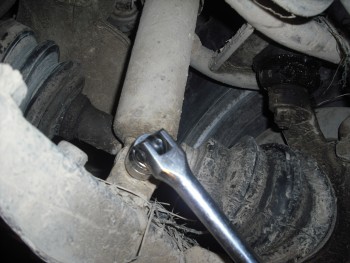
UCA bolt dimensions are M14x1.5x50

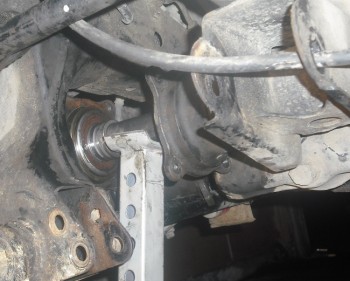
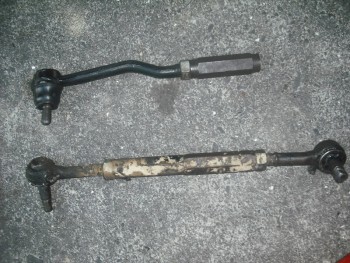
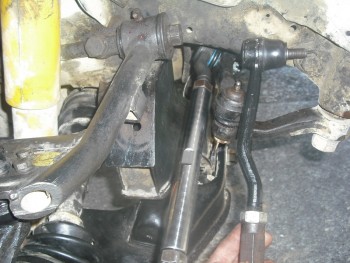
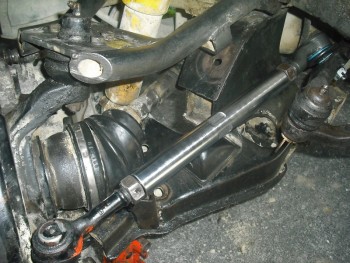
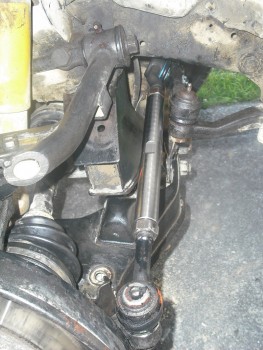
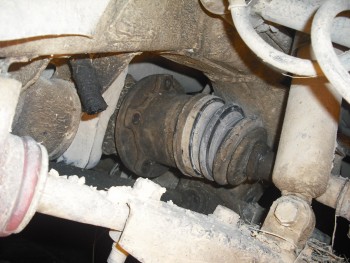
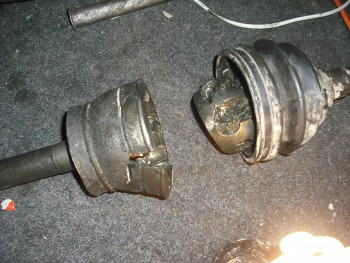
I have also done the 'bearing race mod' on the compression rods. I read about this on the 4x4parts forums.I like the LCA design for strength reasons because it sort of triangulates the control arm, but after well over 300,000kms, the bushing cups had disintegrated. They're not strong enough anyway.
Image

Image
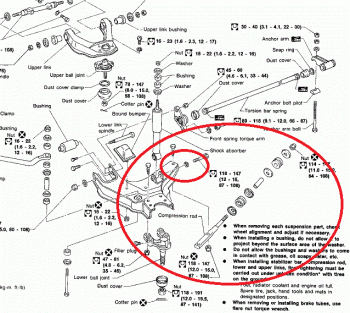
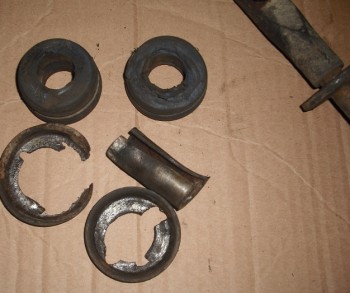
I stared at it for a while and realised that how hard these things have to work in locating the the control arm and acting as a toe pivot point. Once the bushing cups flog out, the bushing is no longer located and the whole assembly is free to flop around the 27mm factory hole that it passes through. This leads to sloppy toe-in/out under high torque loads offroad, and also caster changes on road under braking/accel. as the whole control arm tries to shift fore/aft. It could also result in the rod failing completely if you did a jump etc.

Image
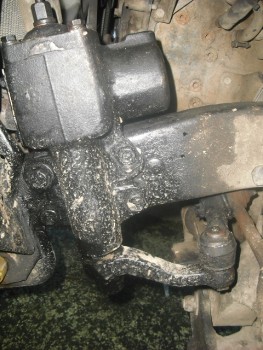
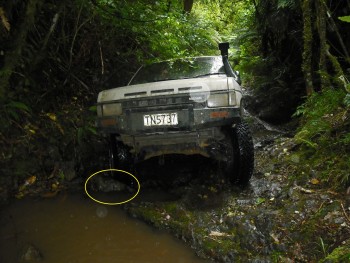
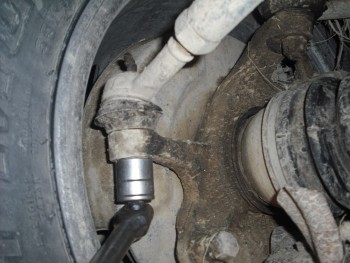
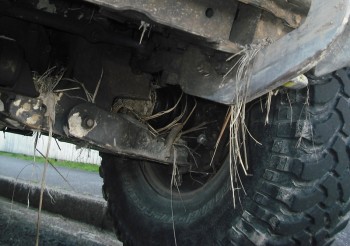
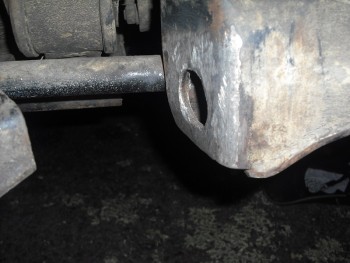
Here is where it had started to contact the hole and rub away material
Image

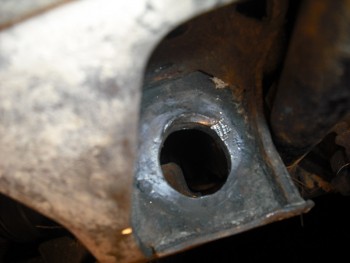
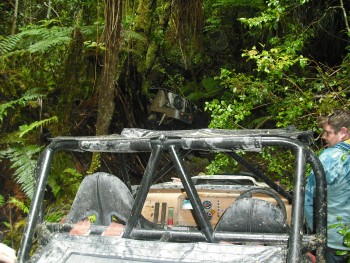
According to the manual there should be 2mm of free space around the bushing sleeve once its all installed. ie the sleeve should never really touch the hole if the bushing is located correctly.The hole was slightly deformed on one side so I opened it up a small amount. Note the carnage to the bracket from pivoting on a rock on the river. I just straightened it with a crowbar and BFH.
Image

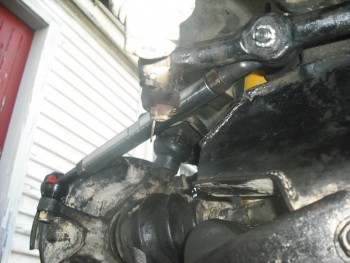
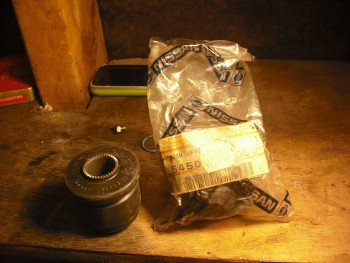
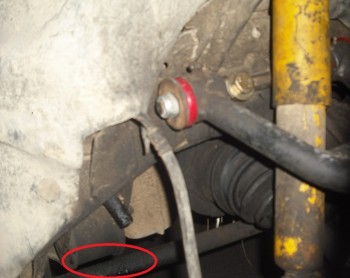
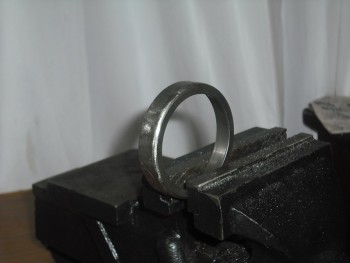
Then I went to visit Ants (fullthrottle) who blazed on these bearing races on both the front and back of the holes. Part number is LM67010, it is an easily available trailer wheel bearing race with keeps them seated perfectly snug. To do it properly, four are needed (2 per side of the vehicle). We also added some washers to the front side, just because there were there any we could. :lol: Thinking about it more, maybe we should have put the washers on the reverse side. I might be (am) crazy but I think it will have changed the caster angle by putting the washers on the front side. Meh.. who gives a shist, more beef is better :lol:
Image
Image
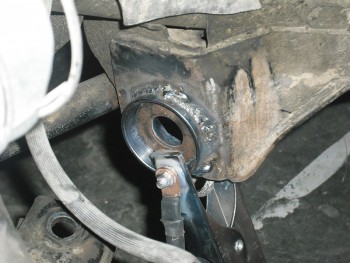
Now the bushings are not moving anywhere.

I'm quite interested to see how far I can go with this so next I will be playing around with some air shocks, independently charged but also with a valve so that they can share the same air supply when needed. I saw this on the 4x4wire forum. I think I have found an air shock that is the same dimensions as the standard front shock. The idea here is that the linked shocks will a) support a small portion of the vehicle weight, to allow the ride height (torsion preload) to be reduced even further, b) allow for easily levelling if needed, and c) sort of create a lever action similar to a live axle. ie when as one wheel compresses it transfers all the air to the opposite side to encourage it to extend as much as possible. However Obviously in some situations you don't want this for stability/safety reasons, hence the valve.

Ultimately I think it would be awesome to do a coilover and get rid of the torsions altogether. I think the lower control arm would be up to the job, since on the Nissan design it already acts as the lever arm for the torsion spring. Obviously a new upper mount would need to be designed and fabricated. And In terms of packaging, it looks like there might be enough space. I was looking at the Gen 3 Pajero IFS.
Image
It would be cool to find a donor coilover and do some measurements. The only difficulty I see would be adjusting ride height (camber). And Finding the right spring rate would be trial and error. Interesting food for thought though...
ChurchurDan
Hard Yaka
Posts: 574
Joined: Sun May 12, 2013 7:49 pm
Location: North Canterbury

Re: Toughening up Terrano WD21 Front End

Post by ChurchurDan »

Nice work.
I put some 3 door bars in my Navaro as with the Navara cab the 5 door bars where far to harsh. I also set the wheel in the middle of its travel and it is so plush to drive on rough road but the ride height is a bit low. It is a big compromise with IFS between function of suspension movement and ride height.
Trench_rat
Hard Yaka
Posts: 147
Joined: Thu Jul 29, 2010 9:01 pm

Re: Toughening up Terrano WD21 Front End

Post by Trench_rat »

nice work 8) my lca bushes are also completely rooted , the bearing race idea is perfect
fullthrottle
Shuttle Queen
Posts: 672
Joined: Tue Jun 28, 2011 3:18 pm
Location: Welly

Re: Toughening up Terrano WD21 Front End

Post by fullthrottle »

Looks good, if I do say so myself.
Yeah you could probably through another washer on the backside, if you want to, then also insert another sleeve to compensate for the extra meat you have just added and stop too much additional compression on the bushes.

I've been following these guys on facebook and their build projects.

http://camburg.com/suspension-systems/

Some really nice work. With all the IFS systems out there, someone is seriously applying some good technology to these setups.
slidenyo
Hard Yaka
Posts: 714
Joined: Sat Feb 09, 2008 1:24 pm
Location: Hamz remotely on topic

Re: Toughening up Terrano WD21 Front End

Post by slidenyo »

unsure why you would rather cast over tube links,
cast isn't very ductile and will quite often shatter with a decent hit (like rock to link)
its also going to need preheat and controlled cooling to weld back together (near impossible trail fix)
I'd stick to the tube ones and brace them with some angle if you're concerned (you can beat it straight out there if you bend it)
problems are only a problem if you not willing to learn how to find solutions
User avatar
lax2wlg
Hard Yaka
Posts: 1437
Joined: Sat May 12, 2012 8:33 pm
Location: Various areas

Re: Toughening up Terrano WD21 Front End

Post by lax2wlg »

Those are some good points Jase.
I don't know exactly.... the tube type links are the same diameter as the Safari ones and really quite undersized IMO. I've bent a tube type one without too much effort. It seems that the I-Beam cast ones take a lot more carnage. eg. there are grazes and marks on them from landing on rocks. However I have a spare cast one too, it is quite heavy but I might start carrying it on trips just in case. :D

Also thanks for the feedback dan,fullthrottle and trenchrat :wink:
slidenyo
Hard Yaka
Posts: 714
Joined: Sat Feb 09, 2008 1:24 pm
Location: Hamz remotely on topic

Re: Toughening up Terrano WD21 Front End

Post by slidenyo »

yeah I'd suggest that's a great idea,
some very good work by yourself in here.
perhaps a subthread could be created to capture such mods that are terrano/patrol/navara specific,
otherwise things seem to get lost once the conversation goes off the boil
problems are only a problem if you not willing to learn how to find solutions
ChurchurDan
Hard Yaka
Posts: 574
Joined: Sun May 12, 2013 7:49 pm
Location: North Canterbury

Re: Toughening up Terrano WD21 Front End

Post by ChurchurDan »

Have you seen this stuff before? Have a look in the fenderwell pics for some coil over porn.
http://www.chaosfab.com/kitpage01.php?id=91440
User avatar
hamboy
Hard Yaka
Posts: 286
Joined: Sun Aug 12, 2012 10:27 pm
Location: Blenheim

Re: Toughening up Terrano WD21 Front End

Post by hamboy »

Something for you guys to chew on, this is my flex on approx. 2 1/2 inch lift, no sway bars, hard on the bumpstops front right and left rear
IMG_0545.JPG

Didn't have a chance to get a pic from the other side
User avatar
lax2wlg
Hard Yaka
Posts: 1437
Joined: Sat May 12, 2012 8:33 pm
Location: Various areas

Re: Toughening up Terrano WD21 Front End

Post by lax2wlg »

Unfortunately I havent been able to play with the air shocks idea. I was at a cross roads because I realised that the only way to knock this setup out of alignment is if the torsion springs fatigue/sag. Mine are 28 years old with over 300,000km, and after a heavy rodgering they will sometimes sag a bit. I also read that 'even the slightest surface imperfection can drastically affect spring performance.' Mine are covered in deep gouges and grazes from sliding over rocks. They dont seem to fail but they do sag with age.

The problem is that there are no 'soft' aftermarket torsion bars available. They are all much thicker than the OEM 2-door torsion bars and therefore stiffer. The Nissan 2-door torsions work very well off road but the price for new ones is silly. ie you could go down the coil-over path for similar money. Hence the air shocks idea as a way of keeping the existing torsions and supplementing them with air assist. But then that adds complications in itself, and you are relying on air lines to provide some spring pressure. Also as it turns out I might be shipping out to JP early next year, in which case I would probably have to part the whole truck out anyway :cry:

I was getting it WOFable though. A while back I had a spare 40 hours so did some carnage repair and new coats of paint.
Image
Image
Image
Image
Image

Then replaced the shitbox Nolethane upper arm bushings with OEM Nissan. They are deformable high quality vulcanised rubber. I am confident that they will never need to be changed again. I pressed them in using my genuine Hi-Lift jack.
Image

The factory service manual says to use dishsoap when pressing them in. So thats what I did, I gave them a soapy massage with glorious ending.
Image

A while back I scored two BFGoodrich 33x9.5s KMs. True 33", rare and no longer in production in this size. Its the real early original design with no rim protector of sidewall lugs. These things are probably the best mod I've done to the front end.
Image
Some may think they look gay and too skinny. They seem pretty similar to a 7.50x16.

They are so light and narrow (mounted on 15x7 alloy with deep backspacing) that not only is the service life of front end parts multiplied by about a million times, but the on road handling/stability/control is razor sharp compared to the 33x10.5s. The reduced weight/width is felt directly through the steering wheel.
Image
Off road they seem to work really well for the size/weight of the vehicle. They dig right down and find the bottom. In some terrain I think that the greater static clearance of the IFS crossmember helps a lot here, in functioning as sort of a skid to drag the vehicle through obstacles. In ruts I have noticed that this dragging ability is useful for offsetting the poor clearance of the Safari rear diff. ie theoretically its hung up on the rear diff (and should be immobile) but there is enough clearance and traction in the front to maintain maintain forward progress.
Including the GPS Theft Tracking system.
TOYOTA - The Official Vehicle of ISIS!
And makers of the '92 Camry, where you got your first backseat handjob.
User avatar
lax2wlg
Hard Yaka
Posts: 1437
Joined: Sat May 12, 2012 8:33 pm
Location: Various areas

Re: Toughening up Terrano WD21 Front End

Post by lax2wlg »

Rear end got hung up majorly again and an outer CV let go trying to dislodge it and bump it over a ledge. Too much steering angle, good solid throttle jab and the only tyre with traction.

Image

Image

The McCready crawler and Weeds' Rover 4.6 powered trials truck helped me out
Image
Image

Look at the clearance on that thing!

I think for a 33" tyre and a vehicle that weighs under 2 ton, the Nissan H233B rear axle is not only unnecessary, but also provides really poor clearance. The next thing I would do is install a C200 8" rear. This gives a lot more clearance and could be setup with a 4-pin Lockrite centre and 4.88s. Then I would be running 8" diffs front and rear. Ironically, originally being a 1988 non turbo poverty pack model, this truck already came with a C200 rear.
Image

Anyway, if the lower A-arm is flat enough, you can change the CV pretty quickly.

These 5 bolts - remove them (12mm)
Image
Remove Hub
Image

Unbolt outer tie rod and belt the knuckle with a hammer, push it out the way
Image

Remove the shock
Image

Jack it up from the base of the control arm.Try to keep the a-arm angle as flat as possible so the outer CV doesnt foul on the shock mount with its pulled out.
Image

Push the wheel as far in as it will go. With some jiggling and plunging it will come out. Pull the inner section out first.
Image

Then just grab the spare CV from the trail spares and do the reverse.

Heres the carnage - broken cage and broken outer bell. The Stub shaft, halfshaft and inner ball/cage CV joint were all undamaged.
Image
TOYOTA - The Official Vehicle of ISIS!
And makers of the '92 Camry, where you got your first backseat handjob.
User avatar
hamboy
Hard Yaka
Posts: 286
Joined: Sun Aug 12, 2012 10:27 pm
Location: Blenheim

Re: Toughening up Terrano WD21 Front End

Post by hamboy »

Jeez, anyone would think you getting rough mate :lol: :lol: . Good to see it out there getting used though,(unlike mine). By the way, if you end up parting out the masterpiece, you know where to find me :mrgreen: :lol:
Post Reply

Return to “Nissan”