Awesome! If I can't work on mine atleast being able to watch someone else get thiers done is good.
And thanks for the yard offer. I might need somewhere just to leave it while I sort a garage.
Checkerheads new project.

Re: Checkerheads new project.
shortylux wrote:I have planned it just to use an external pump. No lift pump as I have built a 2.5 litre sump on the bottom of my tank. I did look at internals but it all looked to hard (when I can easily have a gravity feed surge tank).
I like the idea of a quiet, cool and clean internal pump though. Damn it.
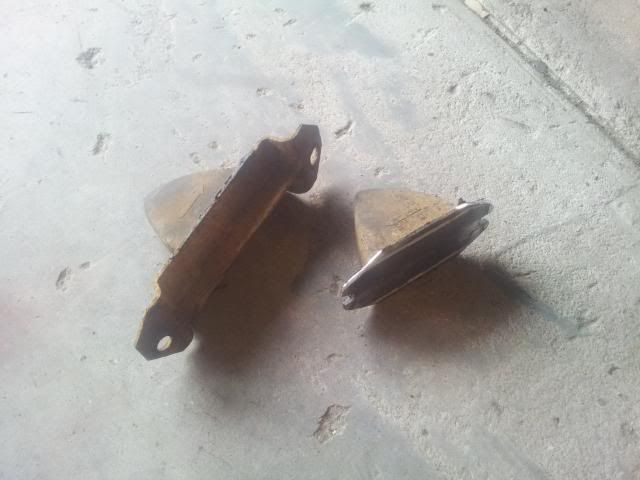
FYI
I use an 044 Bosch pump with a 2.5l sump in the bottom of my 100 liter tank and 10mm fuel line. Good for about 500kw so you'll be fine.
Upon saying that I've made the tank to suit twin 044 pumps and have the provision for twin 10mm fuel lines but that is more for redundancy than need.
Nissan Terrano coilovers, turboed VH45, Safari axles, and some other stuff.
Re: Checkerheads new project.
Awesome. That is reassuring. I have also set up so I can either run twin pumps or parallel filters. Again for redundancy more than actually any need
But it was all a guess based on dead recoking. Good to hear someone who is successfully running it. Thanks.
But it was all a guess based on dead recoking. Good to hear someone who is successfully running it. Thanks.
Re: Checkerheads new project.
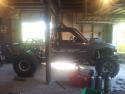
So. Lots of stuff going on with my move to Christchurch and sorting out uni. The main thing was to get the truck transportable, and then to sort transporting it and then put as much of it together as possible.
I didn't know if it was going to Tauranga (my parents) for storage or to Chch with me. Either way it needed the tray started so that I could store/transport stuff on it and also to use up some steel.

Got the boys around for a Hell and Woodstock fueled working bee.
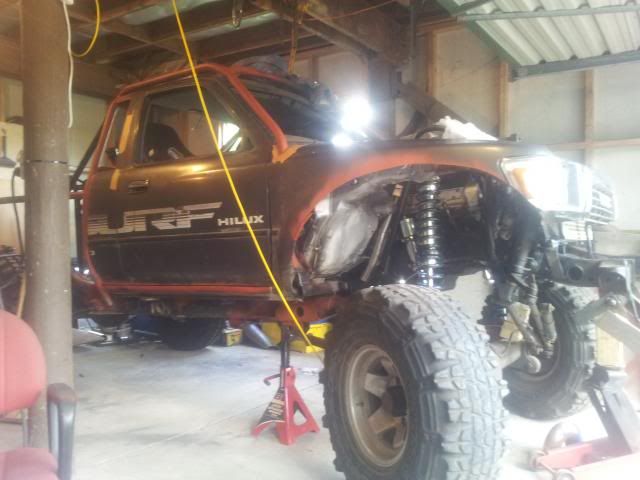
After a couple of days it was looking like this.
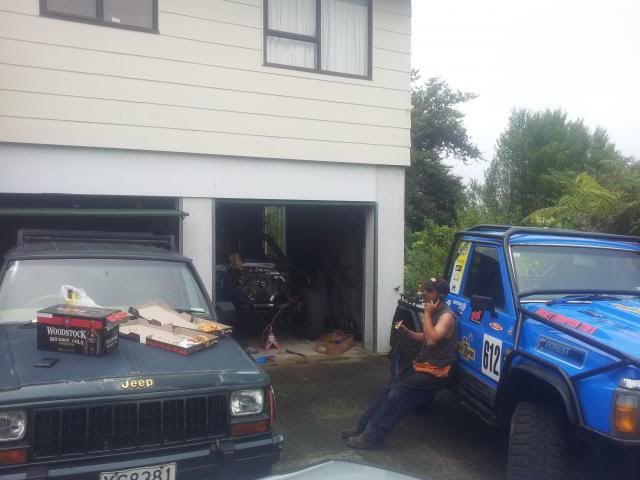
Decision was made to A frame it behind the Jeep. So I added a temporary and Ghetto transcooler and spaced up the rear of the bonnet to help it stay cool. Had previously removed the aircon condensor which will have helped as well. I hind sight I would put the transcooler infront of the rad as the engine kept it's cool but the trans did get a bit hot a couple of times. At the time though I didn't want to lose any engine air flow.
Also turned a Surf bumpstop into a Jeep bumpstop as the Jeep one had lost it's rubber and I knew it would be loaded to the gunnels for the trip down.
Then ordered some springs for 4wdbits as I needed something for it to sit on for the trip down. Again Warren was nothing short of awesome to deal with.
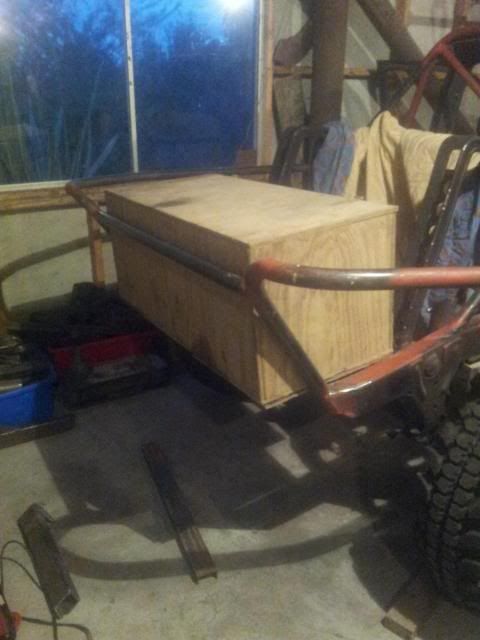
Welded another (hopefully permanent) bar into the tray and a temporary bit of plate for a wooden box to sit on so I could load it up for the trip down.

Taped and welded a bit more and bonnet/glass etc were all secure.

Then got my Jed Clampit/Mad Max on and welded my workbench and a trolley on, as well as some bits to stand my bike on. Also built the A Frame and used a braked trailer coupling. Plumbed the rear brakes to the coupling.
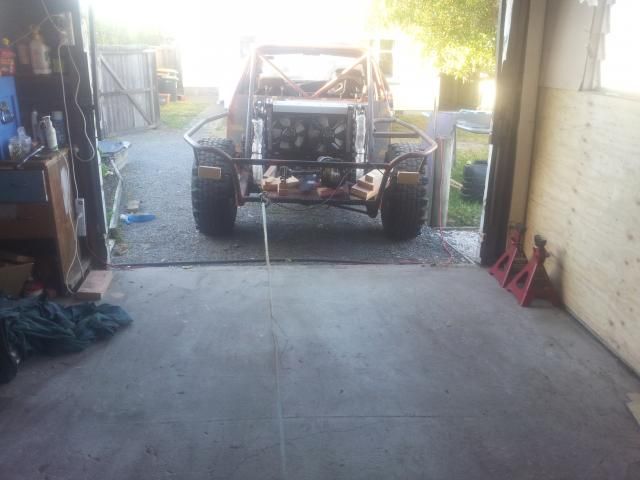
Hauled everything down to Chch. Not without incident, but nothing major.
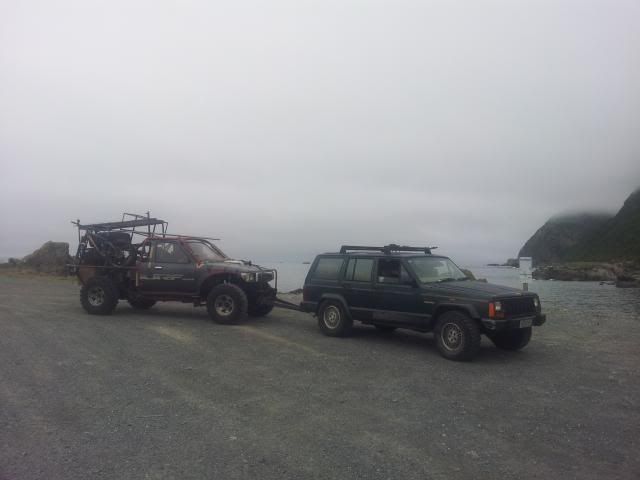
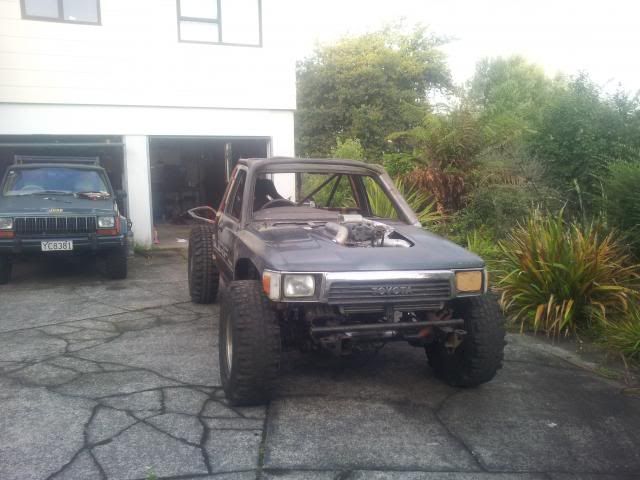
And finally she is in her new home.
Progress from now on will be even slower, but there still should be progress.
Cheers.
I didn't know if it was going to Tauranga (my parents) for storage or to Chch with me. Either way it needed the tray started so that I could store/transport stuff on it and also to use up some steel.

Got the boys around for a Hell and Woodstock fueled working bee.

After a couple of days it was looking like this.

Decision was made to A frame it behind the Jeep. So I added a temporary and Ghetto transcooler and spaced up the rear of the bonnet to help it stay cool. Had previously removed the aircon condensor which will have helped as well. I hind sight I would put the transcooler infront of the rad as the engine kept it's cool but the trans did get a bit hot a couple of times. At the time though I didn't want to lose any engine air flow.

Also turned a Surf bumpstop into a Jeep bumpstop as the Jeep one had lost it's rubber and I knew it would be loaded to the gunnels for the trip down.

Then ordered some springs for 4wdbits as I needed something for it to sit on for the trip down. Again Warren was nothing short of awesome to deal with.

Welded another (hopefully permanent) bar into the tray and a temporary bit of plate for a wooden box to sit on so I could load it up for the trip down.


Taped and welded a bit more and bonnet/glass etc were all secure.

Then got my Jed Clampit/Mad Max on and welded my workbench and a trolley on, as well as some bits to stand my bike on. Also built the A Frame and used a braked trailer coupling. Plumbed the rear brakes to the coupling.
Hauled everything down to Chch. Not without incident, but nothing major.

And finally she is in her new home.

Progress from now on will be even slower, but there still should be progress.
Cheers.
Re: Checkerheads new project.
Successful mission man!
-
tomsoffroad

- Flopsie
- Posts: 2445
- Joined: Wed Apr 28, 2004 12:00 pm
- Location: North Canterbury
Re: Checkerheads new project.
Wow what a mission. Welcome to the mainland brother 

Re: Checkerheads new project.
good work fella.
Ugly is a state of mind..... and the state of my truck!
Re: Checkerheads new project.
tomsoffroad wrote:Wow what a mission. Welcome to the mainland brother
Indeed..
-
catalystracing
- Hard Yaka
- Posts: 820
- Joined: Sat Dec 11, 2010 8:14 am
- Location: within the matrix
Re: Checkerheads new project.
You may have slow progress, but that will still be more than some projects on here.... 


Re: Checkerheads new project.
Thats why there called projects if it has to be done in a month its a job.
-
Checkerhead

- Hard Yaka
- Posts: 463
- Joined: Sun May 25, 2014 11:20 pm
- Location: Christchurch
Re: Checkerheads new project.
I would love to have a little more to update here. But this tiny bit is better than nothing.
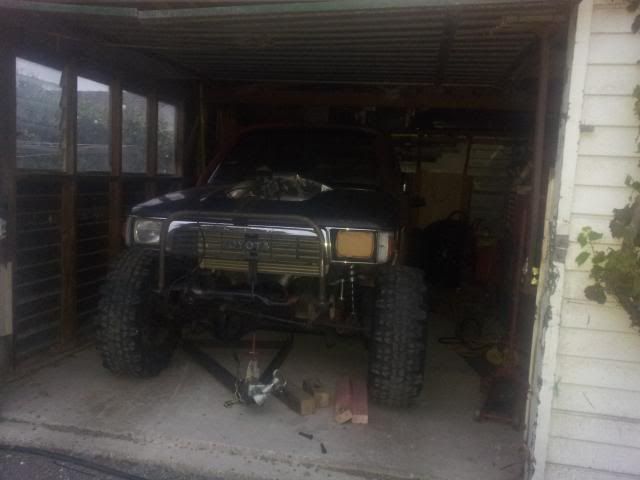
My garage is pretty small. It also has a about a 2" lip to get up into it and the gravel out side is a downward sloping driveway. As such, I can't roll my truck outside to work on things or temporarily create more space inside (obviously I could roll it out but the truck doesn't go so getting it back in required messing around with a jack and bits of wood). So I made this. It's crude, but will do the trick.
Have been making tiny bits of progress on other things. Nothing pic worthy though.
After a few dead ends trying to get some VH45 runners I have come up with a game plan to modify my existing runners. One day I will get it on a dyno and see if it was a bad idea or not. Anyway, got get it running first.
My garage is pretty small. It also has a about a 2" lip to get up into it and the gravel out side is a downward sloping driveway. As such, I can't roll my truck outside to work on things or temporarily create more space inside (obviously I could roll it out but the truck doesn't go so getting it back in required messing around with a jack and bits of wood). So I made this. It's crude, but will do the trick.


Have been making tiny bits of progress on other things. Nothing pic worthy though.
After a few dead ends trying to get some VH45 runners I have come up with a game plan to modify my existing runners. One day I will get it on a dyno and see if it was a bad idea or not. Anyway, got get it running first.
Supercharged VH45 Surf safari winch truck in the making
viewtopic.php?f=18&t=33527&hilit=checker%2A
viewtopic.php?f=18&t=33527&hilit=checker%2A
-
Checkerhead
- Hard Yaka
- Posts: 463
- Joined: Sun May 25, 2014 11:20 pm
- Location: Christchurch
Re: Checkerheads new project.

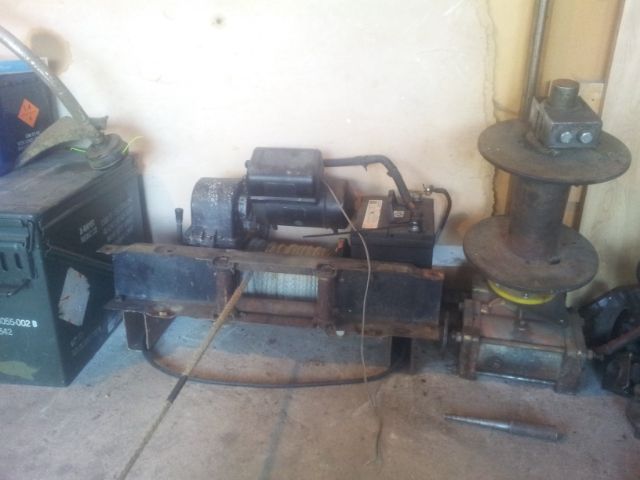
No welds yet, but it's the start of a drum.
Supercharged VH45 Surf safari winch truck in the making
viewtopic.php?f=18&t=33527&hilit=checker%2A
viewtopic.php?f=18&t=33527&hilit=checker%2A
-
Checkerhead
- Hard Yaka
- Posts: 463
- Joined: Sun May 25, 2014 11:20 pm
- Location: Christchurch
Re: Checkerheads new project.
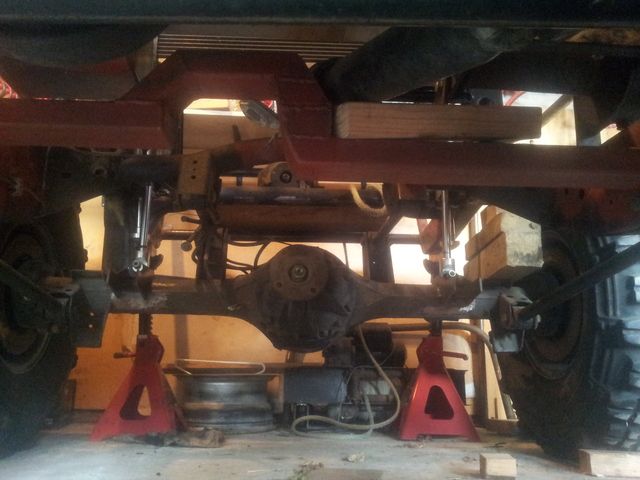
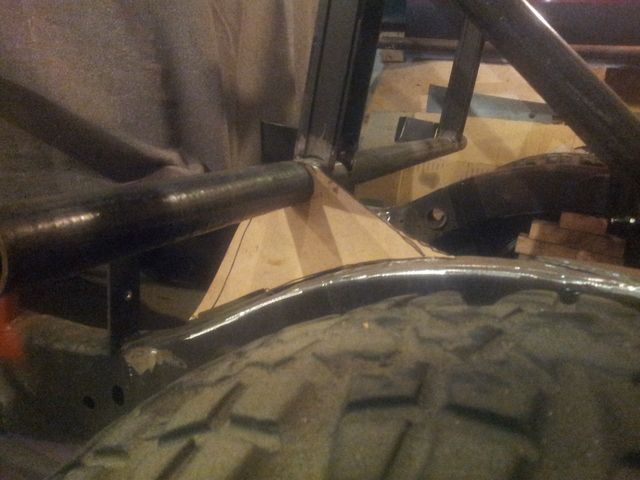
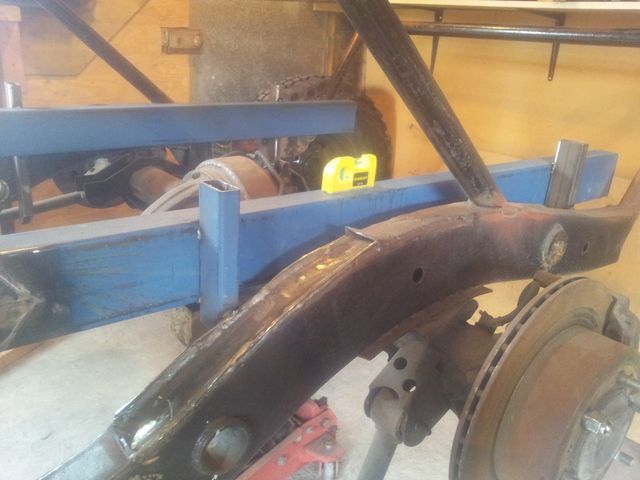
So that winch above needs a place to live (when it's done). And in figuring out where exactly it was going, how the drive shaft would get to it and where the rope would run, I spent a lot of time looking at this dumb crossmember and the small gap between it and my radiator. (sorry bad pic)
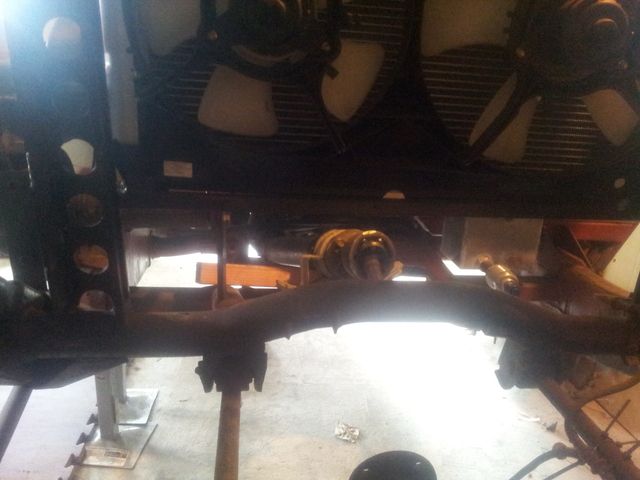
This is the same view with the radiator out. (again, real bad lighting sorry)
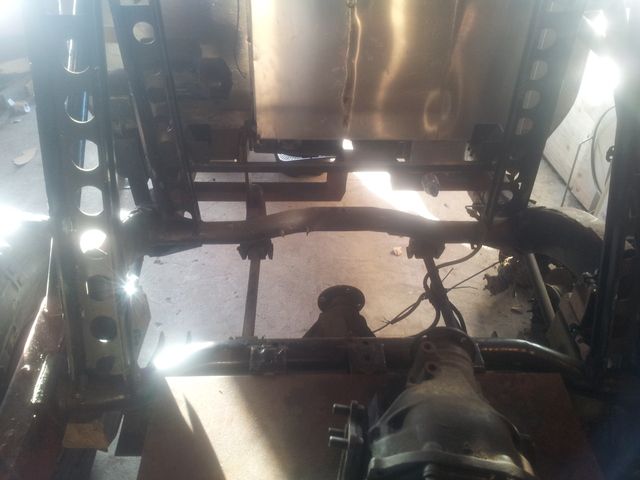
Specifically I didn't like that the cross member was only doing one job (being a cross member). I guess it held my shock mounts, but since building the shock hoops I have changed tac and solid mounted the cab. Hence the shock hoops are half useless/unnecessary now. Add to that, the red RHS cross member in front of it is also semi useless since the cab is now solid mounted and there is a 50mm RHS crossmember running through the rear bottom corner of the cab. Also the red cross member had been beaten way to many times with the ugly stick during fabrication as a result of a few slight changes of plan for different winch positions and rope lines etc.
A better view of said ugly useless crossmember looking rearward from under the truck
 .
.
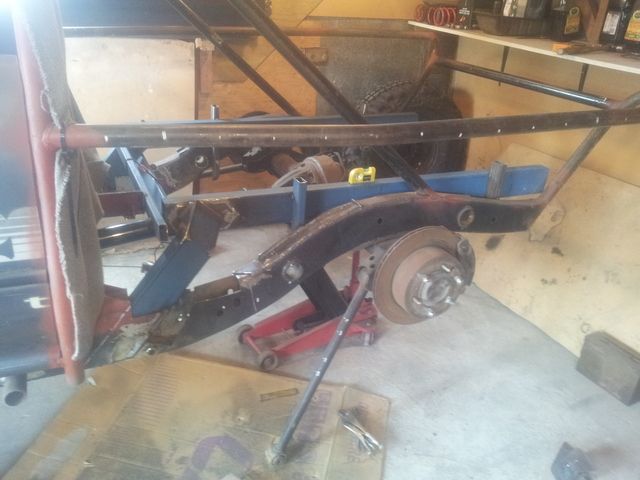
The killing blow was that I measured up and did some maths for a four link (better part of two days planning) and decided that both of those cross members did nothing for me. So out with the old.
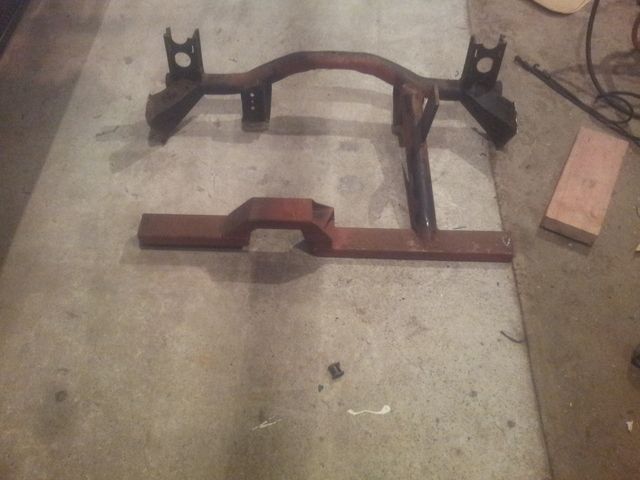
And in with the new.
Now to mount the tube to the chassis.
Not at all finished, but you get the idea. Outer plate will come off and get trimmed better. Then tacked in place. Then the Flat bar will come off so that the outside plate can get a full weld up the inside. Then obviously Flat bar goes back on and gets fully welded. Repeat the whole process for the drivers side.
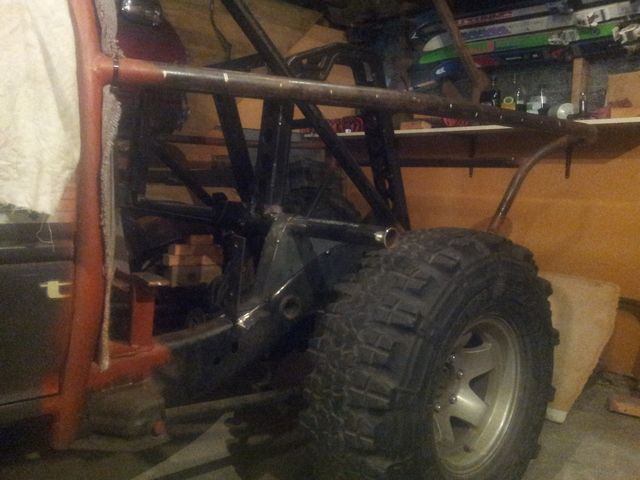
This new cross member will get further bracing in the form of a pipe directly down from the rear stays. This crossmember now mounts the shock hoops, is the lower radiator support and will eventually have the swaybar run through the guts of it.

This is the same view with the radiator out. (again, real bad lighting sorry)

Specifically I didn't like that the cross member was only doing one job (being a cross member). I guess it held my shock mounts, but since building the shock hoops I have changed tac and solid mounted the cab. Hence the shock hoops are half useless/unnecessary now. Add to that, the red RHS cross member in front of it is also semi useless since the cab is now solid mounted and there is a 50mm RHS crossmember running through the rear bottom corner of the cab. Also the red cross member had been beaten way to many times with the ugly stick during fabrication as a result of a few slight changes of plan for different winch positions and rope lines etc.
A better view of said ugly useless crossmember looking rearward from under the truck
 .
. The killing blow was that I measured up and did some maths for a four link (better part of two days planning) and decided that both of those cross members did nothing for me. So out with the old.

And in with the new.


Now to mount the tube to the chassis.

Not at all finished, but you get the idea. Outer plate will come off and get trimmed better. Then tacked in place. Then the Flat bar will come off so that the outside plate can get a full weld up the inside. Then obviously Flat bar goes back on and gets fully welded. Repeat the whole process for the drivers side.

This new cross member will get further bracing in the form of a pipe directly down from the rear stays. This crossmember now mounts the shock hoops, is the lower radiator support and will eventually have the swaybar run through the guts of it.
Supercharged VH45 Surf safari winch truck in the making
viewtopic.php?f=18&t=33527&hilit=checker%2A
viewtopic.php?f=18&t=33527&hilit=checker%2A
Re: Checkerheads new project.
love the evolution.... some days its easier to just start again lol
-
Checkerhead
- Hard Yaka
- Posts: 463
- Joined: Sun May 25, 2014 11:20 pm
- Location: Christchurch
Re: Checkerheads new project.
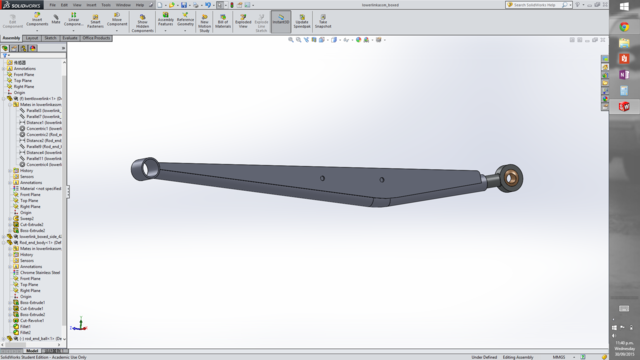
Tiny bit of virtual progress to show the tangent that my build is potentially taking.

Supercharged VH45 Surf safari winch truck in the making
viewtopic.php?f=18&t=33527&hilit=checker%2A
viewtopic.php?f=18&t=33527&hilit=checker%2A
Re: Checkerheads new project.
Keep it up fella more then what ive done to mine 
The_wehi@hotmail.com
(027 788 1046)
pzj70,35's,Lockers,Winch and some stickers for added flex.
^^Soon to be on safari axles and 5.13's, 37's linked front and rear^^
Ln60 project (money pit) <-- Sold
Pzj77 Turbo/auto,33's .
(027 788 1046)
pzj70,35's,Lockers,Winch and some stickers for added flex.
^^Soon to be on safari axles and 5.13's, 37's linked front and rear^^
Ln60 project (money pit) <-- Sold
Pzj77 Turbo/auto,33's .

Re: Checkerheads new project.
Checkerhead wrote:Tiny bit of virtual progress to show the tangent that my build is potentially taking.
Talk to Darinz about his, they have been well tested and through cert. You should talk to him about the bomb proof front arms, they have proven to be stronger than a diff housing
Toy - Zuk chassis tub, hilux 4.88 axles and transfer, Nissan CA18DE motor and auto trans, sc12 supercharger, 32 10'5 simex, twin motor 8274 custom freespool. Well the parts are all there in various corners of the shed
Re: Checkerheads new project.
nothing to do with nz1000 is it
-
Checkerhead
- Hard Yaka
- Posts: 463
- Joined: Sun May 25, 2014 11:20 pm
- Location: Christchurch
Re: Checkerheads new project.
The intention for this truck from the beginning has been an offroad-racey winch truck. But this suspension development is more a "if I'm doing this I might as well do that, and then I might as well do that as well" type of progression. It may yet not happen, but I will draw a few pictures and see if I can make it work to my satisfaction.
Supercharged VH45 Surf safari winch truck in the making
viewtopic.php?f=18&t=33527&hilit=checker%2A
viewtopic.php?f=18&t=33527&hilit=checker%2A
-
Checkerhead
- Hard Yaka
- Posts: 463
- Joined: Sun May 25, 2014 11:20 pm
- Location: Christchurch
Re: Checkerheads new project.
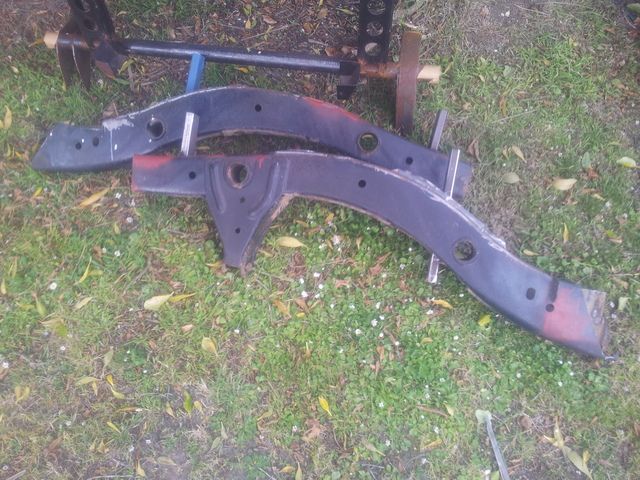
Well, I got this far.

Then I had a further change of heart, and taking De-Rangeds advice maybe a bit too far.
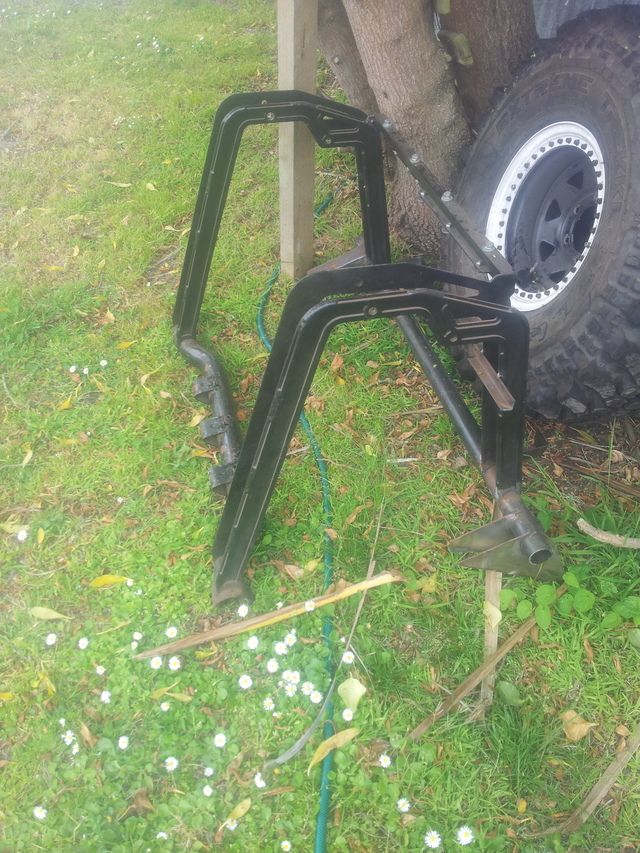
Then I built some more so that I could chop some more off.
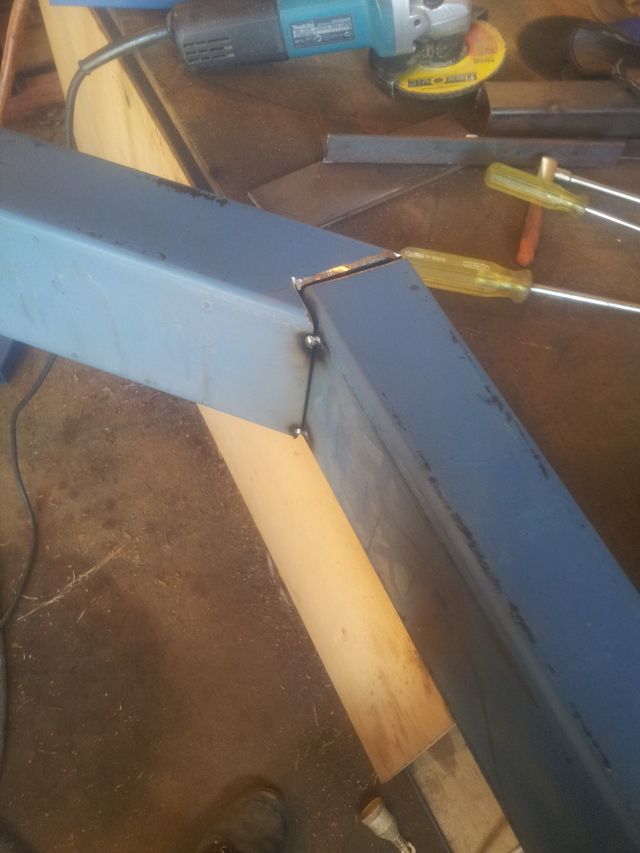
Cut this funny shape into some 110x50x3 RHS.
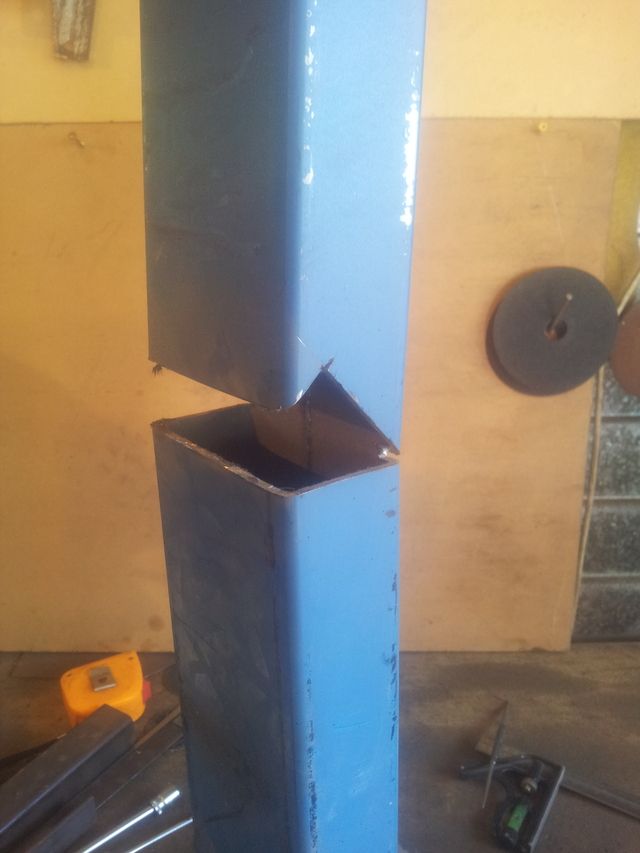
So that I could bend and weld it like this.
Hopefully tonight I will have another wee update.

Then I had a further change of heart, and taking De-Rangeds advice maybe a bit too far.
I removed the new cross member, the shock towers, and a factory cross member.De-Ranged wrote:.... some days its easier to just start again lol

Then I built some more so that I could chop some more off.
Cut this funny shape into some 110x50x3 RHS.

So that I could bend and weld it like this.

Hopefully tonight I will have another wee update.
Supercharged VH45 Surf safari winch truck in the making
viewtopic.php?f=18&t=33527&hilit=checker%2A
viewtopic.php?f=18&t=33527&hilit=checker%2A
-
Checkerhead
- Hard Yaka
- Posts: 463
- Joined: Sun May 25, 2014 11:20 pm
- Location: Christchurch
Re: Checkerheads new project.
Welded some 40x6 strips to a couple of 100x50 RHS lengths to give it some guts where I plan to weld to it. In hind sight I doubt I needed it, oh well, truck is heavier now.
Then tacked some 50x25 RHS to the chassis and used these to help align and hold the lengths of 100X50.
After much measuring, tacking and cutting, measuring again, angle finding, hitting, leveling etc I got to this point where every thing seemed to match on both sides and appears that it will fit around the fuel tank, shocks etc.
Side note.
I have yet to find any rust in this chassis. That doesn't mean that there wasn't an inch of dirt inside. It appears that the crush tube for the lower suspension link mostly caught the dirt as there wasn't too much dirt past that point.
Next it was time to add these to the scrap heap.
So this is where I'm up to now.
It looks ugly, but this is how it will stay while I sort out exactly where and how the four links will mount and suss out the coilover mount. I will add extra gusseting to strengthen and (most importantly) make it not look like a dogs breakfast. These new taller narrower chassis rails allow me to out board the shocks and springs which should help with stability. It also allows the lower link to mount on the inside of the chassis rail, which improves roll geometry as well as not messing with my water pipes (drivers side) or future exhaust (passengers side) which both run outside the chassis.
Next on the list is clean up the axle and move some mounts around. Build some dummy links and see how every thing moves. Then build real links and figure out the shock mounting.
Question.
I am considering mounting the radiator on the same angle as the rear stays. For mounting do I weld tabs to my alloy rad? or do I build some kind of clamp assembly?
I already had a clamp type set up, but it will need rethinking if I am to mount it on a 40 degree angle.

Then tacked some 50x25 RHS to the chassis and used these to help align and hold the lengths of 100X50.

After much measuring, tacking and cutting, measuring again, angle finding, hitting, leveling etc I got to this point where every thing seemed to match on both sides and appears that it will fit around the fuel tank, shocks etc.

Side note.
I have yet to find any rust in this chassis. That doesn't mean that there wasn't an inch of dirt inside. It appears that the crush tube for the lower suspension link mostly caught the dirt as there wasn't too much dirt past that point.

Next it was time to add these to the scrap heap.

So this is where I'm up to now.

It looks ugly, but this is how it will stay while I sort out exactly where and how the four links will mount and suss out the coilover mount. I will add extra gusseting to strengthen and (most importantly) make it not look like a dogs breakfast. These new taller narrower chassis rails allow me to out board the shocks and springs which should help with stability. It also allows the lower link to mount on the inside of the chassis rail, which improves roll geometry as well as not messing with my water pipes (drivers side) or future exhaust (passengers side) which both run outside the chassis.
Next on the list is clean up the axle and move some mounts around. Build some dummy links and see how every thing moves. Then build real links and figure out the shock mounting.
Question.
I am considering mounting the radiator on the same angle as the rear stays. For mounting do I weld tabs to my alloy rad? or do I build some kind of clamp assembly?
I already had a clamp type set up, but it will need rethinking if I am to mount it on a 40 degree angle.
Last edited by Checkerhead on Sun Nov 22, 2015 7:41 am, edited 1 time in total.
Supercharged VH45 Surf safari winch truck in the making
viewtopic.php?f=18&t=33527&hilit=checker%2A
viewtopic.php?f=18&t=33527&hilit=checker%2A
Re: Checkerheads new project.
Looks good fella (well you know what I mean ). Don't solid mount a rad onto anything that has the potential to have torsional twist or shear (ie your roll cage), especially if it is alloy. They like to have lots of isolation and don't like to twist in any way, shape or form. (ask me how I know).
Ugly is a state of mind..... and the state of my truck!
-
Checkerhead
- Hard Yaka
- Posts: 463
- Joined: Sun May 25, 2014 11:20 pm
- Location: Christchurch
Re: Checkerheads new project.
Sweet. Sounds like I will come up with some kind of clamp mount then.rokhound wrote: Don't solid mount a rad onto anything that has the potential to have torsional twist or shear (ie your roll cage), especially if it is alloy. They like to have lots of isolation and don't like to twist in any way, shape or form. (ask me how I know).
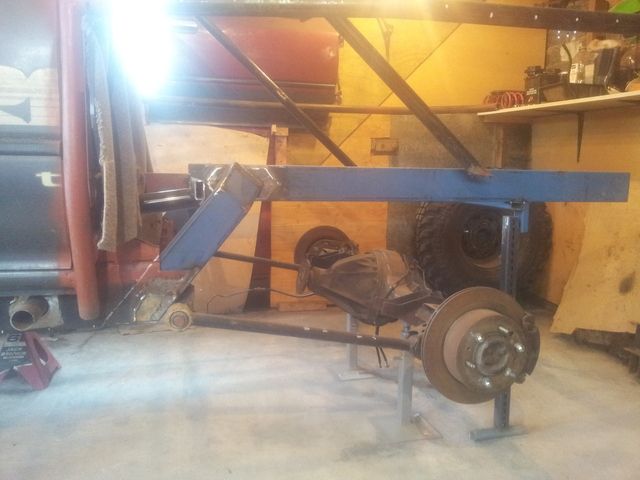
Worked today so not much progress. Started cleaning the diff. Those standard shock mounts sure hang down a long way (Not that you can really see it in the photo).

Now that I have chopped the old chassis out of the way I have been able to confirm a few measurement that I had been guessing at. This is about my millionth version of the geometry and I believe it to be the best compromise between suspension geometry, various clearances and what is achievable with out radical changes (if chopping you chassis in half isn't radical I guess).

With a little upper arm adjust-ability this will give me between 13% and 49% antisquat. The 1 degree roll axis is not ideal but I can live with it I think. In all position my antisquat rises as the suspension compresses (or extends). Worst case scenario I get about 12 degrees of pinion angle change over 560mm (22 inch) over travel. The 300mm (12 inch) of up travel is responsible for nearly 11 of those 12 degrees.
On that note, does anyone know what sort of drive angle (ie flange to flange) misalignment is acceptable in this sort of application?
EDIT. Just saw that the number are not very readable so here is a better pic (so you 4 link geeks can critique my decisions).

And just noticed that the second pic has the adjustable mount "moved" to the highest setting, which gives the lowest antisquat numbers.
Supercharged VH45 Surf safari winch truck in the making
viewtopic.php?f=18&t=33527&hilit=checker%2A
viewtopic.php?f=18&t=33527&hilit=checker%2A
Re: Checkerheads new project.
Hi Aaron,
Have you seen these flash trailing arms, good for ideas https://www.ruffstuffspecialties.com/catalog/R1760.html
Also are you using DOM tube or Schedule pipe, if DOM where are you getting in from.
And last question, what joints are you planning to use.
Cheers
Tim
Have you seen these flash trailing arms, good for ideas https://www.ruffstuffspecialties.com/catalog/R1760.html
Also are you using DOM tube or Schedule pipe, if DOM where are you getting in from.
And last question, what joints are you planning to use.
Cheers
Tim

Re: Checkerheads new project.
About UJ joint angle, I've just been through this with my truck. Basically stuff all deviation is acceptable. Page 12 was really helpful:
http://www2.dana.com/pdf/J3311-1-HVTSS.PDF
Let me know if you want me to work out your drive shaft RPM, just let me know your tyre diameter, diff ratio and max intended speed.
http://www2.dana.com/pdf/J3311-1-HVTSS.PDF
Let me know if you want me to work out your drive shaft RPM, just let me know your tyre diameter, diff ratio and max intended speed.
Re: Checkerheads new project.
Your uppers look to short, they wanna be around 80% of the length of the lowers. Should help with your pinion angle change. but mess with everything else
Toy - Zuk chassis tub, hilux 4.88 axles and transfer, Nissan CA18DE motor and auto trans, sc12 supercharger, 32 10'5 simex, twin motor 8274 custom freespool. Well the parts are all there in various corners of the shed
-
Checkerhead
- Hard Yaka
- Posts: 463
- Joined: Sun May 25, 2014 11:20 pm
- Location: Christchurch
Re: Checkerheads new project.
Yep, have done a bit of pondering using them. The seem like massive overkill for me, but I did reference how far below center they mounted their shocks.suzolla wrote:Hi Aaron,
Have you seen these flash trailing arms, good for ideas https://www.ruffstuffspecialties.com/catalog/R1760.html
NB32 Sch40 seamless tube is what I plan to use, though I also have some NB40 Sch40 that I might use.suzolla wrote:Also are you using DOM tube or Schedule pipe, if DOM where are you getting in from.
When you say DOM, do you mean chromoly DOM? If so you can get it from performance metals (or something like that) in Auckland. I don't plan on heat treating these links, hence chromoly has very little strength (and thus weight) advantage.
If you don't mean chromoly tube then isn't seamless Sch40 better? My understanding is that DOM is a finishing process and is just more flash version of ERW. Since I don't require the good finish or dimensional accuracy that DOM provides, I think I'm way better off with the Sch40.
Feel free to let me know if I'm missing something here.
In the long term I plan to use ruffstuff 1"1/4 rodends for the lower links, maybe a spherical bearing at the chassis end. For now while doing a "proof of concept" I will use a combination of safari genuine and Nolathane bushes. For the upper links I am using 3/4 rod ends (to give pinion angle adjustability) at one end and a genuine safari bush at the other.suzolla wrote:what joints are you planning to use?
If the above all performs well and works as planned, I would like to eventually build the lower links out of Chromoly and get it heat treated. But that's a long way off.
Supercharged VH45 Surf safari winch truck in the making
viewtopic.php?f=18&t=33527&hilit=checker%2A
viewtopic.php?f=18&t=33527&hilit=checker%2A
-
Checkerhead
- Hard Yaka
- Posts: 463
- Joined: Sun May 25, 2014 11:20 pm
- Location: Christchurch
Re: Checkerheads new project.
Thanks Dan. I have looked at that. My uppers are 27" lowers are 37.3". So uppers are 72% of the lowers length. If I pump them out to 80% the pinion angle is good but then my antisquat does things that I don't like under compression (like goes way negativemeatc wrote:Your uppers look to short, they wanna be around 80% of the length of the lowers. Should help with your pinion angle change.
My understanding is that there is a compromise to be made between a consistent pinion angle, and antisquat doing good things under compression or droop. I'm not sure where in this line I want to be, hence my question about acceptable pinion misalignment.
Supercharged VH45 Surf safari winch truck in the making
viewtopic.php?f=18&t=33527&hilit=checker%2A
viewtopic.php?f=18&t=33527&hilit=checker%2A
-
Checkerhead
- Hard Yaka
- Posts: 463
- Joined: Sun May 25, 2014 11:20 pm
- Location: Christchurch
Re: Checkerheads new project.
Thanks Churchill. Good link!churchill wrote:About UJ joint angle, I've just been through this with my truck. Basically stuff all deviation is acceptable. Page 12 was really helpful:.
Just had a quick read. If I understand it correctly the 12 degrees I'm talking about gets halved (because two UJ's take half each).
200kph on 35" tyres with a 4.1 diff gives me a touch under 4900 rpm at the driveshaft. So if I set my pinion at -3 degrees (with reference to the flange on the t-case) than that mean I will be at positive 8 degrees at full bump. Half of that is 4 degrees which according to your link allows me to run the drive shaft at 4000 rpm, or roughly 160 kph. For the tiny amount of time that I will be going over 160 kph and at full compression, I am prepared to accept an accelerated rate of wear on my UJ's.
I will have a more thorough read of that article in the next few evening to make sure I have the right end of the stick.
Thanks again, that appears to be relevant and helpful info.
Supercharged VH45 Surf safari winch truck in the making
viewtopic.php?f=18&t=33527&hilit=checker%2A
viewtopic.php?f=18&t=33527&hilit=checker%2A