Page 10 of 12
Re: D.B's Defender 110
Posted: Tue Oct 22, 2013 7:47 pm
by bang-thud-thump
Is this one ass hole resistant?
Hows the young fella?
Sweet truck as stated above too!
Re: D.B's Defender 110
Posted: Wed Oct 23, 2013 6:16 pm
by monaro427
the time frame you do things in is insane

Re: D.B's Defender 110
Posted: Wed Oct 23, 2013 10:16 pm
by MATT4U
epic.
Re: D.B's Defender 110
Posted: Thu Oct 24, 2013 9:42 am
by DieselBoy
Now I just gotta figure out how to insure it properly this time. If it had been a total loss I would have been screwed!!!!
AA served me really well, but I'm thinking I will hit up a broker
Re: D.B's Defender 110
Posted: Thu Oct 24, 2013 10:17 am
by De-Ranged
Just curious Pete why the down grade from the salisbry axle to a rover ?
You got trick parts in that axle ?
Nice work, got me thinking hard about doing something similar as a tow truck
Oh and recomend using a broker... they can also deal with claims
Re: D.B's Defender 110
Posted: Thu Oct 24, 2013 7:04 pm
by wjw
Looks good mate... can't believe you were allowed so much garage time..
A broker is a good idea, I know people talk about them a lot, but I've had great results with Barley insurance, we have everything through them now. John and Suzzane have been really helpful with all the insurance issues we have had due to the earthquakes. They have had long discussions on our behalf to ensure we could buy our current house, that has a major insurance claim on it.
Providing you know what you want, they will find a policy that fits.
Re: D.B's Defender 110
Posted: Thu Oct 24, 2013 7:13 pm
by Jerry
have had good dealings with john (and suzanne) barley
http://www.barley.co.nz, the specialist 4wd policy is good
they were good to deal with when i had to claim
Re: D.B's Defender 110
Posted: Fri Oct 25, 2013 8:09 pm
by MATT4U
DieselBoy wrote:Now I just gotta figure out how to insure it properly this time. If it had been a total loss I would have been screwed!!!!
AA served me really well, but I'm thinking I will hit up a broker
hit up FMG
Re: D.B's Defender 110
Posted: Fri Oct 25, 2013 8:55 pm
by nakimud
De-Ranged wrote:Just curious Pete why the down grade from the salisbry axle to a rover ?
You got trick parts in that axle ?
Nice work, got me thinking hard about doing something similar as a tow truck
Oh and recomend using a broker... they can also deal with claims
I was thinking the same! although those salisburys hang a fair bit lower than the rover axle
Re: D.B's Defender 110
Posted: Sat Oct 26, 2013 11:39 am
by KIWI_TERRANO
MATT4U wrote:DieselBoy wrote:Now I just gotta figure out how to insure it properly this time. If it had been a total loss I would have been screwed!!!!
AA served me really well, but I'm thinking I will hit up a broker
hit up FMG
2nd this have been really good to me, and the farms and dads trucking firm
Re: D.B's Defender 110
Posted: Sun Oct 27, 2013 11:42 am
by DieselBoy
Re: D.B's Defender 110
Posted: Sun Oct 27, 2013 12:59 pm
by mercutio
nakimud wrote:De-Ranged wrote:Just curious Pete why the down grade from the salisbry axle to a rover ?
You got trick parts in that axle ?
Nice work, got me thinking hard about doing something similar as a tow truck
Oh and recomend using a broker... they can also deal with claims
I was thinking the same! although those salisburys hang a fair bit lower than the rover axle
If you go back to this post Pete explains why he did it originally
http://www.offroadexpress.co.nz/Forums/viewtopic.php?p=304721#p304721
Re: D.B's Defender 110
Posted: Thu Oct 31, 2013 10:45 pm
by DieselBoy
Re: D.B's Defender 110
Posted: Fri Nov 01, 2013 11:33 am
by J_Dub
Sweeet.
Which truck in the other thread is chris' s.
Hes kept quiet with his new ride
Re: D.B's Defender 110
Posted: Fri Nov 01, 2013 4:36 pm
by zukmeista
Light blue Defender
Re: D.B's Defender 110
Posted: Fri Nov 01, 2013 8:19 pm
by drive it ...
Hope you didn't upset spider mum and the kids thrashing around in the scrub with their shiny clear-coat.
Re: D.B's Defender 110
Posted: Sat Nov 30, 2013 9:28 pm
by DieselBoy
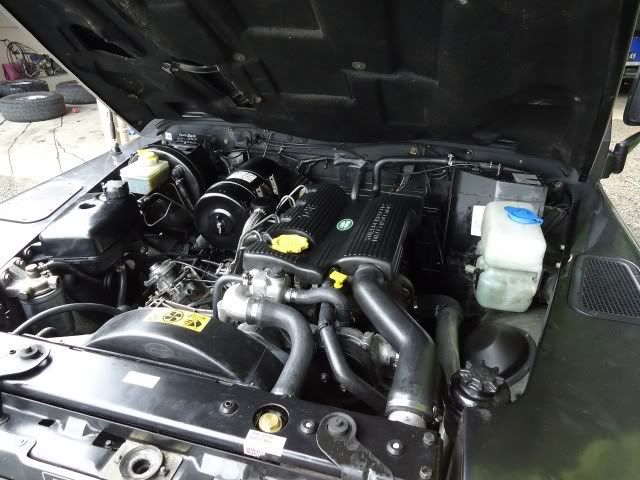
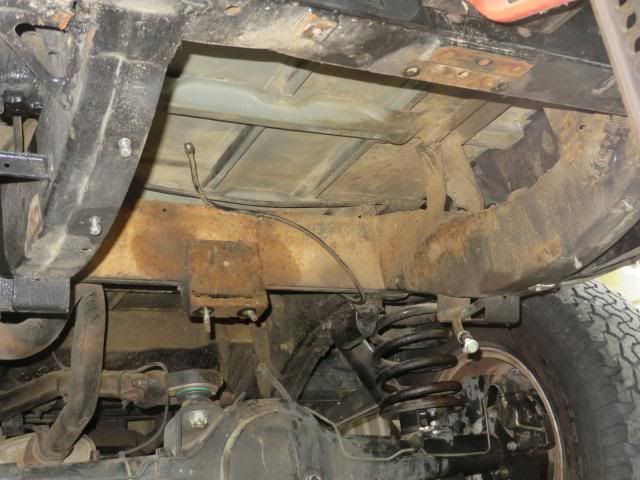
Haven't been up to much exciting stuff on it for while, just weeding through the mechanical stuff. It still bugs me a little every now and then, as I had already been through and future/OZ proofed everything on Dusty over the years, and now I have to do it all again, but on a much reduced time frame which doesn't help spread the cost

Cooling systems are one of those things you just can't skimp on with a Turbo Diesel running a alloy head. Its got to be 100% or better preferably.
On the last trip I noticed a strange noise over the diesel rattle and investigation led me to the water pump. Typical to Land Rover and the 300tdi engine, the water pump is right there in easy reach, pop the drive belt off, undo a pully or two and its off. In fact I spent more time cleaning the gasket off than removal and refitting took.
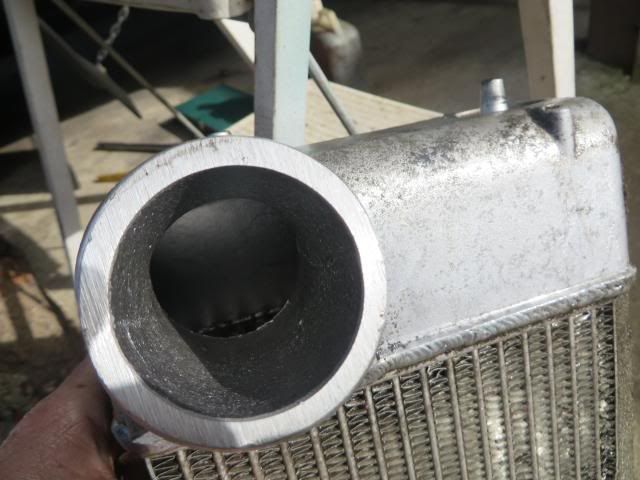
With a a potential OZ trip looming again, i thought i had better do the cooling system properly, so gave it a new thermostat, viscous fan hub and sent the radiator in for quick check and clean.
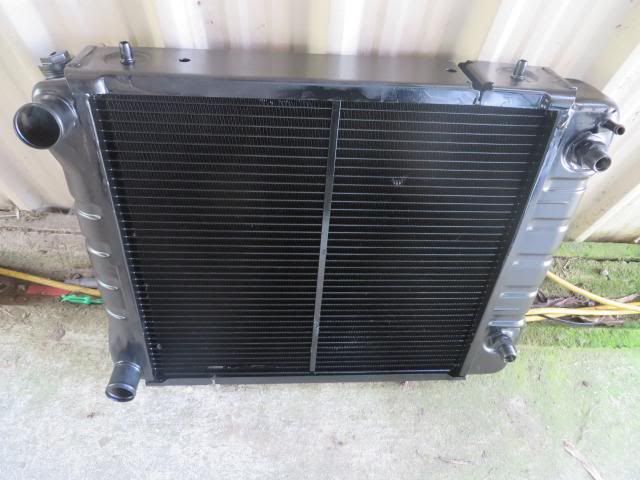
A week later the radiator came home with a new heavy duty core

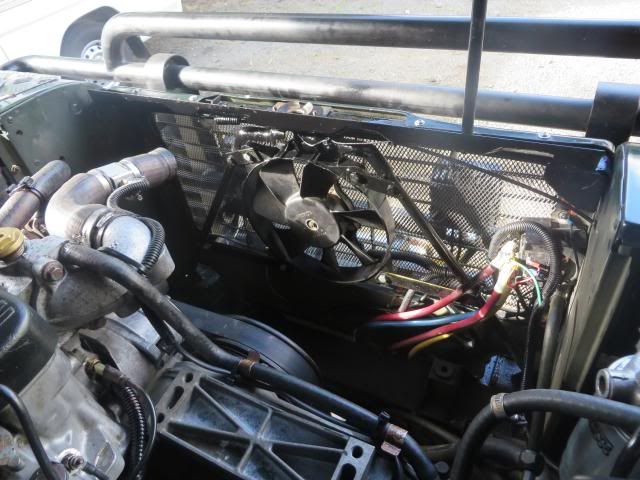
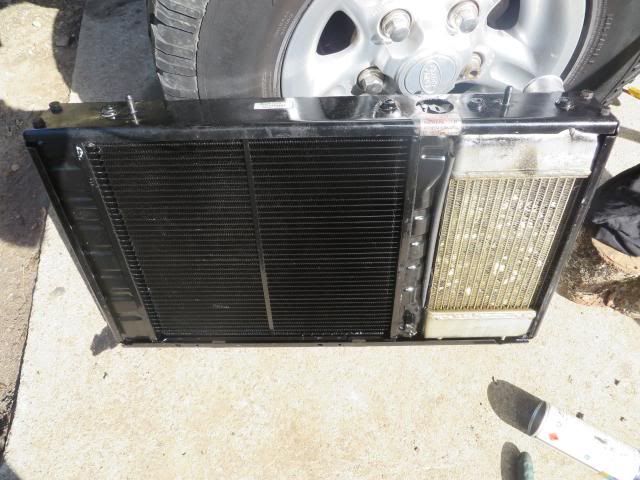
While it was away, i took advantage of the clear space to sneak a extra cooling fan in, one of a large collection i seem to have built up
I stuffed it in here, hopefully it will help with those long slow climbs, and other low speed, high load situations:

One serious radiator, complete with heavy duty large core adding extra cooling capacity and strength to handle pressure washing and general abusive treatment
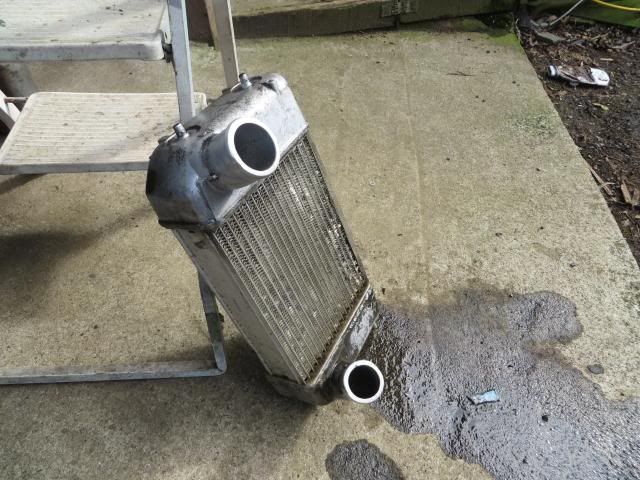
The intercooler sat for the week with with a mix of diesel and petrol in it to dissolve any crud and oil residue, and cleaned out the core.
All installed together and ready to drop into the engine bay
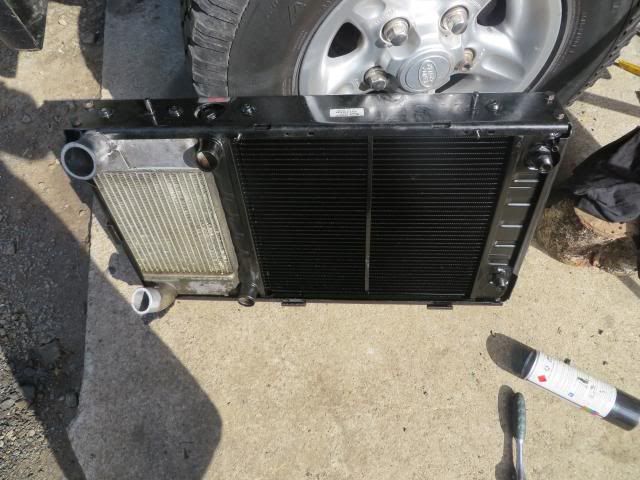
Another mission complete

Re: D.B's Defender 110
Posted: Sat Nov 30, 2013 9:35 pm
by muddyplumber
Awesome work man
Re: D.B's Defender 110
Posted: Sat Nov 30, 2013 10:08 pm
by DieselBoy
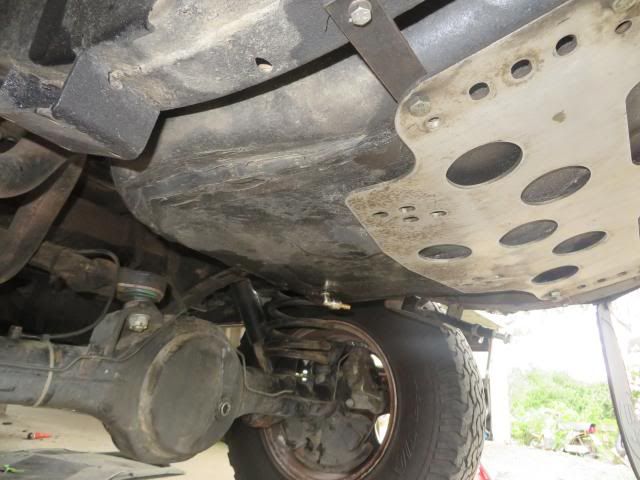
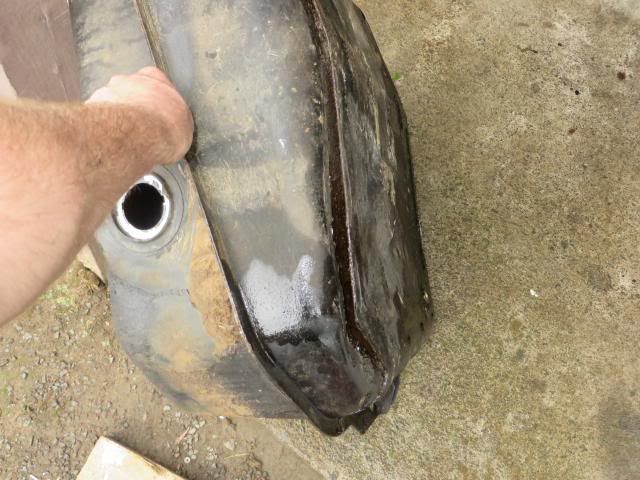
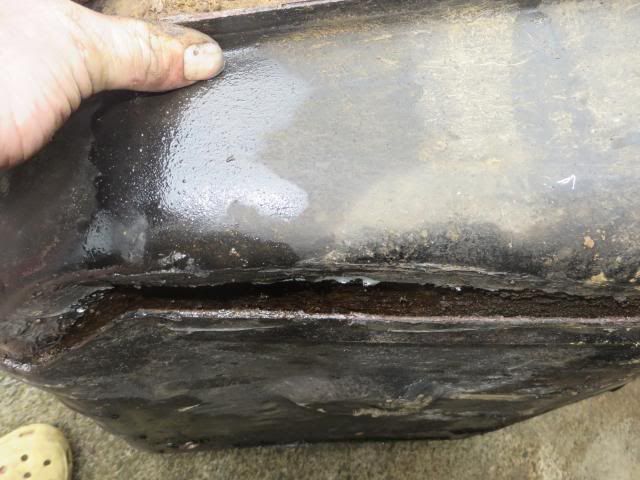
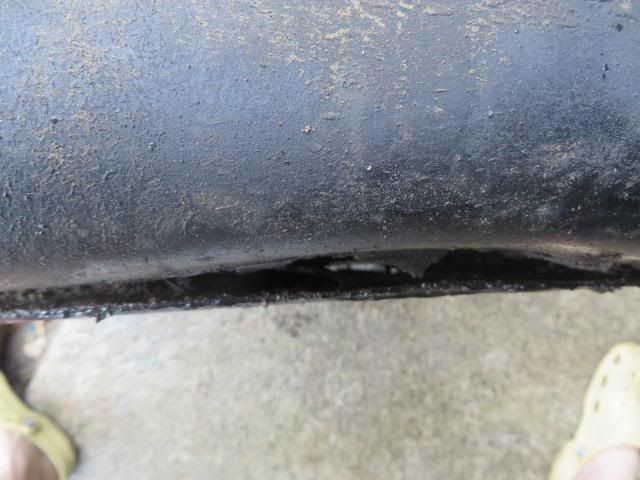
Thursday night I arrived home to a Diesel slick running out the back of the truck. I had filled it up on Wednesday night. Yipee
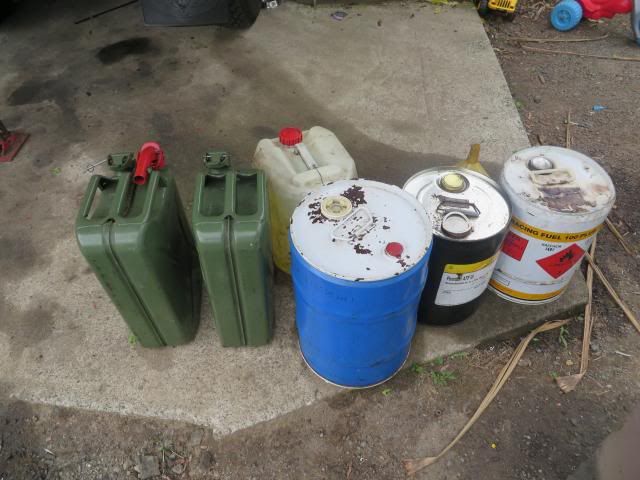
Nothing for it but to put on some old clothes and go get covered in Diesel. I have now found the downfall of having a dual tank system, you gotta have a lot of containers on hand to drain the fuel into
The tank has had a good hit in its previous life, the dent to the actual tank is a lot worse than what the tank guard allows you to see. I filled the gap with silicone a few months a ago, but obviously it was to far to late and what ever has been going on between the guard and the tank has finally caused a leak.
Luckily
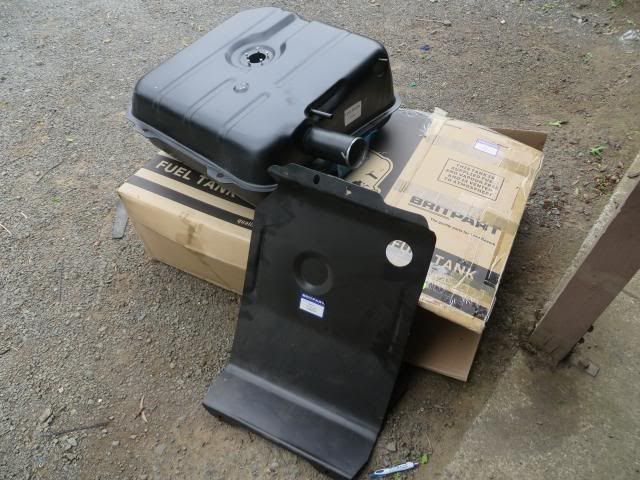
http://www.landroverspares.co.nz had a replacement tank and guard in stock. Very fortunate considering how close to xmas it is. I picked it up today, mission on
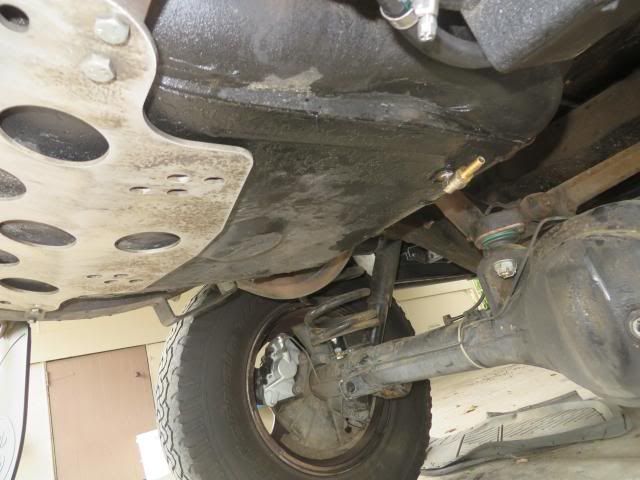
The old tank came out quite easily. This truck has definitely seen some off road time

I however did manage to root the fitting on the pickup, it snapped when i was trying to undo the hose from it. Ok, i didn't realise it was plastic, it was in a cnut of a place, and yes, once i had the tank out on the floor i realised i could have removed the whole sender/pick assemble from the tank with the hose attached and it would have been fine. Hope there's one of those in the country!!
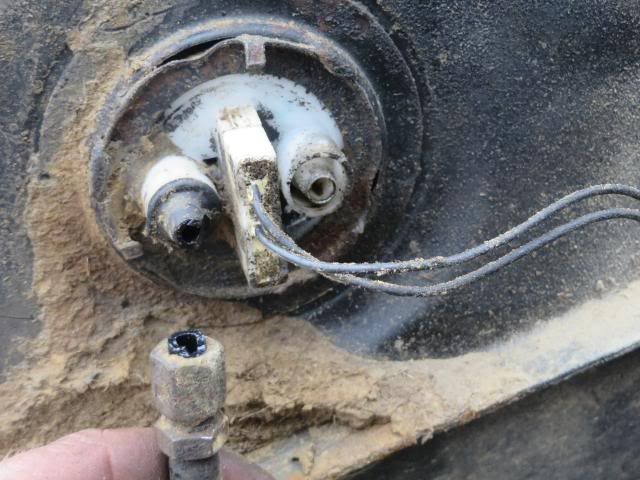
Oh, and the drain plug thread is different to the thread on the attachment for the long range tank feed. I have a feeling its gonna be a tricky one to solve, maybe a banjo bolt
Would be so boring if every job was straight forward
Either way tomorrow is Trials time, so the tank can wait

Re: D.B's Defender 110
Posted: Sun Dec 01, 2013 6:48 pm
by lokrite
Before you put new tank add some 10mm spacers between tank and guard on the bolts that way you can wash all the crud out which causes the corrosion on the tank base and maybe another coat of paint . the truck is looking real flash cheers
Re: D.B's Defender 110
Posted: Sun Dec 01, 2013 7:07 pm
by DieselBoy
lokrite wrote:Before you put new tank add some 10mm spacers between tank and guard on the bolts that way you can wash all the crud out which causes the corrosion on the tank base and maybe another coat of paint . the truck is looking real flash cheers
Good idea, was wondering about using urethane to seal the guard on, but that's even better
Re: D.B's Defender 110
Posted: Mon Dec 02, 2013 8:55 pm
by DieselBoy
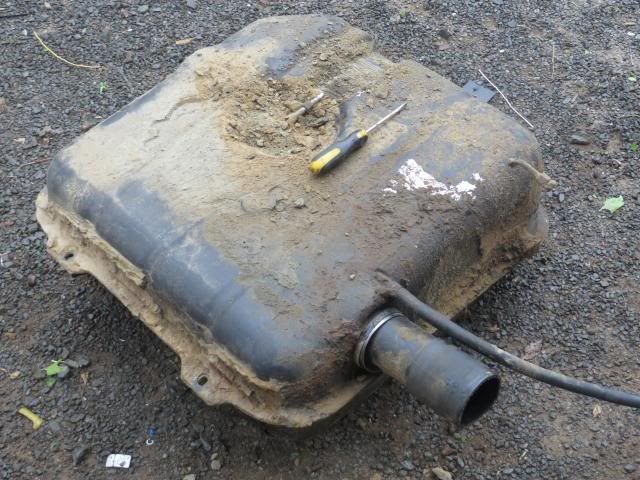
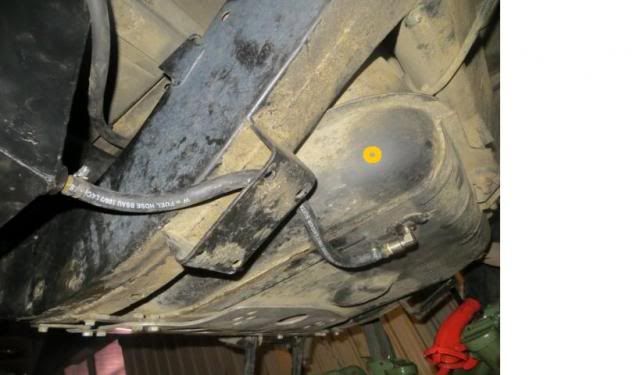
Been churning all day on the issue the of drain plug on the new main tank being different to the old main tank.
The problem being that drain plug is used to link the main and aux tanks together and equalise the level as the fuel from the main tank is used.
Its a pretty ugly system, but it works:
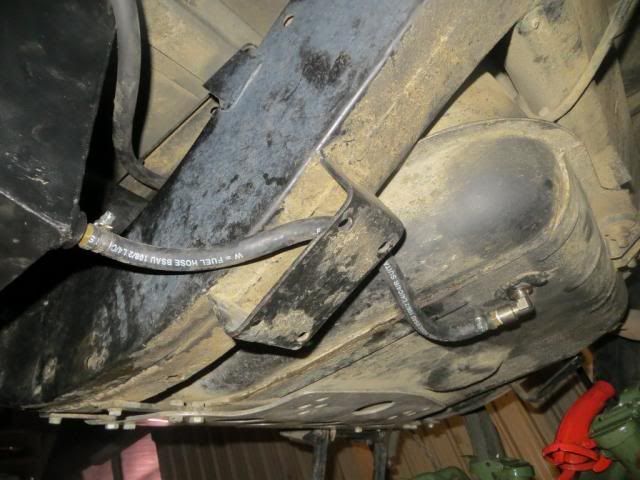
I'm thinking now might be the perfect time to rectify the uglyness and get the hose up out of the way. Brand new tank, never had fuel in it, and its out of the vehicle so couldn't ask for a better opportunity.
I could put a proper fitting in about where the yellow circle is, it would do the same job and get rid of the hose hanging down below the tank
So the question i want to ask all those engineering types out there, what in your opinion is the best option to put a fitting into the tank???
Do you braze in a brass fitting?? ( I have one with a barb to take the hose)
Tig on a nut and screw the brass fitting with barb into that??
Tig on bit of pipe??
Get the mig out and burn a bloody big hole in the tank trying to weld something to it when I should have taken it to someone with Gas or a Tig
Re: D.B's Defender 110
Posted: Mon Dec 02, 2013 9:00 pm
by callum007
Tig on a nut.. Im no engineer, but you can bush rig a fix in a welded nut easier than a flogged out brass fitting or a broken pipe. Go for something really common thread wise and larger.
Re: D.B's Defender 110
Posted: Tue Dec 03, 2013 8:22 am
by klompy
Easyflow will be the easiest your local hose doctor or engineer should have some.
Re: D.B's Defender 110
Posted: Tue Dec 03, 2013 12:21 pm
by churchill
Weld/brase a BSP socket so you can screw a hose tail into it. BSP should be a good pipe thread to uses as there will be heaps of fittings available for it. NPT is another thread type but seems to be less popular in NZ.
Re: D.B's Defender 110
Posted: Wed Dec 18, 2013 1:34 pm
by Colinl
+1 for braze unless you are confident with a tig torch.
A much better seal since you can sweat the bronze into the gaps.
a leak/ pressure test is always a good idea when dealing with fuel tanks.
Re: D.B's Defender 110
Posted: Sun Mar 09, 2014 8:10 pm
by DieselBoy
Re: D.B's Defender 110
Posted: Sun Mar 09, 2014 8:35 pm
by DieselBoy
I have been mostly doing boring un-post worthy stuff, replaced all the bushes and ball joints on the front end, new clutch, rear main, H.D clutch fork, slave cylinder just that sort of thing.
A couple of fun things that I have managed to get done and remembered to take pics of, are the roof rack, which started off as this:

....and ended up as this:
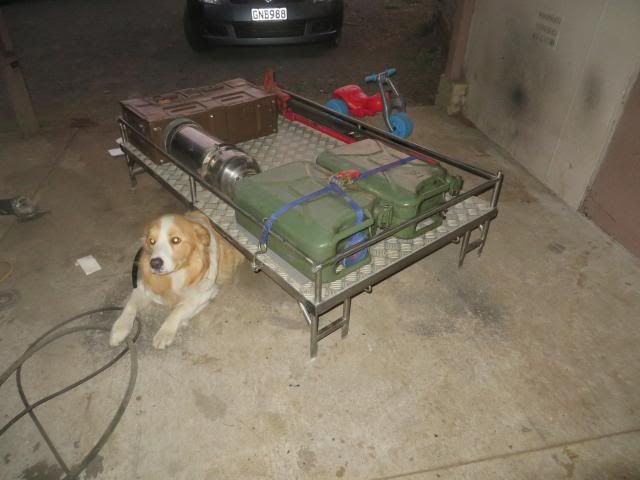
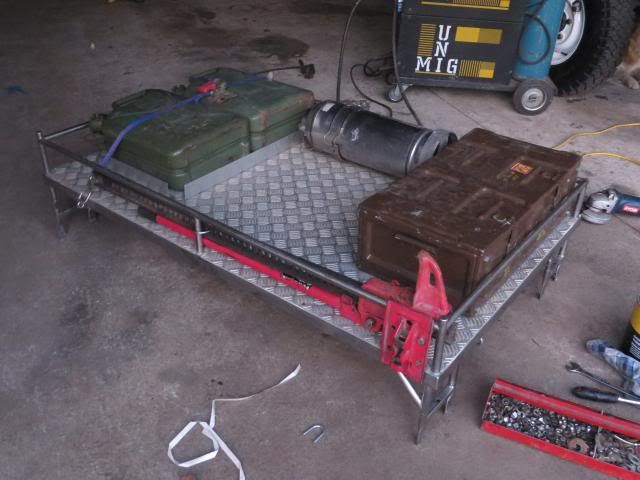
The stainless container takes 11 liters of emergency water, it will always be full. The jerry cans will always be empty when on the roof, they will be carried inside the vehicle when full and put into the main tanks as soon as their is room so they can go back on the roof empty. The tin box, buggered if I know, but I'm sure it will get used. The empty space in the middle will fit an empty 20L water drum if required. Might even chuck a full sized axe up there. The basic idea is to keep it really lite up there.
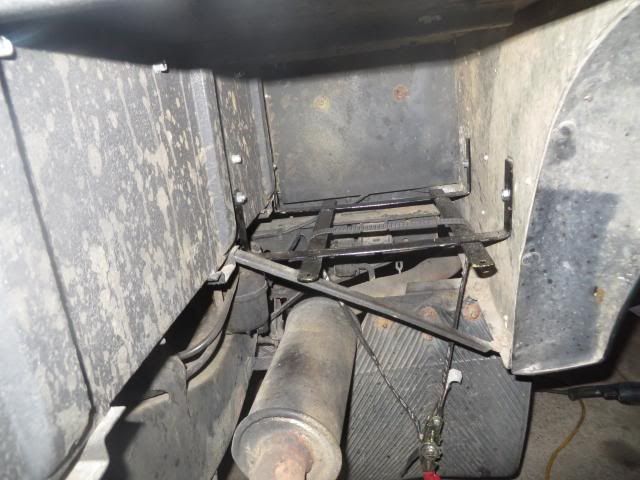
I also needed to increase the water storage capacity, so sneaked in another 20L drum under the rear guard, taking the total potential water capacity to 91 litres:
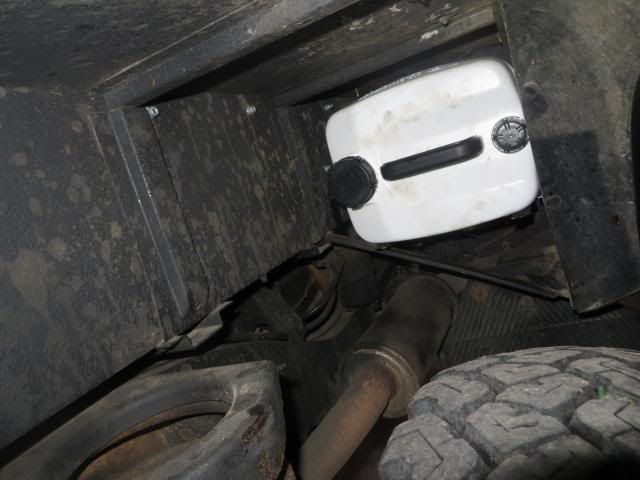
Strapped in with a little tie down:

The support frame:
Bonus is that a 20L Jerry can of fuel could go in there instead.
Re: D.B's Defender 110
Posted: Sun Mar 09, 2014 8:50 pm
by DieselBoy
Re: D.B's Defender 110
Posted: Sun Mar 09, 2014 9:59 pm
by DieselBoy
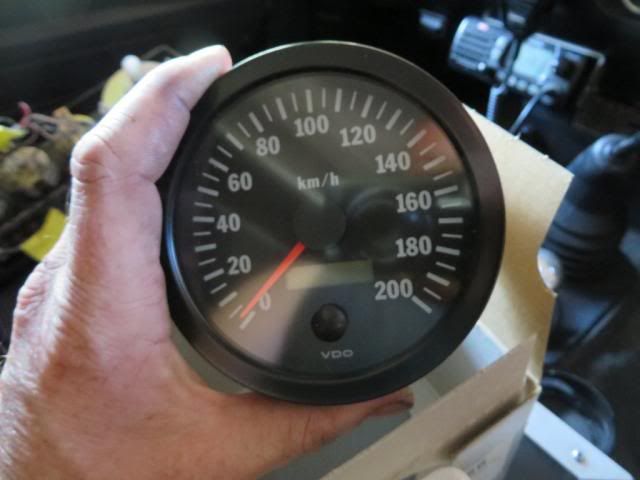
Another fun bling mission, electronic speedo conversion time
I have replaced the mechanical cable driven speedo on which the trip meter had died, with a VDO electronic replacement.
Straight forward job, remove old speedo and cable, crimp a few spade terminals on, run a length of wire and fire away an email or two.
For those that might like to follow in the future, here's the parts list:
VDO Electronic Speedo, 4", 0 - 200k's"
http://www.egauges.com/ProductDetails.a ... de=437-156Installation and Calibration instructions for the speedo:
http://www.vdo-gauges.com/media/instructions/0%20515%20012%20051%20--%20Programmable%20Speedometer(c).pdfThe following parts can be sourced locally from
http://www.Landroverspares.co.nzLand Rover Discovery 300Tdi Inductive 2 Wire Speed Sensor: YBE100540
Speedo Drive Gear to match speed sensor: FRC9339
Wiring Harness to fit plug on speed sensor: STC4637
3m of 2 core trailer wire
Box of blade type crimp connectors
The new Speedo:
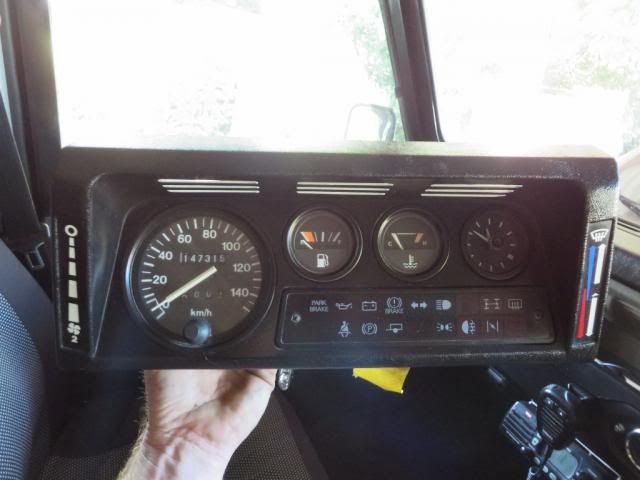
The dash removed with the old speedo in place still:
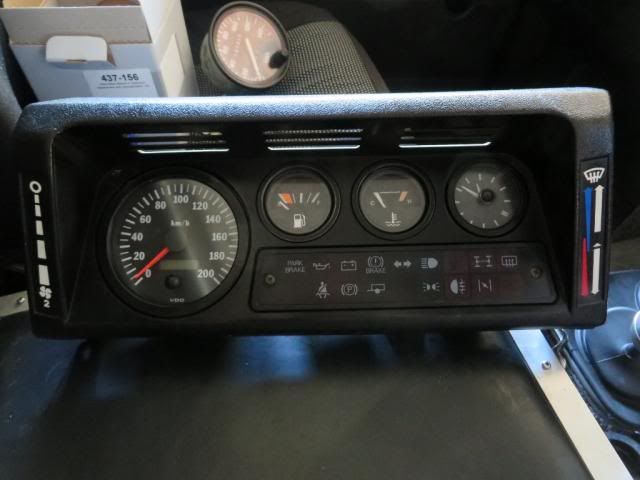
New Speedo fitted:
The Wiring Monster was unleashed, a blur of snipping, striping and crimping ensued, and there was no way in hell i was going to photograph the evidence
From the speedo down to the transfercase I just ran a 2 core trailer type cable:

Here's a really bad shot of the speed sensor and wiring harness. I just cut the bullet connectors off the harness and put a two pin narva plug on inplace, then wrapped it with heaps of insulation tape. Wiring Monster stylz
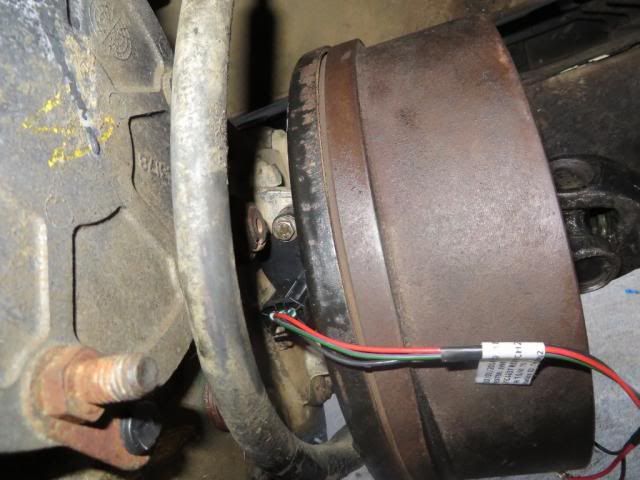
Really simple job to do, although I did cheat a tiny bit as I had the gearbox out on Saturday so fitted the speed sensor up while the box was out

The calibration was easy, I initially used the GPS for speed and distance for the auto calibration to get it in the ball park, then manually fine tuned it from there, again based on the GPS speed reading.
The Legal Stuff if your Diesel powered:
Simple really, email
rucassessments@nzta.govt.nz and tell them what your up to.
They will require the invoice for the new speedo, the current reading on your old speedo, and reading of the new speedo. They will enter the data and then you had down to the post shop or where ever and get your new lable. I haven't done this bit yet, only emailed them to find out what I had to do, so fingers crossed it is this simple