BJ74, UPGRADE!!

Re: BJ74, UPGRADE!!
Theyre about 25mm long. Are you using anything to lube the bead as you do it up?
Didn't barbie drive a jeep??
-
MNC
- Hard Yaka
- Posts: 2100
- Joined: Sun Apr 02, 2006 12:00 pm
- Location: Close to (wishing I was closer to) the Puhoi Pub!
Re: BJ74, UPGRADE!!
turoa wrote:Different tyres have different bead thicknesses and swaper beads are fawkin thick. Beadlocks are generally set up for one brand of tyre
Sorry Fakey - off topic...
OK, so I'll try some longer beadlock bolts. Hopefully I will be able to get the swampers to seal on rims I got off Mr O
So Fakey - you running tubes? If so what did you get? The big tire tubes seam to be very expensive

-
MNC
- Hard Yaka
- Posts: 2100
- Joined: Sun Apr 02, 2006 12:00 pm
- Location: Close to (wishing I was closer to) the Puhoi Pub!
Re: BJ74, UPGRADE!!
Fakey wrote:Theyre about 25mm long. Are you using anything to lube the bead as you do it up?
Bugger, mine are 25mm as well - guess the swamper sidewall is thicker than the Wranglers.
Yip brushed on warm soapy water while I was doing it
-
Sadam_Husain
- Angry bird
- Posts: 5164
- Joined: Mon Feb 20, 2006 12:00 pm
- Location: WELLINGTON
Re: BJ74, UPGRADE!!
MNC wrote:Sorry Fakey - off topic...
OK, so I'll try some longer beadlock bolts. Hopefully I will be able to get the swampers to seal on rims I got off Mr O
So Fakey - you running tubes? If so what did you get? The big tire tubes seam to be very expensive
Try clamping the ring down a bit with vicegrips and a small screwdriver(s) through the bolt hole(s) to keep it aligned and clamp down at 0, 90, 180 ahd 270 degrees to keep the ring going down evenly, once you have got those 4 positions started and even put the rest of the bolts in and go around clockwise slowly and dont forget lots of lube around the bead. The tyres should go on easier next time you have to take the off.
-
niblik
- Sausage Shack
- Posts: 3307
- Joined: Wed May 03, 2006 12:00 pm
- Location: erm.. out in the shed for a mo...
Re: BJ74, UPGRADE!!
a bit of expense now or a lot of hassles when out wheelin.. i know which i'd go for mat.. 
not a fan of the big flat plate on the front between the 'dame edna bred with a butterfly' front barwork or of exo's in general, but i can appreciate the work ya puttin in dude, so cudo's to you man..

not a fan of the big flat plate on the front between the 'dame edna bred with a butterfly' front barwork or of exo's in general, but i can appreciate the work ya puttin in dude, so cudo's to you man..
-
MNC
- Hard Yaka
- Posts: 2100
- Joined: Sun Apr 02, 2006 12:00 pm
- Location: Close to (wishing I was closer to) the Puhoi Pub!
Re: BJ74, UPGRADE!!
niblik wrote:a bit of expense now or a lot of hassles when out wheelin.. i know which i'd go for mat..
Fair call.
Will give that a go too Sadam - lots of lube around the rim, you're starting to sound like Skid.
Re: BJ74, UPGRADE!!
niblik wrote:not a fan of the big flat plate on the front between the 'dame edna bred with a butterfly' front barwork or of exo's in general, but i can appreciate the work ya puttin in dude, so cudo's to you man..
MNC, Try putting one of your lock rings on the rim without the tyre on it an measure the gap for the bead. The bead will only crush so much, might be too big for your rims
Im running them tubeless for now with dump valves. Two of the tyres had a little bit of bead damage on one side so I put that side to the lock ring an used some silicone to make sure they sealed. The silicone made those two the easiest to fit.
To do them up i did up four opposite bolts to get it started then worked around in a star like pattern to get them all pulled down evenly.
Helped Ive got a 3/8" cordless Impact gun, saved soo much time
Didn't barbie drive a jeep??
Re: BJ74, UPGRADE!!
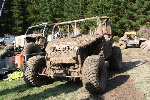
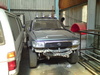
Did some work on the front end today.
Originally I set it up with patrol upper spring mounts an springs but it sat too low so I put in some 80 series springs which were about the right height but made the front end very stiff. Id need 100mm patrol lift springs to get it sitting where I wanted.
This is what i started with

All gone

New mounts 100m lower on the chassis rail, cheaper than $400 100mm lift springs:wink:
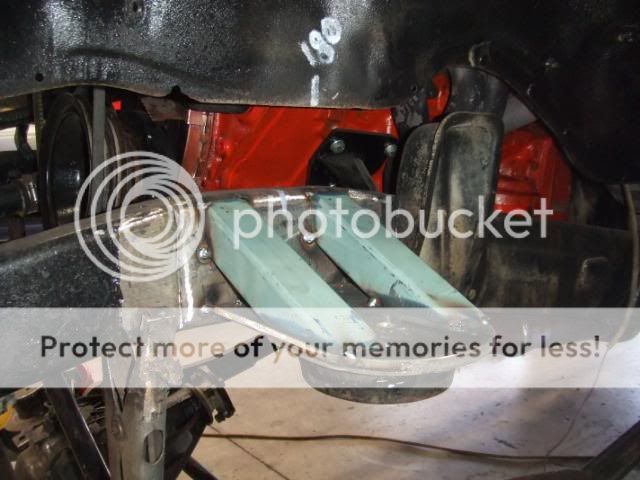
All done

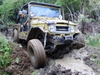
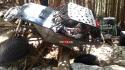
Should sit nice an level once the front springs settle an fuel etc goes in
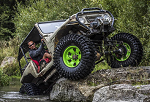
Flexes a bit better with the softer springs


Originally I set it up with patrol upper spring mounts an springs but it sat too low so I put in some 80 series springs which were about the right height but made the front end very stiff. Id need 100mm patrol lift springs to get it sitting where I wanted.
This is what i started with
All gone
New mounts 100m lower on the chassis rail, cheaper than $400 100mm lift springs:wink:
All done
Should sit nice an level once the front springs settle an fuel etc goes in
Flexes a bit better with the softer springs
Didn't barbie drive a jeep??
-
MNC
- Hard Yaka
- Posts: 2100
- Joined: Sun Apr 02, 2006 12:00 pm
- Location: Close to (wishing I was closer to) the Puhoi Pub!
Re: BJ74, UPGRADE!!
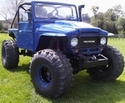
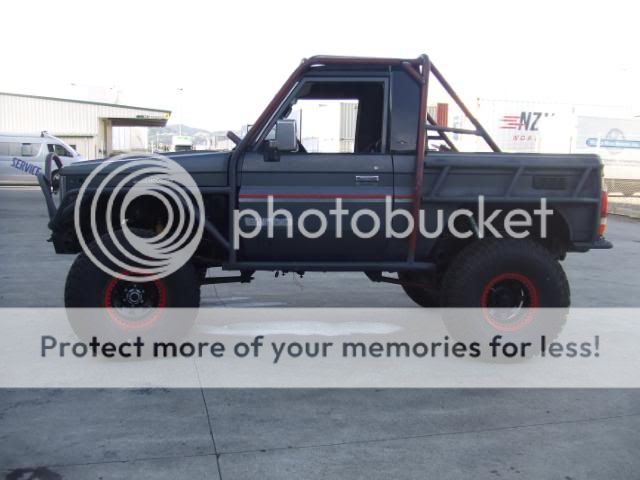
Oh man... can even see those flash as red calipers with the wheels on. Lovin the black rim and red beadlocks - what colour is this truck going to end up?
Re: BJ74, UPGRADE!!
Far out!! Everytime i see your 74 i swear it looks beastier and beastier!!! Top Job Fakey 
Whens your expected completion date?
Whens your expected completion date?
Re: BJ74, UPGRADE!!
Probably going to paint it red with black roof an cage.
As for completion date hmmm not sure really itll be done when its done I guess.
Got clutch issues at the mo not getting enough travel out of the slave cylinder, so working on sorting that out aswell as a few other issues
As for completion date hmmm not sure really itll be done when its done I guess.
Got clutch issues at the mo not getting enough travel out of the slave cylinder, so working on sorting that out aswell as a few other issues
Didn't barbie drive a jeep??
Re: BJ74, UPGRADE!!
not bad.. pitty it had nissan bits there otherwise i might have wanted them.. 
Re: BJ74, UPGRADE!!
Got a few little bits an pieces done this week, got new fairlead an 25mm wheel spacers for the rear from 4x4bits
Mounted the fairlead today

Made the cage mounts for the rear side bars an a mount for my highlift


Got some new Narva led work lamps for the front

Also got a surf master cylinder from pick a part an fitted it today
The surf one has a 1" bore compared to the 7/8" bore of the 70 series one so should give me a bit more braking force
Surf one on top

Fits straight on apart from the front pipe needing to be bent slightly

Made a frame an mounted the new seats, started on the snorkel but got no pics of that
Mounted the fairlead today
Made the cage mounts for the rear side bars an a mount for my highlift
Got some new Narva led work lamps for the front
Also got a surf master cylinder from pick a part an fitted it today
The surf one has a 1" bore compared to the 7/8" bore of the 70 series one so should give me a bit more braking force
Surf one on top
Fits straight on apart from the front pipe needing to be bent slightly
Made a frame an mounted the new seats, started on the snorkel but got no pics of that
Didn't barbie drive a jeep??

Re: BJ74, UPGRADE!!
Your truck looks good, thats a decent amount of articulation you have there. Putting a larger bore master cylinder will reduce the brake force but should shorten the pedal travel unless there's something I'm missing.
Re: BJ74, UPGRADE!!
Fakey wrote:Made the cage mounts for the rear side bars an a mount for my highlift
Also got a surf master cylinder from pick a part an fitted it today
The surf one has a 1" bore compared to the 7/8" bore of the 70 series one so should give me a bit more braking force
Surf one on top
Fits straight on apart from the front pipe needing to be bent slightly
Made a frame an mounted the new seats, started on the snorkel but got no pics of that
yup 1" bore will decrease pedal travel but make the brakes heavier or push harder for same effect, best option would be to fit a VH44 remote brake booster
cheers
pedro
Re: BJ74, UPGRADE!!
The surf master cylinder has a shorter stroke than the 70 one, so ill give it a go when I get it mobile.
Didn't barbie drive a jeep??
-
ClassicCruiserSpares
- Sausage Shack
- Posts: 1259
- Joined: Sat Jan 16, 2010 9:16 pm
- Location: Christchurch,
Re: BJ74, UPGRADE!!
I agrre with pedro use the the vh44 remote booster and itll sort out the 70 series braking issues.
Toyota Landcruiser FJ40, front and rear lockers, 35" simex.
Toyota FJ45 build in progress.
Tires are like boobs, they always look big until you have played with them for a while, then you just want a bigger set.
Toyota FJ45 build in progress.
Tires are like boobs, they always look big until you have played with them for a while, then you just want a bigger set.
Re: BJ74, UPGRADE!!
Just thought I should let you know to save you a bit of head scratching. Interesting about it working on the 40, I've gat a mate with one and his brakes are shite so will let him know about that.
Re: BJ74, UPGRADE!!
Been pretty busy lately with work but still managed to get plenty done after 7pm most nights
Pulled the rear bars off, painted them an the rear end of the truck then put the bars back on an fitted two new tow hooks.
Finally got the clutch issue sorted, wasnt getting enough travel out of the slave cylinder to release the clutch. Got a new 7/8" bore master an fitted it today. Plumbed it all up an took it for a drive.
Went pretty dam good, but the transfer case sounds like its got an angry cat stuffed in it
Did some price checking on the vh44 auxillary booster. Repco an MP auto parts both had them for around $850
BNT have them for $435 incl gst, even had two on the shelf so I bought one. Fitted it today. Huge improvement in braking force even with the 37"s
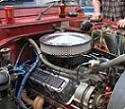
Had to move both batteries to the Lhs of the engine bay to make room for the VH44 so made up a new battery tray an tidied up all the loose ends with the factory wiring
Done heaps more but that is all I can remember right now Pics later if I have time
Pulled the rear bars off, painted them an the rear end of the truck then put the bars back on an fitted two new tow hooks.
Finally got the clutch issue sorted, wasnt getting enough travel out of the slave cylinder to release the clutch. Got a new 7/8" bore master an fitted it today. Plumbed it all up an took it for a drive.
Went pretty dam good, but the transfer case sounds like its got an angry cat stuffed in it
Did some price checking on the vh44 auxillary booster. Repco an MP auto parts both had them for around $850
BNT have them for $435 incl gst, even had two on the shelf so I bought one. Fitted it today. Huge improvement in braking force even with the 37"s
Had to move both batteries to the Lhs of the engine bay to make room for the VH44 so made up a new battery tray an tidied up all the loose ends with the factory wiring
Done heaps more but that is all I can remember right now
Didn't barbie drive a jeep??
Re: BJ74, UPGRADE!!
Fakey wrote:tidied up all the loose ends with the factory wiring
Yip I hear what ya sayin.. LOL Same for me.. it's painful..
Re: BJ74, UPGRADE!!
When I say tidied up I mean I cut off what I dont need (95% of it) an just relocated the few things I am going to reuse
Didn't barbie drive a jeep??
Re: BJ74, UPGRADE!!
Been a while so heres some porn for ya
VH44

installed

rear painted with hammertone silver
Some from this weekends mission, rip out the initial rear spring set up (fail)
What was there


Wanted to move the springs out as far as poss but wanted it to sit lower aswell so sectioned the chassis to suit

All welded up with new pipe to replace the factory bent shock pipe i cut out


Then welded this in


Cut off the original axle spring mounts

Back in position to check clearance an spring mount position

Ill finish the new mounts off tomorrow, Im hoping itll sit around 50mm lower at the back an will be more stable with the springs moved out 50mm each side
Also finished the exo main hoop chassis support mounts today aswell

might put up some more of the finished product tomorrow
VH44
installed
rear painted with hammertone silver
Some from this weekends mission, rip out the initial rear spring set up (fail)
What was there
Wanted to move the springs out as far as poss but wanted it to sit lower aswell so sectioned the chassis to suit
All welded up with new pipe to replace the factory bent shock pipe i cut out
Then welded this in
Cut off the original axle spring mounts
Back in position to check clearance an spring mount position
Ill finish the new mounts off tomorrow, Im hoping itll sit around 50mm lower at the back an will be more stable with the springs moved out 50mm each side
Also finished the exo main hoop chassis support mounts today aswell
might put up some more of the finished product tomorrow
Didn't barbie drive a jeep??
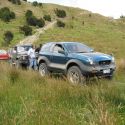
Re: BJ74, UPGRADE!!
Looking good buddy! Getting there
There's gotta be some rocks round here SOMEWHERE!
Re: BJ74, UPGRADE!!
Looking Awesome dude, Keep it up.
Re: BJ74, UPGRADE!!
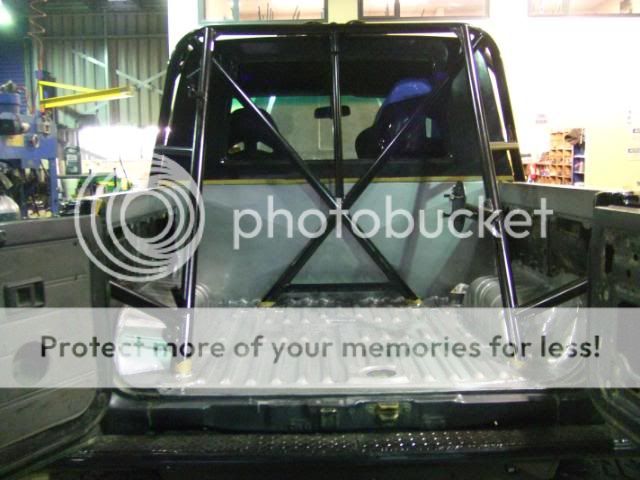
Couple more pics of the axle mounts an the upper x member all finished up
I made the new spring platforms sit flush on the axle, combined with raising the upper mounts 25mm Ive managed to lower the back of the truck around 50mm.
That combined with moving the springs out 50mm each side has greatly improved the handling an driveability on road but lost a bit of articulation but I may be able to overcome this by clamping the springs in

Haven't flexed it yet so might have to adjust the bumpstops but they actually crush down to half their height with weight on them
Upper x-member finished

I made the new spring platforms sit flush on the axle, combined with raising the upper mounts 25mm Ive managed to lower the back of the truck around 50mm.
That combined with moving the springs out 50mm each side has greatly improved the handling an driveability on road but lost a bit of articulation but I may be able to overcome this by clamping the springs in
Haven't flexed it yet so might have to adjust the bumpstops but they actually crush down to half their height with weight on them
Upper x-member finished
Didn't barbie drive a jeep??
-
niblik
- Sausage Shack
- Posts: 3307
- Joined: Wed May 03, 2006 12:00 pm
- Location: erm.. out in the shed for a mo...
Re: BJ74, UPGRADE!!
great stuff fakester... oober blingin..
with the back end under full compression, hows the back end upper heims clearance from the upper spring crossmember thang? looks about right for the bump stops to work goodly.. just thought i'd enquire...
you've done some great stuff there guy..
with the back end under full compression, hows the back end upper heims clearance from the upper spring crossmember thang? looks about right for the bump stops to work goodly.. just thought i'd enquire...
you've done some great stuff there guy..
Re: BJ74, UPGRADE!!
With the weight of the truck on the bumps an no springs in I had over 2" between the top of the joints an x-member, looks closer in the pics tho.. I was looking at heavier weight factory height springs to stiffen the rear up but after driving it im not sure ill need them (an $300 for OME ones is quite a bit extra that could be better used else where:oops: )
haven't had a chance to flex it yet but im hoping the bumps should stop the tyres getting cut to shreds on the guards
haven't had a chance to flex it yet but im hoping the bumps should stop the tyres getting cut to shreds on the guards
Didn't barbie drive a jeep??
-
MNC
- Hard Yaka
- Posts: 2100
- Joined: Sun Apr 02, 2006 12:00 pm
- Location: Close to (wishing I was closer to) the Puhoi Pub!
Re: BJ74, UPGRADE!!
Fakey wrote:Couple more pics of the axle mounts an the upper x member all finished up
Looking good Fakey.
Have you got more planned for the diff housing? Just asking as you haven't painted it.
Re: BJ74, UPGRADE!!
Nah took that pic when the welds were still hot so hadnt painted it, all done now tho once I sort out what im doing with the handbrake cable im going to put some plate over the pumpkin to protect the crownwheel tho
Didn't barbie drive a jeep??
Re: BJ74, UPGRADE!!
lookin awesome
FJ40,INJECTED SB 406 CHEV, LOCKER,35 SIMEXS,warn winch , 80seies vx 4.2 24v turbo diesel ,fr and rear lockers 3" exh top mount intercooler, 021 724482