Page 4 of 7
Re: TJ Build
Posted: Sat Sep 19, 2009 5:45 pm
by TJ
In May, I got sick of the slight vibrations at idle coming from the motor mounts. So replaced them with new units from Brown Dog Industries. These are with 1" riser and have ultra flex rubber bushing (the ones I took off were later bartered with XJ for spring spacers - there was nothing wrong with them, just that they had poly bushings).

Same mounts painted black.

Re: TJ Build
Posted: Sat Sep 19, 2009 5:57 pm
by TJ
Late in May, my wife gifted me a winch for upcoming birthday.

Since my ARB bar was already configured for a winch, it was an easy install (yeah right!! - needed very small hands).
I decided to install my solenoid box in the engine bay. It was first mocked up next to the brake master cylinder:

Then a brakcet was done up and installed:

Then came the final fitting:

I have used 50mm2 welding cables for all electrical connections to minimise voltage drop. I drilled a few holes to relocate/permanently mount my front licence plate. Here is the finished product:

Since I was at it, took a 5-core trailer cable and mounted in-cab controls:

The main safety switch is through a ignition powered source (safety is paramount with kids around). It has LED toggle switch to indicate when its armed:

Re: TJ Build
Posted: Sat Sep 19, 2009 6:00 pm
by TJ
Since then a few minor other things have been done like replace the steering stabiliser and some other odds and ends.
My next item is probably a tummy tuck (have been thinking about it for some time now). All other pieces are in place. Lets see how long before that happens.
Re: TJ Build
Posted: Fri Oct 02, 2009 8:11 pm
by TJ
Cracked my first hundred thousand mark today:

Hope to repeat this many times over.
Re: TJ Build
Posted: Sat Apr 14, 2012 11:49 am
by TJ
After a very long break from ORE Forum, I think it might be time to reconnect with the community. It was nice to see a big presence of ORE people at the 24 hour challenge. I am with Auckland 4wd Club, so had to support the team and the community.
I have done some work on the TJ since the last big set of mods. But I'll try to list them in a couple of days.
Re: TJ Build
Posted: Sat Apr 14, 2012 3:38 pm
by xj
Hey pal, WB!
Re: TJ Build
Posted: Sun Apr 15, 2012 11:10 am
by Sadam_Husain
yeah its been a while mate welcome back

Re: TJ Build
Posted: Sun Apr 15, 2012 11:24 am
by TJ
Thanks guys.
It was nice to see you SH at Woodhill teams challenge. May be a team Jeep can be put together for next year!
Re: TJ Build
Posted: Sat Apr 21, 2012 9:07 pm
by TJ
Ok, some of the things I have done in the last year or so:
-
Bash plate for steering box protection (from Black Jack Welding Australia):


-
Painted factory alloys black

-
Out went OME springs - in came Currie Enterprises progressive springs
Re: TJ Build
Posted: Sat Apr 21, 2012 9:15 pm
by kbushnz
Yes we need to get that Jeep dirty.....

Re: TJ Build
Posted: Sat Apr 21, 2012 9:25 pm
by TJ
Sorting out all the minor bugs, like back end bottoming on every single bump. OME springs were toast.
Re: TJ Build
Posted: Sat Apr 21, 2012 9:40 pm
by TJ
Last weekend:
- Changed diff oil front and rear. While changing the oil for at the back, decided to bling it a bit. Put ARB diff cover that I had lying around. I have obviously painted it black. Rather than use RTV or such, I used Lube Locker metal reusable gaskets. Nice and tidy job, made even easier:

I am sure lockers will make their way soon(ish).
- Changed transfer case and power steering fluids.
Re: TJ Build
Posted: Sat Apr 21, 2012 10:04 pm
by TJ
This weekend so far, I changed transmission fluid. I thought about dropping the belly plate (or the shovel) but then thought about testing it to see if I could change the fluid without dropping it. Its not a lot of space, but yes it can be done without dropping the skid.

You just have to have very nimble and multi-jointed hands to get to the filter:

I also plumbed new lines to add an external filter to make my life easier (it won't require as frequent internal filter replacement now).

This is what the lines look at the bottom of the radiator:

Older line left unchanged is the return line back to the transmission. Current plumbing:
Transmission --> External Filter and Temp pick-up --> External Cooler in front of the radiator --> Factory under radiator cooler --> Back to transmission
Here is the cooler in front:

Now to get the cooler in there, the easiest way is to remove the passenger headlight (complete assembly) and the slip it from the hole in between the grill and a/c condenser.
My engine and transmission oil temp gauges are already installed:
Took it for a test drive, nothing leaks and the gauge works great.
Re: TJ Build
Posted: Fri May 25, 2012 8:27 pm
by Fen
TJ wrote:Next I finally hard mounted the air compressor in the engine bay. I would have installed it inside the cab, but cab real estate is very precious in a Wrangler. I have had the Bushranger MaxAir II for almost a year now and carrying it in a bag was becoming a bit tedious. I already had the optional hard mount bolts from the friendly people at Auckland 4x4.
I did a bit of research on the internet and chose the tray under the brake master cylinder as the appropriate location. It is hidden a little from the mud and is as far away from the exhaust manifold as possible, particularly on a RHD TJ. This tray is normally used by factory for mounting ABS module, but since I do not have that luxury, it was vacant space. Incidentally, this location is where the main battery is installed on LHD Wranglers (as the brake system would be on the opposite side right next to the exhaust). Install was simple, I just needed a double jointed elbow and very thin and long fingers!!
I did install a relay in the plastic cavity of the compressor and connected it to the battery directly. This was necessary as the load can be up to 40A and I did not want a trigger switch inside the cab running such a high load.
I have installed a 900 elbow on the output side to make it easier to connect the air hose. I have also extended the intake filter to point higher than the brake cylinder to avoid sucking any water splashes.
I then took the trigger wire through an existing hole in the firewall inside the cab. I have acquired a switch that this wire will be connected to so that I would be able to turn the compressor on and off from the comfort of driving seat. Ultimately, the idea is to add a small tank and possibly front and rear lockers.


This is where I had stopped about ten days ago.
Sweet. One of my jobs this weekend is to mount my identical compressor. I was thinking rear wheel arch just ahead of the roll cage base, but I was less than keen to drill through the Speedliner I haven't even paid for having applied. I don't have an ABS controller on that plate either, so mine will be going there too.
Re: TJ Build
Posted: Fri May 25, 2012 10:39 pm
by TJ
Fen wrote:Sweet. One of my jobs this weekend is to mount my identical compressor. I was thinking rear wheel arch just ahead of the roll cage base, but I was less than keen to drill through the Speedliner I haven't even paid for having applied. I don't have an ABS controller on that plate either, so mine will be going there too.
Glad you like it. It worked great so far. Doesn't get too hot, its out of the way, and power cable is not too long (no voltage drop). I used rubber washers under the 4 bolts holding the compressor (between compressor footing and the tray) to act as kind of shock absorbers. This way not much vibration gets carried through the metal tray, body and the frame when the compressor is on.
Re: TJ Build
Posted: Sun Jun 24, 2012 6:09 pm
by TJ
Changed the leaking factory radiator with a brass/copper Adrad unit from Trevor Morris Radiators (Onehunga). It comes with welded on wings and fits perfectly. Fan shroud holes and everything is pre-drilled and in correct place.
Thought about changing to electric fan set-up, but then decided not to for now. There are more pressing upgrades like rear drum brakes (I am starting to hate them from maintenance point of view).
Re: TJ Build
Posted: Sun Jun 24, 2012 7:45 pm
by xj
yeah T, dont miss the drum brakes one iota.
Re: TJ Build
Posted: Sun Jun 24, 2012 8:45 pm
by TJ
xj wrote:yeah T, dont miss the drum brakes one iota.
I can go two ways:
- Get a conversion kit from US which is based on Ford 8.8 axles used in Explorer. Getting future pads, rotors etc might be tricky in NZ. Besides, introducing Ford parts seems a bit blasphemous for a modern Jeep (I know back in the day it was war times, so a bit acceptable).
- Use all Jeep parts for a TJ Rubicon that came with factory disc brakes. Part list and numbers that I am trying to verify:
Axle bearings x 2 – TJ OEM
Axle seal x 2 – TJ OEM
Bearing retainers x 2 – TJ Rubicon
Brake tube, hose, and mount -- Left side 52128431AC
Brake tube, hose, and mount -- Right side 52128430AC
Disk Brake Rotor x 2 – TJ Rubicon
Rear brake pads x 2 – TJ Rubicon
Disk Brake Caliper x 2 – TJ Rubicon
Longer studs x 10 - 1-0476284
Handbrake Cables x 2 – TJ Rubicon
Loaded Backing Plate Left side 52128414AB
Loaded Backing Plate Right side 52128415AB
Mounting bolt kit, Caliper to Mounting plate x 2
This would be a complete factory swap with no modifications of any kind.
Re: TJ Build
Posted: Sun Jun 24, 2012 8:56 pm
by xj
eek, theres a mission.
Re: TJ Build
Posted: Sun Jun 24, 2012 9:07 pm
by TJ
xj wrote:eek, theres a mission.
Not if I break it into smaller pieces. Rotors, calipers, caliper pins and shoes I can get from BNT locally. Bearings and seals from Greg.
That leaves me with backing plates, hoses and handbrake cables. These I will probably have to import or get used off a ZJ (they swap over to TJ if fitted with disc brakes).
If I get new axles (chromolly) then seals, bearings and new studs are already included in that package.
Hmmm, time to think which way I am going next. I've already got 16x8" rims on order. Factory 16x7" rims aren't wide enough.
Re: TJ Build
Posted: Mon Jun 25, 2012 6:29 am
by yeti
got disc on the back of mine..........shall find out more for you...ford me thinks
Re: TJ Build
Posted: Mon Jun 25, 2012 8:51 am
by xj
Ford Explorer rear ends are the go so I hear, dunno about the diff ratios though.
(not that I have got time to explore Jeep things at the moment, busy with Discovery and VX Landcruiser research/mods)
Re: TJ Build
Posted: Sun Sep 09, 2012 12:50 am
by TJ
Last weekend I had picked up my new rims. They are Pro Comp alloys (16x8").
Considering which tyres to go with. Thinking between two options, Silverstone 117 Sport (nice cheap) or Mickey Thompson Baja Claws (pricey).
Re: TJ Build
Posted: Sun Sep 09, 2012 1:00 am
by TJ
Swapped the wire rope with Amsteel Blue synthetic. For the time being I have left the roller fairlead on, but I am looking for an aluminium one. The problem though is that ARB bumper mounts the winch in a way that the fairlead is recessed by 1 3/8" inward. The thickest aluminium fairlead I have found so far is 1 1/4" thick. That would lead the rope to rub on the bumper edges when used at angle. Yes, measurements are in inches (its a Jeep after all).
I have put up a few photos for ideas.
Re: TJ Build
Posted: Sun Sep 09, 2012 8:29 am
by NJV6
Unless the rollers are chaffed from wire rope, I'd just keep them, they are far easier on the rope if you are pulled at all sideways as the radius is greater.
Re: TJ Build
Posted: Sun Sep 09, 2012 11:23 am
by TJ
NJV6 wrote:Unless the rollers are chaffed from wire rope, I'd just keep them, they are far easier on the rope if you are pulled at all sideways as the radius is greater.
Rollers aren't bad. But if I can find a better solution with less parts to go wrong, I am open for ideas. Aluminium fairlead 1 1/4 inch thick looks workable with some spacers behind.
Re: TJ Build
Posted: Sun Sep 09, 2012 1:44 pm
by Sadam_Husain
as above that fairlead looks in pretty good nick and should work fine so long as theres nothing for the rope to catch or rub on TJ
Re: TJ Build
Posted: Sun Sep 09, 2012 9:23 pm
by TJ
Sadam_Husain wrote:as above that fairlead looks in pretty good nick and should work fine so long as theres nothing for the rope to catch or rub on TJ
Ok then, I'll leave them alone for now. These look like another alternative:
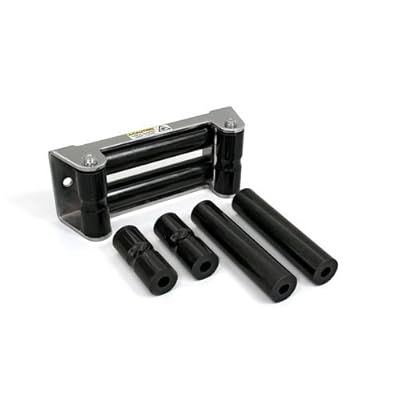
These are Daystar's Synthetic Winch Rope Roller. You just take the steel roller off and put these in. Converts the old steel rollers.
Re: TJ Build
Posted: Tue Oct 16, 2012 9:33 pm
by TJ
Finally got new tyres fitted on the rims. New tread design is so much better at braking in wet conditions, its like I have completely different brakes now.
Re: TJ Build
Posted: Wed Oct 17, 2012 10:13 am
by phraza
Nice work, they are lookin' good!