2 extra cylinders in a 60-series cruiser...

For all Toyota related topics ie. Hilux, Cruiser topics
User avatar
SupraLux
Complete Bastard
Posts: 2415
Joined: Tue Dec 10, 2002 12:00 pm

2 extra cylinders in a 60-series cruiser...

Post by SupraLux »

This post is a bit of a nudge for a certain board member who has taken his truck from a rusty average-looking old tank to a very cool and very fast (and very noisy!) monster... which is now all legal again...

If you live in Christchurch you will either see it or you'll hear it.

I have one photo from before all the really hard work began... back then it had 33" tyres, a 50mm body lift, 50mm suspension lift and extended shackles... sitting in my back yard waiting to go to the workshop... I expect the un-named board member will throw a few more photos up here of all the mods and how they came to be...

Steve

Image
User avatar
krawlr
Hard Yaka
Posts: 508
Joined: Mon Jan 30, 2006 12:00 pm

Post by krawlr »

yeahhhhhhhhhhhhh

lt1 nothin but :lol: :lol: :lol: :lol: :lol: cast iron head free zone :lol: :lol: :lol: roller cams,rockers FACTORY :lol: :lol: :lol:

got one in a 40 :wink:
User avatar
mike
Last minute Mike
Posts: 3545
Joined: Fri Dec 06, 2002 12:00 pm
Location: Christchurch - The place I'd like to be

Post by mike »

i hope those photos come soon. I like before and after shots without months inbetween :wink:

mike
1973 SWB Land Rover V8 Hybrid
1994 Toyota Surf
User avatar
LT1-62
Bush Crasher
Posts: 88
Joined: Thu May 05, 2005 12:00 pm
Location: Beeaaaauuutiful Christchurch

Post by LT1-62 »

hehe, exactly how many months in between has it been ??? :roll:

Regarding pictures...patience grasshoppers, I am so busy with organising my life for a move to Dorkalnd in 3 days :shock: that I dont have time at the moment but dont worry the pics will come.

Holy crap did it really use to look like that? I wish I had of taken photos when I first drove it out of Turners Christchurch, bald 31"s and flat as a pancake suspension, thatd would have made for some really good metamorphosis photography...
User avatar
Conan
Hard Yaka
Posts: 180
Joined: Thu Aug 12, 2004 12:00 pm
Location: Christchurch

Post by Conan »

fully! sooner the pictures the better! was looking like a machine even when it was sitting in bits on steves workshop floor...
User avatar
Conan
Hard Yaka
Posts: 180
Joined: Thu Aug 12, 2004 12:00 pm
Location: Christchurch

Post by Conan »

fully! sooner the pictures the better! was looking like a machine even when it was sitting in bits on steves workshop floor... keen to see the finished product
User avatar
turoa
Pyro Junior
Posts: 3112
Joined: Sun Oct 30, 2005 12:00 pm

Post by turoa »

we're still waitin
User avatar
LT1-62
Bush Crasher
Posts: 88
Joined: Thu May 05, 2005 12:00 pm
Location: Beeaaaauuutiful Christchurch

Post by LT1-62 »

OK finally got my shite together and digged out some of the build pics so expect some soon, here is a finished product pic that I have on the laptop so consider this a teaser...

Image
User avatar
LT1-62
Bush Crasher
Posts: 88
Joined: Thu May 05, 2005 12:00 pm
Location: Beeaaaauuutiful Christchurch

Post by LT1-62 »

Image
User avatar
SupraLux
Complete Bastard
Posts: 2415
Joined: Tue Dec 10, 2002 12:00 pm

Post by SupraLux »

About bloody time :lol:

...I wish I'd taken a few more pics myself... not like it was only there for an afternoon or anything :P

Steve
User avatar
mudchuka
Hard Yaka
Posts: 271
Joined: Thu Feb 23, 2006 12:00 pm
Location: invercargill

Post by mudchuka »

whats the big drama i dont even see a winch or simexes.
User avatar
SupraLux
Complete Bastard
Posts: 2415
Joined: Tue Dec 10, 2002 12:00 pm

Post by SupraLux »

mudchuka wrote:whats the big drama i dont even see a winch or simexes.


Your sig line says it all... That truck has an alloy head 350 chev that you can feel coming from miles away... :)

Steve
User avatar
LT1-62
Bush Crasher
Posts: 88
Joined: Thu May 05, 2005 12:00 pm
Location: Beeaaaauuutiful Christchurch

Post by LT1-62 »

mudchuka wrote:whats the big drama i dont even see a winch or simexes.

see top photo for winch
User avatar
SupraLux
Complete Bastard
Posts: 2415
Joined: Tue Dec 10, 2002 12:00 pm

Post by SupraLux »

LT1-62 wrote:
mudchuka wrote:whats the big drama i dont even see a winch or simexes.

see top photo for winch


:?: I seem to recall helping you pull that winch off :P
User avatar
LT1-62
Bush Crasher
Posts: 88
Joined: Thu May 05, 2005 12:00 pm
Location: Beeaaaauuutiful Christchurch

Post by LT1-62 »

As Steve said the top pic shows the old FJ62. Driveline totally standard with 3F engine (4L straight toyota 6), H55F (5 speed cruiser box) & 3.7 diffs. Mods at that stage were 2" body lift, Dobinson 2" lift springs and 2" over stock ghetto-fab shackles. Wheels were hankook 33x12.5s on stock toyota rims powdercoated black.

So I started to get a bit itchy for a bit more pep and having read all about the tried and true 350 chev cruiser conversion, and having always wanted to own a v8, I thought why the hell not. Given the fact that you have to shell out pretty serious cash for the bellhousing adaptor kit to do the conversion I thought you at least wanna spend some bucks on a decent engine, so I invested in some newish technology.

The donk:

Image

Located the engine off trademe (ah yes trademe, what would we ever do without you), and had it delivered to my house within the week. The engine is a '95 generation II Chev 350ci LT1, fuel injected, with alloy heads rated at 305hp and 340ft lbs of torque. It was cut from an (apparently) driving '95 camaro (apparently) with 69k miles complete with loom and computer, cat and even fuel lines...


With a new engine and all that extra power I decided I needed big new tyres and some new wheels to boot, so I got these

Image

Image

Image


35x12.5x15s BFG MTs and 15x10" rockcrawler wheels with 2.5" backspacing. New tyres and 10" rims with such little backspacing gave me an improvement in track width of about 6"s. I decided on 35" BFGs since this was the biggest tyre I could run with my suspension setup, and the BFGs are famed for having good offroad performance whilst maintaining good road manners.

Well, lunch is over, watch this space over the next few days for the rest of the build. Matt
User avatar
tank
Driver/Navigator
Posts: 19
Joined: Sun Jan 29, 2006 12:00 pm

Post by tank »

Right. Enough of these pics I wanna her wail like a dutch whore, wheres those audio bites of the LT1 at 6G?
User avatar
LT1-62
Bush Crasher
Posts: 88
Joined: Thu May 05, 2005 12:00 pm
Location: Beeaaaauuutiful Christchurch

Post by LT1-62 »

So if your gonna spend shitloads on an injected smallblock, chev to toyota alloy bellhousing, and new wheels and tyres, why not paint the sucker as well? And for that matter why not add new front shock towers to run some big long ranchos.

The first pic shows the new front shock towers tacked in place.

The second pic shows the new wheels tried on for size, as well as the first of the new paint. You can also see the shiny new bellhousing :D


Image


Image


Note supralux sitting in the background, with soon-to-be LT1-62 now sitting just as high ;)
User avatar
callum007
Hard Yaka
Posts: 1143
Joined: Tue May 30, 2006 12:00 pm
Location: Dunedin
Contact:

Post by callum007 »

still running sway bars too.. all looks good.. why you moving to dorkland.. only thing i enjoy about it over dunedin is the temp..
Dont follow me. i'll get stuck and need a tow..
User avatar
Sadam_Husain
Angry bird
Posts: 5164
Joined: Mon Feb 20, 2006 12:00 pm
Location: WELLINGTON

Post by Sadam_Husain »

Looks like you had better firewall clearance than I did with my conversion, I had to make a bit of room for the head clearance on the passenger side

Image
User avatar
LT1-62
Bush Crasher
Posts: 88
Joined: Thu May 05, 2005 12:00 pm
Location: Beeaaaauuutiful Christchurch

Post by LT1-62 »

Yeah, still running front swaybar with extended links, took it off for a while but whooooooaaaaaaa cornering at speed was a bit hairy. Will get disconnects one day, the bushes are shot anyway so I dont think its limiting flex too severely.

Nice panel work Sadam, not something youd expect from the butcher of baghdad...
User avatar
LT1-62
Bush Crasher
Posts: 88
Joined: Thu May 05, 2005 12:00 pm
Location: Beeaaaauuutiful Christchurch

Post by LT1-62 »

Oh yeah Dorkland was a career choice, 8 years of uni and needed a job so, despite Auckland being the last city in NZ I wanted to move to, had to leave the lifestyle behind and get corp. Dorks has been a shiteload of fun so far though, although not much 4wd fun...
User avatar
mercutio
Hard Yaka
Posts: 1955
Joined: Tue Jul 08, 2003 12:00 pm
Location: Wellytown

Post by mercutio »

hurry up and get it ready i think it would be mean on thompsons track
User avatar
SupraLux
Complete Bastard
Posts: 2415
Joined: Tue Dec 10, 2002 12:00 pm

Post by SupraLux »

mercutio wrote:hurry up and get it ready i think it would be mean on thompsons track


read the very first post on this thread, and look at the date I posted it... :lol:

Its been ready for a year! :lol:

Steve
User avatar
LT1-62
Bush Crasher
Posts: 88
Joined: Thu May 05, 2005 12:00 pm
Location: Beeaaaauuutiful Christchurch

Post by LT1-62 »

Ranchos 9000s installed


Image


Here comes the engine, how many kgs did you say that block and tackle's rated for Steve?


Image


Image


Engine mounts tacked. The engine mounts, new rubbers, cast alloy bellhousing, new flywheel, and a large handful of weird looking associated hardware was purchased from Marks 4wd Adaptors in Aussie (http://www.marks4wd.com).


Image
User avatar
LT1-62
Bush Crasher
Posts: 88
Joined: Thu May 05, 2005 12:00 pm
Location: Beeaaaauuutiful Christchurch

Post by LT1-62 »

Rancho 9000 in-cab controller gauge bling

Image


Off to the paint shop. The colour is matte green aka olive drab. I also considered a flat black paintjob but heard they can end up looking like shite if not sprayed properly.


Image


Image


Image
User avatar
LT1-62
Bush Crasher
Posts: 88
Joined: Thu May 05, 2005 12:00 pm
Location: Beeaaaauuutiful Christchurch

Post by LT1-62 »

Bumper fab
I wanted to build new front and rear bumpers for a couple of reasons.

Firstly, both the front and rear bumpers on a factory 60 series cruiser limit approach and departure angles quite drastically. It is especially bad in the rear of these wagons because they have a big fat ass that tends to drag on things, the low slung factory rear bumper and tow bar makes it even worse. I had a factory PTO winch bumper on the front and decided to take it off. The number of places that the 400+mm platform bumper had limited me from going was greater than the number of places that the winch had saved me from, so it was gone. It also created another $500 to my budget after selling it on trademe.
Secondly, the 50mm gap left by the bodylift needed to be filled and looked stupid IMHO.


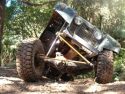
The first pic shows the panels put back on after paint and the middle section of the front bumper fitted up for test.

Image


First step to designing the bumpers was surfing the likes of IH8MUD forums for stuff other people had done, and trying to find somoething I liked. After compiling a folder full of bumpers I had a general idea what I was after, so I stole a bunch of cardboard from work and got me old tape measure out.

Having gotten in touch with my artistic self and made a cardboard template, I had a piece of 3mm steel plate folded up to my specs, and ripped into it with the grinder.


Image


The folded inserts that sit inside and bolt to the chassis rails are also 3mm plate, however the strength of the bumper mounts come from the 10mm flat bar which also extends through the front of the bumper and can be used as tow points.


Image


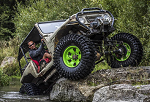
The strength of the bumper comes from 100mmx50mm steel box section that sits snugly ontop of the chassis rail mounts and runs the full length and contour of the bumper, including the side 'wings'. You can also see from the above pic that I have made the bottom of the bumper start at the chassis rail, so the lowest point of the front of the truck is now the chassis, this is a VAST improvement over the factory setup, and hides the body lift nicely.


Image
User avatar
LT1-62
Bush Crasher
Posts: 88
Joined: Thu May 05, 2005 12:00 pm
Location: Beeaaaauuutiful Christchurch

Rear bumper

Post by LT1-62 »

Unfortunately I dont have any build pics of the rear bumper but it was made a similar way. I made a cardboard template, got the steel shell folded up and then ripped into it with the grinder. The frame mounts are 10mm flatbar that extend through the bumper to serve as tow points, and inside the 3mm plate shell there is box section providing the meat of the bumper.

Image

I decided to remove a crossmember that was built into the frame behind the bumper. You can see a picture of this in one of the previous 'getting painted' photos. I then chopped a few inches off the rear of the chassis rails so I could recess the bumper as close as possible to the rear of the truck whilst still providing adequate protection for the rear doors. Like the front bumper the lowest part of the truck is now the chassis rails.

I also wanted to incorporate a removable hitch into the bumper and I found pics of one I liked on ih8mud.com, where the reciever protudes through the face of the bumper, meaning that the reciever had zero impact on rear departure angle.

I copied this design and to make it strong I integrated the receiver into the new tube steel crossmember to replace the one I cut out. the reciever is also welded to the box section that makes up the core structure of the bumper. For the 'wings' of the bumper I used some 5mm plate steel to add some protection for the rear quarters.


Image


After having the whole thing tacked together I then took it down to Blackwells Engineering in Christchurch to get it welded together so it was WOFable. They were suitably impressed enough with the strength of the design to put their sticker on it and give it a 3ton tow rating.

I dont have a picture of the 30cm drop on the removable tongue but Im certainly glad its removable since it looks ridiculous :D


Image
User avatar
LT1-62
Bush Crasher
Posts: 88
Joined: Thu May 05, 2005 12:00 pm
Location: Beeaaaauuutiful Christchurch

COMFY :)

Post by LT1-62 »

Landcruisers are not renowned for the comfort of their seats (not ones built pre 90's anyway, so using the old adage 'gotta cert it so might as well mod as much shite as possible' I installed comfy new seats to boot. Here is a picture of the super beef mounts (i've heard certifiers tend to look extra hard at things like seat mounts).

Image

and here is a pic of the seats installed...


Image


The seats are from a '95? Diamante and were scored for cheap off trademe (surprise, surprise). They fit perfect, JUST managing to squeeze in. They are totally lush and kinda make you forget your driving a 4 corners leafsprung vehicle with 35" mud tyres. The arm rests are my favourite, and make bouncing around offroad and long distance driving a breeze. :D
User avatar
niblik
Sausage Shack
Posts: 3305
Joined: Wed May 03, 2006 12:00 pm
Location: erm.. out in the shed for a mo...

Post by niblik »

looks awesome the mods done.. very nice thought put into the bars and i like the removable hitch.. the seats look comfy as hell too! great lookin 60 ya buildin.. p.s.. go soa.. :twisted:
User avatar
LT1-62
Bush Crasher
Posts: 88
Joined: Thu May 05, 2005 12:00 pm
Location: Beeaaaauuutiful Christchurch

Post by LT1-62 »

Here is a pic of the front bumper painted up...


Image


In addition to adding new shock towers in the front, I also wanted to get longer shocks in the rear. Given that you are not supposed to run rancho 9000s upside down and the damper adjuster nob of the shocks hang in the breeze in the stock position, I decided to move both top and bottom shock mounts in the rear. In order to move the bottom shock mounts up to the axle case, Steve (aka Supralux) built a new crossmember that sat significantly higher than the stock top-mount cross member. Steve did a great job of making use of the extra space under the body afforded by the 2" bodylift, putting the new cross member up as high as was possible. He even had the foresight to include extra mounts on the new crossmember if I ever decided to fiddle around with the rear suspension again (an insightful design given my propensity to fark around with stuff).


This pic shows both the old and new lower shock mount, freshly painted. Steve recycled the mounts from old spring plates.


Image


This pic shows the new crossmember. You can also see the old crossmember and the old top shock mount. You can appreciate how far this mount has had to move to accomodate the longer shocks and moving the bottom mounts to the axle. Also in this pic you can see the external high pressure fuel pump and the other mounts Steve built out wide (which should come in handy if (when) I decide to spring it over).


Image

another...


Image
Post Reply

Return to “Toyota”