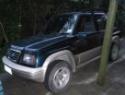
As some of you will know I've been busy doing the body lift on my 5 door V6 Vit over the past few days. As usual, things have not gone super smooth, so I figured it would be good to post a decent how-to for anyone else wanting to do it. So here goes:
Things to keep in mind before you start and while your doing the body lift:
* Work on level ground! If you don't you will find that the body will shift while you are working and you end up having to press it back into position - See my photos later on.
* To fit a 2" lift you will be jacking the body somewhere between 75mm and 100mm above where it sits on the chassis. This is quite a lot, so spend at least 20 minutes going through the entire engine bay and around the car and check which things connect the body to the chassis. On mine I had:
* Brake distribution block and fuel lines in front of the firewall driver's side.
* Strut brace!
* Hose connecting the air box with the air intake on the engine.
* Alternator power cable
* Brake line for left front wheel.
* Fuel tank filler hose.
I bought the 5 door body lift kit sold by Ben on trademe for $275, It's a pretty good quality kit, although you will see later that I only ended up using the female bolts and four of the spacers out of the kit.
So, these are the steps that I followed:
Step 1: Remove the front bumper, front grill and headlights. You have to remove the headlights to get to the two bolts underneath that bolt the front mounts.

http://www.andante.co.nz/projects/vitara/pics/bodylift/1_front_stuff_off_large.jpg
Step 2: Remove the rear bumper

http://www.andante.co.nz/projects/vitara/pics/bodylift/3_rear_stuff_off_large.jpg
Step 3: Remove the two screws holding the brake distribution block to the chassis and the screws holding the fuel lines to the body on the driver's side in front of the firewall.

http://www.andante.co.nz/projects/vitara/pics/bodylift/2_brake_dist_block_large.jpg
Step 4: Remove the two clips holding the passenger side brake line to the body.
Step 5: Loosen the clamps on the fuel filler hose.
Step 6: Loosen the clamps on the steering column in the engine bay.
Step 7: Remove the strut brace.

http://www.andante.co.nz/projects/vitara/pics/bodylift/4_strut_brace_off_large.jpg
Step 8: Remove the pipe connecting the airbox with the air inlet on the engine.
Step 9: Remove the center console and all the rubber boots around the transfer case lever and the gear lever.
Step 10: Remove the two bolts that are located underneath the headlamps and loosen all the body mount stud nuts. Unscrew the nuts completely from the side you are going to lift first and for the other side just undo the nuts as far as you can while leaving them on the studs.
If you've made it this far, your pretty much ready to start lifting the body. When lifting my body I used the widest piece of wood that I could to spread the load on the body as much as possible.
Start on one side and very slowly jack the body up. Stop every two or three pumps and work your way along the length of the car looking for anything that could be getting stretched or interfering! It would also help if you had two jacks that you could put in front of the rear wheels and behind the front wheels on the same side and jack it up nice and evenly.
When you've jacked it up high enough, remove the rubbers, remove the sleeves from the inside of the rubber bushes and fit the body lift spacers in. The order for my kit was: Body - Spacer Block - Rubber Bush - Chassis - Rubber Bush - Washer - Female bolt.

http://www.andante.co.nz/projects/vitara/pics/bodylift/body_lifted_large.jpg
I mentioned earlier that it was important to work on level ground, if you don't follow that advice (or like in my case your property has no level ground!) then you might have to end up doing something like this:

http://www.andante.co.nz/projects/vitara/pics/bodylift/move_body_large.jpg
The blocks that came with my kit seemed a bit narrow and they dug into the rubber bush:

http://www.andante.co.nz/projects/vitara/pics/bodylift/old_spacer_block_large.jpg
I was not that impressed, so I shot down to Universal Plastics (Also called Dotmar) in Mt Wellington and picked up some 75mm diameter rod UHMWPE plastic. (Ultra High Molecular Weight PolyEthylene) This was around $100 for enough material to do 8 * 50mm spacers.
I machines the spacers on the lathe at work and this was the result:

http://www.andante.co.nz/projects/vitara/pics/bodylift/new_spacer_large.jpg
I only made 8 of the larger spacers and siliconed four of the smaller ones onto the chassis where the body rubber spacers were. If you look underneath while it's jacked up it's pretty obvious where the four smaller spacers go. I just used some black RTV Silicone to glue the four on.
When you have fitted all the spacers, drop the body down slowly and evenly and screw in the female bots so they have a few threads on, doing this will help keep the body in the right place while your doing the other side.
When your done doing the same with the other side, go round and tighten up all the female bolts and fit the two longer bolts into the mounts under the headlights.
So, you've made it this far and you think your pretty much done . . . Not a chance, the job is only about half done. There are a number of things you still need to do:
Step 11: Cut away the inside of the guards to fit the strut brace back in. For this I used my new and shiny multi-cutter. This is a cutter that uses vibration instead of a rotating disc to cut. It worked amazingly well and is very easy to handle.

http://www.andante.co.nz/projects/vitara/pics/bodylift/strut_brace_cut_large.jpg

http://www.andante.co.nz/projects/vitara/pics/bodylift/multi_cutter_large.jpg
Step 12: Remove and extend the transfer case lever and gear lever. - Because the transfer case and gearbox mount to the chassis, but you use the levers inside the body, you will find that they are too short and are likely to hit the body when changing gears. Luckily removing them is pretty easy and I have a little mig welder at home that I used to glue a bit of rod in to lengthen it.
To remove the lever: Pull off the rubber boot that seals around the transfer case lever, inside there is a metal holder, press down on this holder and rotate and the metal holder will pop out, then just pull on the tc lever and it will come out.
This is what you will see:

http://www.andante.co.nz/projects/vitara/pics/bodylift/tc_lever_large.jpg
And this is after I welded in a 50mm spacer. Yes, my welding is pretty rubbish, but it will hold just fine, just had to grind it nice and smooth at work the next day.

http://www.andante.co.nz/projects/vitara/pics/bodylift/tc_lever_welded_large.jpg
I will continue to update this thread as I go, still a bit to do before I will be 100% finished
