Rebuilding a Hilux / LandCruiser Swivel Housing

brakes-shocks-lockers-etc
Post Reply
User avatar
SupraLux
Complete Bastard
Posts: 2415
Joined: Tue Dec 10, 2002 12:00 pm

Rebuilding a Hilux / LandCruiser Swivel Housing

Post by SupraLux »

Well, its a dirty job but someone has to do it - and I've done my fair share and then some. The last one I did I photographed my progress so that anyone wanting (or more likely, needing) to do it can have a reference.

I'll work through this in stages, as each side can take several hours to do and writing this up will probably take just as long.

If you need a rebuild kit, wheel bearing kits or any other parts to do this repair then please flick me an email at steve@4wdstuff.co.nz as I can supply them. Alternatively I can do the whole job for you, saving you a great deal of time and mess :)

If you have questions about a part I haven't covered yet then please hang on to them until I cover it, if you have questions about a step I have covered then ask - or if you disagree about a particular method I use then please post it up - This isn't about me, its about rebuilding a knuckle and the best way to do it.

Once complete, I'll have it trimmed, fixed and the extraneous crap removed then post it in the tech section.

Ok, so on with the tech.

Before you begin, assemble the following items:
one knuckle service kit (commonly configured with the part number SH4)
2 tubes of good quality GP grease (I use red-i marine grease) per side
a sh&tload of rags
and tools:
17mm deep socket
10mm socket with thin walls
12mm socket
ratchet and short extension
torque wrench
circlip pliers
ball-joint puller
diags (sidecutters)
soft drift
hammer
prybar
a container or two for nuts and bolts
a parts washer or a container with parts wash fluid (or kero) in it and a stiff brush

Ok, so first park the vehicle on the flat, jack it up as high as practical and put a jack-stand under the axle to support the side you're working on. Undo the 6 10mm head bolts holding the free-wheeling hub cap in place (if you have a non-factory brand hub this cap may be secured with cap-screws or something else). There is not a great deal of room around the bolt heads so you may need to grind a 10mm socket down a little to fit as I have done here. Also put a rag on the floor under the area you are working as much dirt and grease will end up down there. Note how clean the one I am using is now... check it again later in the process...

Image

Slide the cap straight off and place it in a container - if you are not planning to clean and re-grease the manual hub then wrap or cover it to keep it free of dirt while the knuckle is being rebuilt.

Image

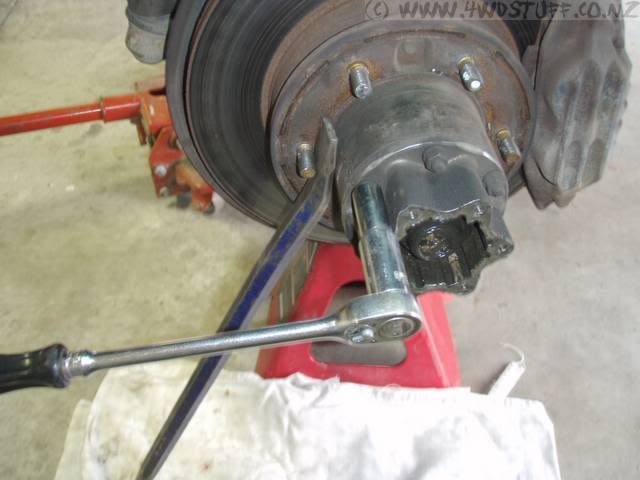
Then undo the 6 nuts holding the hub body on using a 12mm socket. Do not completely remove them, just unscrew then so the end of the nut is flush with the end of the stud. At this point you may want a pry-bar or something similar wedged between a stud and the body and the ground to stop it turning while undoing these nuts as they will (should) be tight.
Image

The reason for having the nuts flush is that the next step is to crack the tapered cone washers free of the hub body - and these jam in quite tight. I use a brass drift on the top of the stud and prefer to have the nut to both spread the shack and support the end of the drift while hitting it. Shocking the end of the stud will loosen the cone washer allowing them to be removed.

Image

Note the previous person to do this job used another method to remove the cone washers - one I don't approve of - the sides of the hub body flange have been hit, which deforms them, popping the cone washer out... this is not a good method as it deforms and weakens the body - although as a last resort it is usually effective.

Image

Once all 6 cone washers have been loosened they can be removed and placed in your container, and the circlip on the end of the CV can be removed (carefully - they can be a right pain in the arse to find if it 'pings' off across the garage). Note that in many of the steps that follow you may need to wipe grease out of the way to see what you are doing.

Image

The hub body can now be removed

Image

Next the 2 nuts and locking tab-washer need to be removed. Use a screw-driver or a small cold-chisel to knock the tab(s) facing out back flat so that the first nut can be undone.

Image

Then remove the nut and the tab washer (it may need some extra help to be removed, they get bound up on the threads - your rebuild kit should have a new one so don't sweat too much about damaging it unless you are only tightening the wheel bearing).

Image

Then remove the second nut and the rotor section is almost ready to remove - all that remains is to remove the brake caliper. This can be done by pulling the spring clip that holds the short hard line from the caliper to the flexy-line and then undoing the 2 17mm head bolts on the back of the caliper and carefully positioning it out of the way (sometimes its best to tie it to the leaf spring with a bungy or a zip-tie).

Image

Image

At this point the rotor section can be removed - be aware there will probably be a bit of grease and muck coming from within if the seal has been gone for a while and its leaked diff oil into the knuckle. Also, the outer wheel bearing and a thick washer will fall out as the rotor section is pulled off.

Image

Image
User avatar
SupraLux
Complete Bastard
Posts: 2415
Joined: Tue Dec 10, 2002 12:00 pm

Post by SupraLux »

Ok, so the next step is to remove the 8 bolts (14mm head) holding on the stub axle, which will also release the big dust seal and the brake rotor backing plate. If you have not disconnected the brake line or supported the caliper then this will pull down and make life difficult at this stage.

Image

Once all are undone, remove the dust seal and backing plate and support the brake assembly again, out of the way. Now you can start to see how much of a mess is going to have to be cleaned up... it would pay to re-insert two bolts to hold the stub axle in place again while the majority of the dirt is cleaned off the knuckle housing, to keep it from getting all over the inside.

Image

Image

At this point it might make life easier to remove the tie rod from the steering arm. Use a proper puller to disconnect it, as a hammer will most likely damage something. Also flip the nut and thread it onto the tie rod to help spread the load.

Image

Now undo the 4 19mm nuts holding the top steering arm in place, and then carefully tap the side of the arm to get the 4 cone washers to pop out (leave the nuts on the top of the studs as sometimes the cone washers let go with a 'ping' and they can be difficult to find :) )

Image

and loosen the lower 4 nuts as well (the lower ones do not have cone washers, just spring washers).

Then remove the 8 small bolts (10mm head) on the back of the knuckle housing which are holding the 2 steel formers and the felt, rubber and steel seals in place.

Image

Using a careful combination of leverage and tapping the side of the steering arm with a hammer you can now lift off the steering arm. It gets bound in to the kingpin bearing, and if the bearing is too badly damaged it can be quite tricky. I have had the odd one where I've actually had to break the bearing to get it apart.

Image

And now the knuckle housing can be removed for cleaning... just leaving us with the CV and the knuckle itself.

Image

You will see as you turn the CV that there are two 'flats' on the side of it, and if you line them up with the two 'lobes' top and bottom of the ball that you will be able to carefully pull out the CV and axle assembly - wrap the CV in a clean rag and place it aside for cleaning and re-greasing prior to re-assembly.

Image

Image

You can now see the inner seal, the source of all our problems. This seal is the one that lets the diff oil into the knuckle and causes the leak... its removal required a small punch or screwdriver and a hammer - just 'bash' (carefully) the side of the seal to deform it and it should fall out. Alternatively you can try and prise it out - this doesn't always work tho.

Image

Image

If you are replacing the kingpin bearings (you've come all this way, you really should) - and I am going to for obvious reasons, then you will need to knock out the bearing shells. You will find 2 indents at the back of each shell seat where you can alternatively tap a punch to carefully remove the seats. One good tap on the punch back and forth and it will work its way out.

Image

Image

At this point you are done stripping the knuckle. It will need a really good cleanup if its anything as bad as this one... the knuckle itself will need cleaning with some scotchbrite or wet and dry, and all the old grease and oil needs to be cleaned out, along with any rust or dirt. Next step, the re-assembly.
User avatar
nstacey
Hard Yaka
Posts: 542
Joined: Fri Jun 08, 2007 12:00 pm
Location: Tawa, Wellington

Re: Rebuilding a Hilux / LandCruiser Swivel Housing

Post by nstacey »

I've pulled my front axles to put my lokka up front,
Image

The grease on both sides is a bit emulsified see pic, and obviously has been packed with quite a bit of grease last time a previous owner had it out. Steve's pic here hasn't been greased at all and the pics in my workshop manual are clean.

Image

So when I reassemble, does the axle need to be packed with this much grease?(if any)
85 Hilux single cab
02 Grand Vitara
User avatar
Pedro
Hard Yaka
Posts: 902
Joined: Mon Dec 09, 2002 12:00 pm
Location: Wellington

Re: Rebuilding a Hilux / LandCruiser Swivel Housing

Post by Pedro »

i pack the CV with suitable grease and then put more in around the swival housing as such, i think it helps prevent water and crap getting into the cv area, i then add about 100 mls of EP diff oil thru the bung on the side of the housing ,the grease and oil emulsify and turn into a sloppy slippery mix, have not had a cv shite itself yet, it wroks for me , wether its the correct way ......

pedro
User avatar
coxsy
Hard Yaka
Posts: 5200
Joined: Tue Jun 20, 2006 12:00 pm
Location: mangere auckland

Re: Rebuilding a Hilux / LandCruiser Swivel Housing

Post by coxsy »

go the grease way
89 safari, pto winch, 33x15 simexs. sliders,75mm lift . turbo intercoolered
User avatar
Andrew1706
Hard Yaka
Posts: 716
Joined: Wed Nov 28, 2007 12:00 pm
Location: Auckland

Re: Rebuilding a Hilux / LandCruiser Swivel Housing

Post by Andrew1706 »

Good timing with bumping the thread, I just bought a seal kit to do my diff :D
User avatar
Bulletproof
Hard Yaka
Posts: 1775
Joined: Sat Apr 19, 2008 8:18 pm
Location: Nelson

Re: Rebuilding a Hilux / LandCruiser Swivel Housing

Post by Bulletproof »

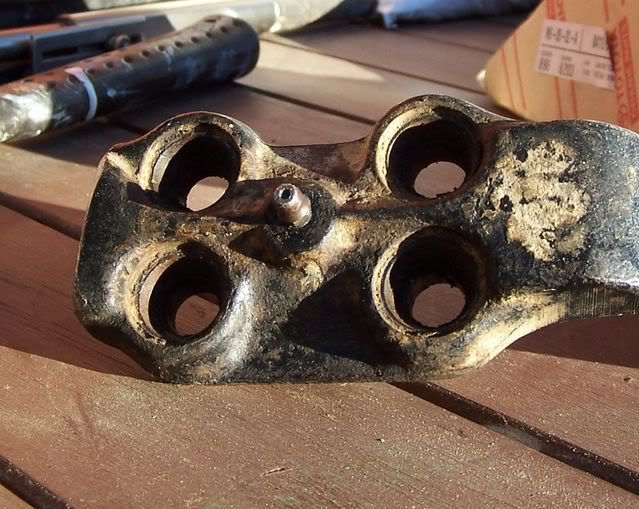
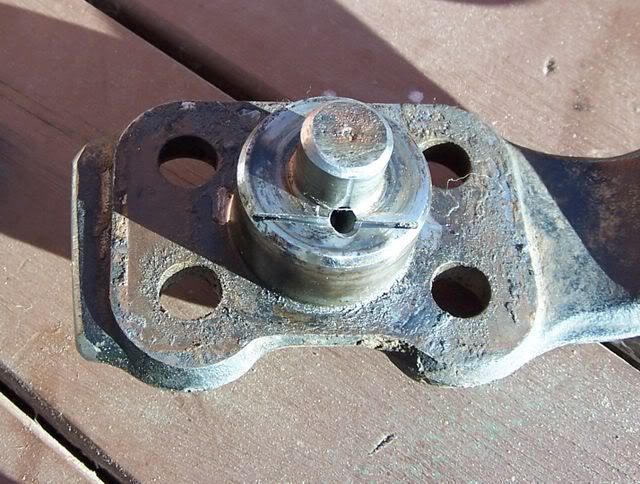
If you are rebuilding the swivel housing it pays to modify it and fit a grease nipple for the top king pin bearing :idea: :idea: :idea:
This what I have done and it stops them rusting up

Image

Image

Cheers Richard
Never say die, up man and try
User avatar
nstacey
Hard Yaka
Posts: 542
Joined: Fri Jun 08, 2007 12:00 pm
Location: Tawa, Wellington

Re: Rebuilding a Hilux / LandCruiser Swivel Housing

Post by nstacey »

Where's the best place to go for a Hilux Swivel kit? I've got play in the front passengers side hub. (definitely in the Swivel not the wheel bearing)
85 Hilux single cab
02 Grand Vitara
User avatar
Fakey
Hard Yaka
Posts: 1159
Joined: Mon Sep 21, 2009 8:48 pm
Location: Townsville Nth QLD

Re: Rebuilding a Hilux / LandCruiser Swivel Housing

Post by Fakey »

BNT are normally cheaper than repco I know that much :wink:
Didn't barbie drive a jeep??
User avatar
meatc
Hard Yaka
Posts: 979
Joined: Mon Apr 02, 2007 12:00 pm
Location: Whangarei

Re: Rebuilding a Hilux / LandCruiser Swivel Housing

Post by meatc »

Don Kyatts (ex truck and bus) in South auckland. Google them or yellow pages (I cant be bothered) I got told by a mate at BNT to get them from Kyatts as thats where BNT get them.

They have them on the shelf and will send them out overnight if you ring early enough. (like before lunch)
Toy - Zuk chassis tub, hilux 4.88 axles and transfer, Nissan CA18DE motor and auto trans, sc12 supercharger, 32 10'5 simex, twin motor 8274 custom freespool. Well the parts are all there in various corners of the shed
User avatar
coxsy
Hard Yaka
Posts: 5200
Joined: Tue Jun 20, 2006 12:00 pm
Location: mangere auckland

Re: Rebuilding a Hilux / LandCruiser Swivel Housing

Post by coxsy »

got a kit for the saf today at Don kyatts $200
89 safari, pto winch, 33x15 simexs. sliders,75mm lift . turbo intercoolered
User avatar
nstacey
Hard Yaka
Posts: 542
Joined: Fri Jun 08, 2007 12:00 pm
Location: Tawa, Wellington

Re: Rebuilding a Hilux / LandCruiser Swivel Housing

Post by nstacey »

I'm going to dig this post up yet again.

Have put my swivel housing back together (axle not back in yet) so I've bolted in both the steering arm and the lower bit that retains the kingpin bearings.

Question is should it be fairly stiff to move the steering piece left and right (without the tie rod attached)? At the moment I can move ok it with one finger (but not my little finger) If that is a unit of measurement. There is no up down movement which is good. I can't find it in my workshop manual (only the IFS stuff)

Is this just because everything will be seating in? I used one shim on top and one on the bottom as this was what was on the old bearings when I took them off.
85 Hilux single cab
02 Grand Vitara
User avatar
coxsy
Hard Yaka
Posts: 5200
Joined: Tue Jun 20, 2006 12:00 pm
Location: mangere auckland

Re: Rebuilding a Hilux / LandCruiser Swivel Housing

Post by coxsy »

well know the nissan book shows a spring balance being used to get the correct weight or pull required to move the hub unit can remember if the toyota book for the 40 has the same requirement
89 safari, pto winch, 33x15 simexs. sliders,75mm lift . turbo intercoolered
User avatar
De-Ranged
Hard Yaka
Posts: 1883
Joined: Tue Apr 06, 2004 12:00 pm
Location: Hawkes Bay

Re: Rebuilding a Hilux / LandCruiser Swivel Housing

Post by De-Ranged »

The breakout measurement is measured easily with a fish scale :wink: hook the end in the steering arm with it in the straight ahead position.... pulling to the side should take between 3kg's-6kg's the actual measure is (29-57N) if its more put extra shims in if its less take some out (the kit should come with them, unless you have the terrain tammer kit this dosn't come with them or bearings) oh and do this before you put the wipper seals in :wink:
Common fault with this job I find is people seating the cup race of the bearings with a hammer... this can bruise the lip, this is easy to feel once you have it tight by hand rotate it, if it feels notchy then you've done this :lol:

Cheers Reece
User avatar
jeremy
Hard Yaka
Posts: 288
Joined: Sat Jan 21, 2006 12:00 pm
Location: Auckland

Re: Rebuilding a Hilux / LandCruiser Swivel Housing

Post by jeremy »

You are supposed to also use the shims to center the knuckle on the housing.

Some reading...
http://pirate4x4.com/forum/showthread.php?t=678087

And jafa's alternative method...
http://www.pirate4x4.com/forum/showthread.php?t=734345

De-Ranged wrote:(the kit should come with them, unless you have the terrain tammer kit this dosn't come with them or bearings)
I think you can get different kits from Terrain Tamer with different bits in them, as the kit I have from them comes with everything including shims and bearings.
User avatar
timmay556
Hard Yaka
Posts: 198
Joined: Tue Apr 07, 2009 3:47 pm
Location: Taupo

Re: Rebuilding a Hilux / LandCruiser Swivel Housing

Post by timmay556 »

This thread is good! Anyone point me in the direction of buying a "kit" I believe that 4wdstuff isn't running anymore.
User avatar
kbushnz
Hard Yaka
Posts: 2486
Joined: Wed Sep 16, 2009 9:03 am
Location: Massey, Auckland

Re: Rebuilding a Hilux / LandCruiser Swivel Housing

Post by kbushnz »

Terrain tamer kits, Don Kyatt aka NZ Bus and Truck in Manukau AKl.
Give them a ring.....

Calvin
Cheers Calvin
KZJ78 Landcruiser Prado...
User avatar
timmay556
Hard Yaka
Posts: 198
Joined: Tue Apr 07, 2009 3:47 pm
Location: Taupo

Re: Rebuilding a Hilux / LandCruiser Swivel Housing

Post by timmay556 »

Perfect, Will call on Tuesday.

When you tighten your hubs because the wof man says there is too much play, are you tightening the big nut that can be seen in this pic: http://i241.photobucket.com/albums/ff22 ... e00012.jpg

Also what tool do you buy to tighten it?
nismo26
Hard Yaka
Posts: 405
Joined: Sun Nov 22, 2009 5:13 pm
Location: Christchurch

Re: Rebuilding a Hilux / LandCruiser Swivel Housing

Post by nismo26 »

Yes that nut will tighten the wheel bearings, you can get a socket here, http://www.snr4x4.co.nz/54mm-spindle-socket-p-206.html
User avatar
timmay556
Hard Yaka
Posts: 198
Joined: Tue Apr 07, 2009 3:47 pm
Location: Taupo

Re: Rebuilding a Hilux / LandCruiser Swivel Housing

Post by timmay556 »

Fantastic, have sent him a quick question but then I will be ordering from from there - easier then ordering from 2 places.
jagni401
Bush Crasher
Posts: 80
Joined: Sat Jun 18, 2011 12:58 am
Location: Christchurch

Re: Rebuilding a Hilux / LandCruiser Swivel Housing

Post by jagni401 »

So when your tightening the nut, do you just tighten it enough to remove the play, but not too tight that the wheel wont rotate unrestricted?
Post Reply

Return to “Drivetrain / Suspension”