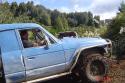
the body was lifted with 60mm box section and already had the guards cut for bigger wheels
next was the roll cage and the mounts for it. the whole thing is removable and has the seats bolt to the same mounts. the only part of the body we really need is the firewall as it mounts alot of stuff. we had the 2 main hoops bent and everything else was cut and notched at home
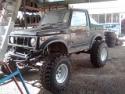
went ok until the engine stoped running, cleaned out the carb after that want all was well. heres some pics of the finished project it has a warn winch that can be flipped around the other way by simply undoing 4 nuts
Susan must now have a name change, because the smoky old Datsun A15 engine is useless going up steep hills with bumps - the engine cuts out momentarily, usually just at the time you need full power. The problem is the carburettor, so the son and I (but mostly "I") are in the process of installing a Toyota 4age engine. All the wiring that I had to work out from scratch will now be tossed aside while I figure out how to wire up the new engine.
We have learnt a few things with this vehicle over the last 4 years, some of which Defmonbart has already mentioned. For example the winch, which sits in a steel frame and is held in with 4 bolts (finger tight). The frame has raised lips welded to it that take the winch loads (the bolts only stop it from falling out if we turn turtle), and by mounting it in the rear of the vehicle the weight is better distributed. We probably spend more time pulling ourselves out of mud holes by going backwards so the rear position is better suited for this. When we want to winch forward we just undo the four nuts, lift the whole winch and it's steel support plate up and turn it around so it changes winching direction. We then run the cable under the vehicle and out through a fairlead attached to the front bumper (visible in one of the photos).
Also mentioned were the rear drum brakes, which are bloody useless on any vehicle that spends a lot of time in muddy conditions. We used standard Suzuki front disks, but to mount them on the rear axles we cut the flanges out of the original drums and then turned them up in a lathe so that the disks were a snug fit over the top. The result is a cheap and strong rear disk mount but you also need longer wheel bolts, which must now go through the old drum flange plus the disk flange. Genuine wheel bolts with a flat on one side cost an arm and a leg, but for a fraction of the price you can buy high tensile bolts of the right length and then grind a flat on the head so they fit the flanges (remember, this vehicle is not road legal and is towed everywhere with an A-frame). The calipers came from the rear brakes on a Toyota levin, and I fabricated the mounts and bolted them up to the diff housing. The mounts are much heavier than they need to be, and I should have used thinner steel plate.
The fuel tank is not in an ideal position either, because it sits too low and too far back in the chassis so gets all the hits when dropping off banks. In fact, the first tank developed pinhole leaks from creases in it, and the second one is now at the end of it's life as well. We will install a new tank but it will be set further forward in the chassis, and will be either a fuel cell or a tank made from a stainless beer barrel.
The steering rod is also vulnerable to bending, and I'm sure there are plenty of you out there who have hit something and bent one. A very effective way to strengthen it is to weld a length of 25 x 25 x 6 mild steel equal angle down each side of it. This effectively places the round steering rod inside a square box, and we've never bent one that has been modified like this.
So far, Susan has cost us about $3,500 in materials and LOTS of time spent cutting and welding, but the fun we've had is priceless. We had her weighed without the winch and she came to 760 kg.
The next major change will probably be coil spring suspension front and rear, and a Toyota engine with front-wheel-drive gearbox so we can get the engine further back and also dispense with the transfer case, but that's a whole new can of worms that can wait a year or two (I don't even want to think about it).
time for the 4age, bigport redtop, with k50 (i think) gearbox, still using the 410 transfer case
the old a15 had a mechanical fuel pump, and the 4age has an electric one located in the fuel tank, so we have put in a new tank mounted next to the winch and as low as possible without hitting the diff
power steering is another thing we added. the box and pump is off an old Isuzu truck. mounting the box was quite a job as the bolt holes didn't match up with the original ones, so the chassis was drilled out for a couple of new sleeves to be welded in. this is so the head of the bolts are recessed into the chassis allowing the tires not to rub on them
a rear mounted radiator had gone in. its from a subaru i believe
also because of the size of the new plenum we had to relocate the brake booster, this was done by moving it over and using a torque tube to keep the pedal in the factory location
the engine had a loom made up by the previous owner, and once installed the engine barely idled. first thing we noticed was the fuel pressure at the rail was only 20psi, so after getting a new fuel pump we had 80psi at the tank and 40psi at the rail which is what its meant to be. it still ran like a dog, after hours of frustration and swapping out sensors and ecus we decided to get professional help. we took it up to Stu Jones and straight away he noticed a few things that should be changed. after a day in his hands it was re wired and running beautifully. it still had a high idle tho and Stu informed us this was usually caused by the idle up valve on the throttle body, we have removed this and put a plate where it used to be and now our idle is bellow 1k.
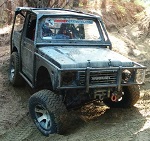
hers a few more random pics our wheels are 15x8 and have had the centers flipped giving us a massive -67 offset!!
we have a few spare diffs and axles if the 4age ends up snapping anything
hers the strengthened diffs we are running
hers a simple mount for working on diff heads made out of an old diff housing we had bent up
the cage was sanded and re painted while it was off
This is one cool little truck. Looks like a bit of a mongrel variety made up with bits from this and that like mine haha. Im running the rear discs with the factory front calipers, subaru master cylinder. Nissan radiator in the rear. Vitara engine since thats what I picked up cheap, SU carb conversion solves the problem most carbs have running at angles. Where abouts are you guys looks like a good truck for mine to come play with when I finish it? Like the winch mount that looks quite clever..mines in the front where the radiator was, problem is to clear the steering box it has to be mounted backwards which is going to mean the brake doesnt work and its bloody close to the crank pulley. Is it a pain when you have to switch the cable to the front? Also grinding down HT bolts for wheel studs is an interesting idea too, are they a pain to line up the wheel as they would try and fall out without the splined end? Definately much cheaper if it works, my rears are JUST long enough, but swapping my 0 offset steelies for some wider offset alloys so picking i'll need longer ones, plus thinking off cutting a spare set of stuffed discs down to make a spacer on the front that matches the extra offset from the rear discs so that'll make the front ones too short as well. I did try cutting the centers out of the steelies but they were bloody well welded and didnt want to wreck them cutting any deeper. Loving the keg too haha, I thought of doing that too but they pretty hard to find cheap plus I cant alloy weld, running the good old plastic boat tank at the moment
-------------------------------------------------
Newly brought currently bog standard Discovery V8i with a drinking problem
Real pleasure working on this and glad its all running sweet now - so much fun just mucking around in it, pretty tempted to build one myself now! Keep me updated with how it goes!
3VILC – We are in Massey, West Auckland. The only place we have gone wheelin’ is the Woodhill 4x4 park, and a few times along the beach from Muriwai to the South Kaipara Head area. My son (Liam) and I would like to try some other terrain, such as the Thompson Track across the Kaimai range.
In answer to your other questions: The winch is easy to turn around – it is held in a cradle by four 12 mm nuts that are only finger tight, so if we want to winch from the front we undo the 4 nuts, lift the winch up and spin it around 180 degrees and put the nuts back on (the winch is bolted to a steel channel, so the winch and channel are moved together). The winch power cables are attached directly to the battery which is next to the winch, and they are long enough to enable the winch to face front or rear. The only shitty part is if the vehicle is well and truly stuck, in which case someone gets covered in mud crawling under the side of the vehicle to pass the wire rope over the front axle and out through the front fairlead. If it is done before getting stuck, then it’s easy. Oh, and there is a large self-lubricating plastic block with a big guide groove in it that is bolted under the main chassis cross-member just behind the seats. This is the first guide that cable passes through after leaving the winch, and then it goes over the front axle and out through the fairlead bolted under the front bumper. I got this concept from the off-road vehicles that compete in the Rainforest Challenge, in Thailand (worth having a look at these vehicles. There are some neat-looking ones).
The HT bolts that we use for the extended wheel studs on the rear disk mounts are still a good fit in the original splined holes, but perhaps nut as tight as I would like. Having said that, they don’t move around and I think I may have put some thread-lock compound on them which also helps. They are certainly a much cheaper option than buying specialized studs and have the same tensile rating, but are probably not legal for a road-registered vehicle. Your idea of using the cut-out centres of old drum brakes as wheel spacers is a good idea – nice and simple and a good way to spread the loads over a wide area.
The keg fuel tank was not my idea – it was on a donor SJ410 I bought a few years ago in non-running condition. It is stainless so there are no problems welding with DC TIG. The large pipe sticking up from the centre goes almost to the bottom (perhaps within 3 mm of it), and this acts as a baffle to stop surging in the centre where the electric pump is mounted. The filler pipe is welded to one side and does not extend far into the tank. We use a highly sophisticated method of determining how much fuel we have, and we call it a “wooden dipstick”.
I’d also like to thank Stu Jones for his excellent work in getting the new motor and loom sorted out. Liam and I had tested and tried almost everything, but it still idled at about 2000 rpm and we could not get it to run smoothly. As Liam said, Stu got it all going and after we plugged the idle-up air valve it now starts first time and idles at about 750 rpm. Stu also showed us how to wire in the fuel pump cut-off relay so that it stops running when the engine stops for any reason (otherwise we could have an 80 psi flamethrower in an accident), and this has now been done and it works perfectly. Thanks again Stu.
I’d also like to put in a plug for Phil Bradshaw’s website on car building. Before we changed to the 4AGE engine I knew nothing about fuel injection systems, but thanks to Phil I now have a really good understanding of how they work and what all the sensors do. Phil is, I think, and ex RNZN man so he would be pleased to see the HMNZS WELLINGTON sticker on the little beastie.
At the time of writing I still have to modify the throttle pedal linkage (too much travel), and I’ll put a locked diff in the rear. And then we are off up to Woodhill as soon as it opens (it’s been just over a year since we started the latest mods, so about bloody time!).
Havnt done Woodhill yet, although it will be up the top of list to try, once I have established the truck is going to behave itself before I tow it that far Thompsons is where I have been most since its closest to me, but also been probably a little over a year since I brought the Suzuki as a rolling chassis so well overdue to getting out for a play, thank god its near finishing, or at least usuable (I dont think they are ever "finished"). Mines got a locked rear diff, brought it like that, makes a good mess of the gravel drive during test runs round the section Learnt a lot about Toyota EFI on my old truck, had a carby 4Y hilux that I adapted 3YE injection onto, almost identical to the old 4AGE setup, actually think a 4AGE corolla wiring diagram provided me most help hooking it all up. The 8valve vitara engine i've put in mine seems to go well under limited testing at least.
-------------------------------------------------
Newly brought currently bog standard Discovery V8i with a drinking problem
CORRECTION re the rear wheel studs. The Suzuki studs DO NOT HAVE SPLINES, but instead rely on a flat on one side of the head that sits against a mating flat cast into the brake drum. This is what stops the stud from rotating when it's done up, so the cheap HT bolt may not work if it is replacing a splined stud.
PeteP wrote:CORRECTION re the rear wheel studs. The Suzuki studs DO NOT HAVE SPLINES, but instead rely on a flat on one side of the head that sits against a mating flat cast into the brake drum. This is what stops the stud from rotating when it's done up, so the cheap HT bolt may not work if it is replacing a splined stud.