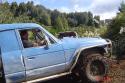
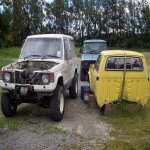
I've collected up some parts over the last year
body
should be enough to make a start
the plan is to bob tail the surf, mount the engine as far back as practical, run the fwd box as a low ratio transfer case.
then i'll try fit double triangulated front and rear 4 link.
why a surf? because people love to hate on surfs so why not make a surf that's still a surf but not really a surf just to mess with people.
the end goal is to have something light and low that is really simple. i plan to do the local mud plug and we will leave space for winches just incase i want to go down that track and do a season or two of winch challenges.
wish me luck