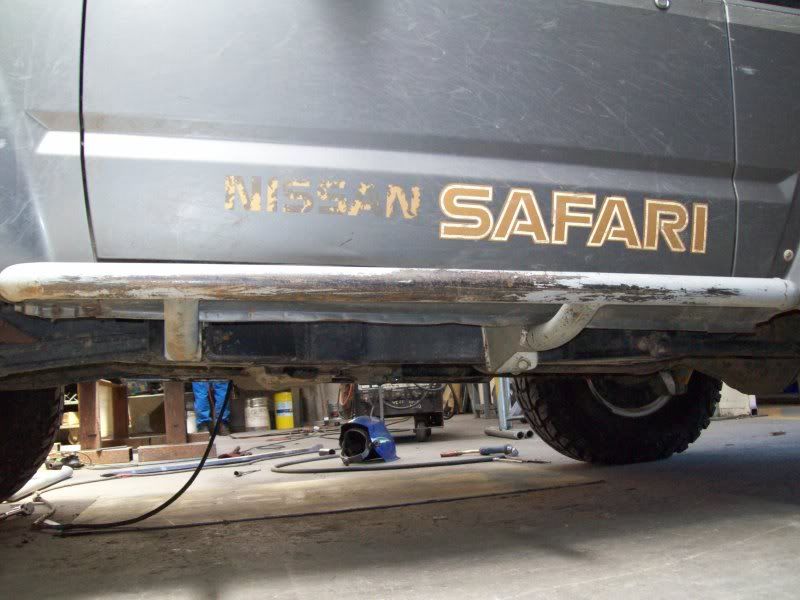
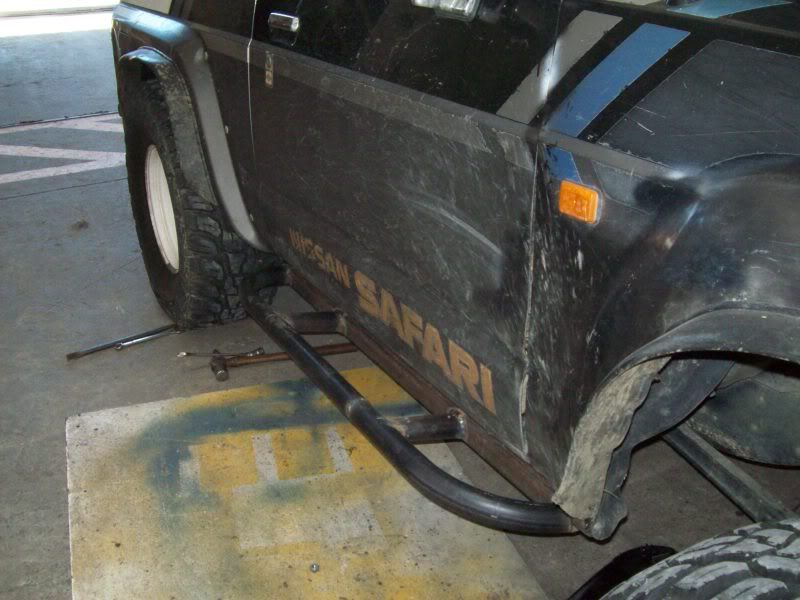
Easy 1/4 panel cut and sidebar mount point

For all Nissan related topics

Moderator: Mark

Post Reply
User avatar
Muzza
Hard Yaka
Posts: 107
Joined: Sun Jul 30, 2006 12:00 pm
Location: Central Hawkes Bay

Easy 1/4 panel cut and sidebar mount point

Post by Muzza »

Hi Guys
:D
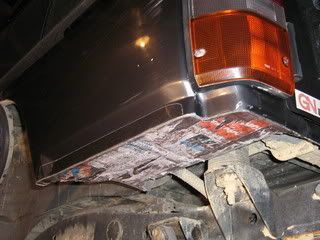
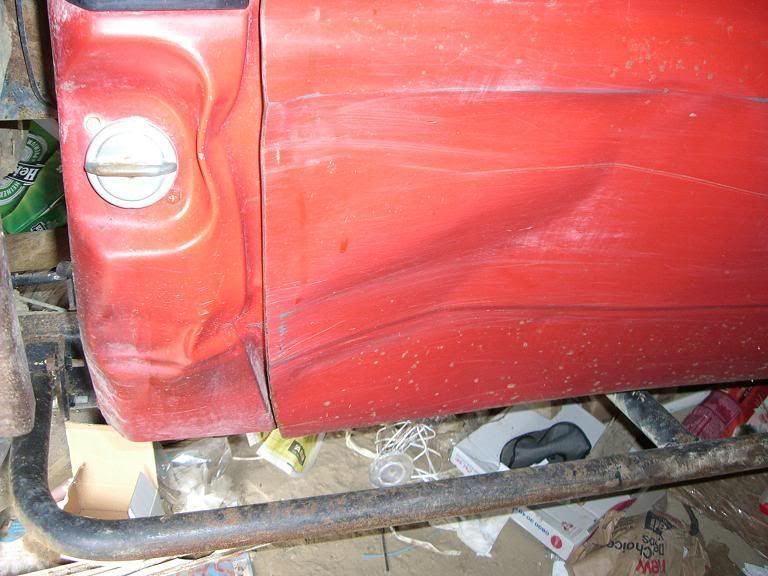
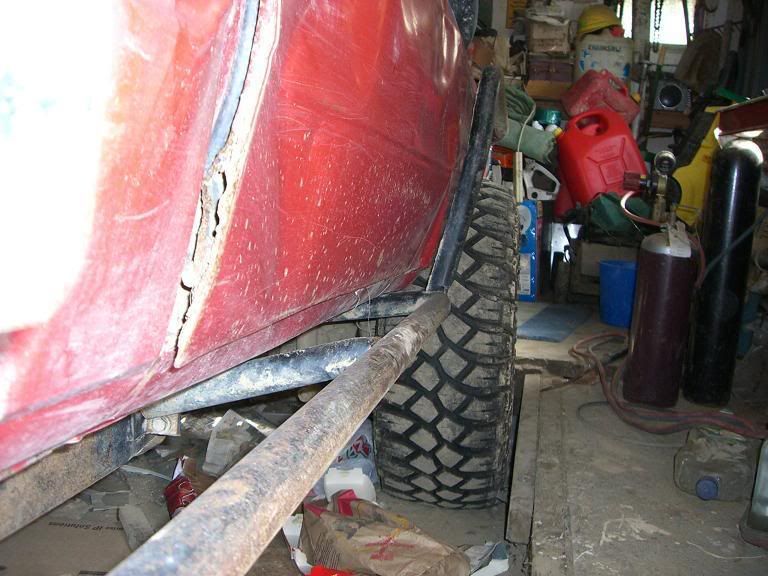
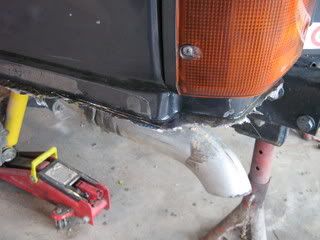
Finally got around to doing my rear quarter panel chop and sidebars so thought someone might be interested in seeing them as the sidebars mount differently ( rear suspension arm box )to others I have seen, and I used fiberglass cloth and resin for my rear guard chop which I found very easy and has the advantages of no welding, damage to paint and very neat.

Guard chop
Cut just below the new line and cut tabs which I bent inwards for the fiberglass to key into. These tabs were cut with tinsnips but I later found the cutting disc did a better job by not twisting the tabs.
Do tabs all the way round ( one side is only half done here )
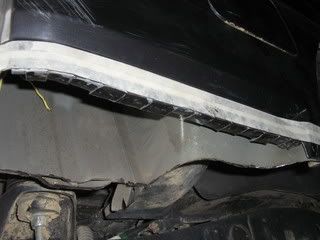
Image

I cut some fiberglass matt roughly the shape of the hole. Dunked it in resin and laid it on a board ( Paper inbetween to make it easy to seperate ) and held the board up flush to the bottom of the cut. It was a simple job then to just build it up inside the cavity with more cloth and resin, keying it into the tabs. ( plenty of vids on UTube showing how to fiberglass )
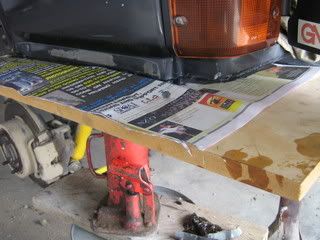
Image

Let dry then pull off the board. You can see the resin has oozzed out filling and sealing any holes and gaps.
Just trim the excess and you have one very neat, strong job.
Image
Image
Don't forget to put the drain holes back in for the floor support

Sidebars
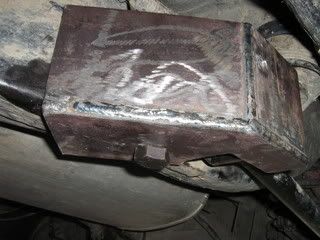
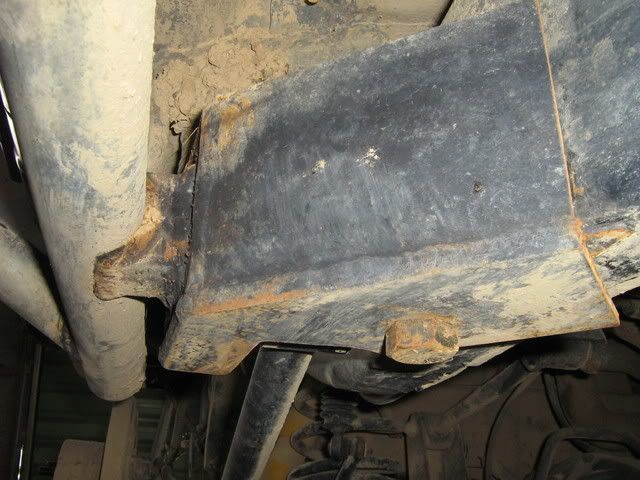
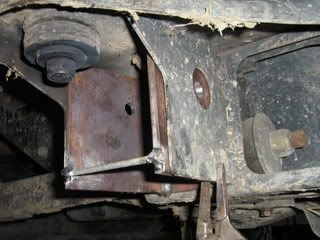
Made the brackets out of 6mm thick x 100mm wide flat. This was just the right width and depth to fit inside the front body mounting bracket and around and under the rear suspension arm mount.

Front Attachment is pretty typical but I have made sure that the plates are hard up against the underside of the body mounts so there is less weight taken on the bolts. I thought I would need to put an extra bolt in the lower corner but it doesn't seem to need it. 1st Pic below shows the bracket only partly made.
Image
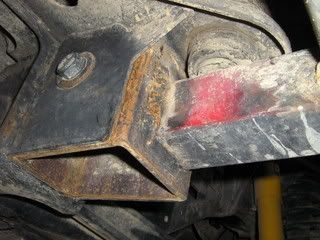
I made some tapered washers to lock and locate the big factory hole onto my smaller bolts.
Image

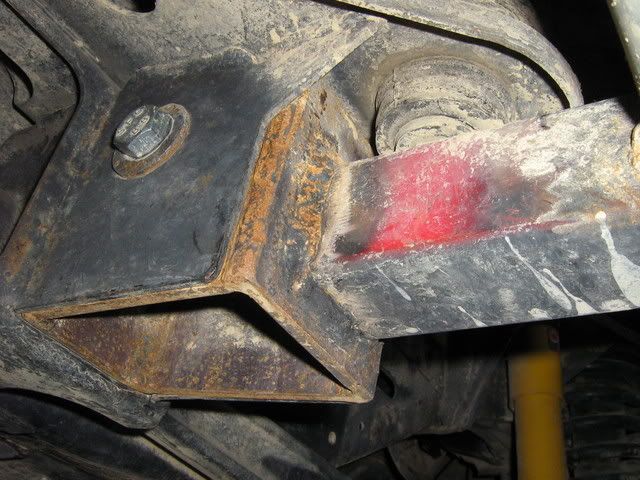
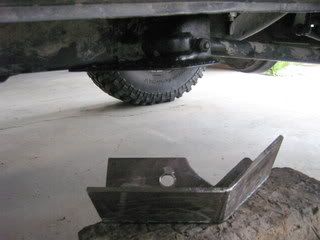
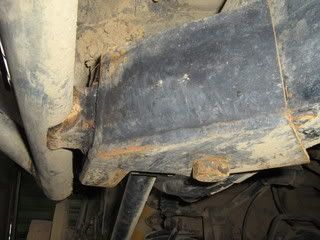
Rear Attachment uses the big hole in the bottom of the rear lower suspension arm brackets
Image
Left side
Image
Left side

I used a 20x50mm bolt with a nylock nut. I had to drop the suspension arm to put the nylock nut inside the suspension bracket but once inside it was kept from turning because it was wedged into the triangular corner. you could get real fancy and use some "Kneedit" to help locate it but you can get your fingers in behind easily enough to start the thread.
Image
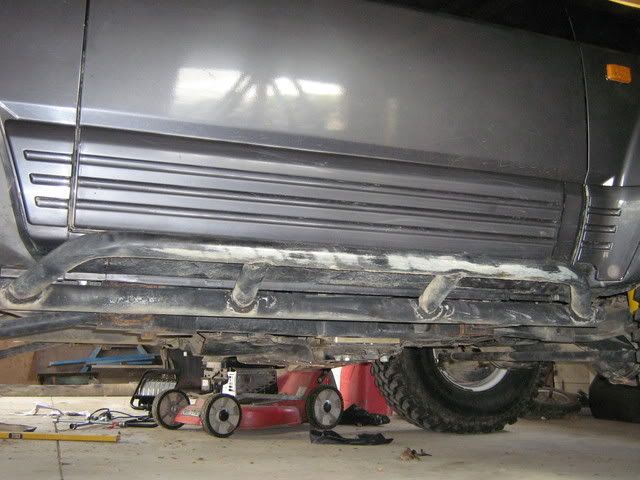
This is the Right side view ( after some playing )

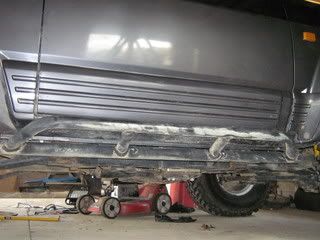
Because the bracket is so close to the bar there is not much leverage, and the triangular shape of the bracket and the fact it wraps around the suspenion bracket makes it plenty strong enough.
Had the "HiLift" jack under them and lifted the truck no sweet.

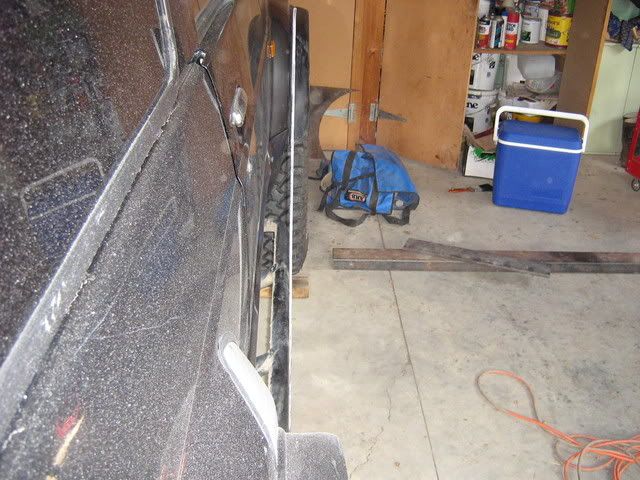
Bar offset ?
I wanted resonable protection but not so wide as to drag unnecesarily or hinder entry into the cab. You can see from the pic that they protrude out abit more than halfway between the widest point of the door and the tyres. After a good thrashing at RallyWoods I feel really pleased with this setup.
Image
Image

Hope this may help someone
Cheers :)
User avatar
flyingbrick
Hard Yaka
Posts: 1725
Joined: Sun Jan 18, 2009 7:36 pm
Location: Hamilton/Auckland

Re: Easy 1/4 panel cut and sidebar mount point

Post by flyingbrick »

Nice work dude- i love threads like these.

How much for a set of sliders identical to those? :mrgreen:
phone Ross Bolus (secretary of the BOP club) He'll save you.
User avatar
Muzza
Hard Yaka
Posts: 107
Joined: Sun Jul 30, 2006 12:00 pm
Location: Central Hawkes Bay

Re: Easy 1/4 panel cut and sidebar mount point

Post by Muzza »

Don't know what they are worth ? :? .... but I have had others ask me if I am interested in making some for them, so I am going to price up getting an engineer to make some. ( Took me nearly a year to get around to making these and they are still not finished properly. )
Should know more within the next week. I can then PM you with more info, pic's and $$ if you are interested.
What are ARB's ... etc bars worth anyway :?:
I have got a 1'' body lift but I can't see any problems adapting them for 0 - 2' lift.
I now need to make a rear and front bar but before I can do my front bar I want to lift and recess my electric winch even more. There is heaps of space between the front pulleys and the radiator so I am thinking I might put in a pair of slimline electric fans and move the radiator/ arcon etc back.

Cheers
:D
User avatar
DaveM
Hard Yaka
Posts: 3249
Joined: Tue Nov 02, 2004 12:00 pm
Location: Blenheim

Re: Easy 1/4 panel cut and sidebar mount point

Post by DaveM »

flyingbrick wrote:Nice work dude- i love threads like these.

How much for a set of sliders identical to those? :mrgreen:


x2 on the price PM :wink:
User avatar
gary_in_nz
Hard Yaka
Posts: 636
Joined: Thu Mar 15, 2007 12:00 pm
Location: Hawkes Bay
Contact:

Re: Easy 1/4 panel cut and sidebar mount point

Post by gary_in_nz »

that is very nice work, how thick box section did you go?? also looks like 40x40?? i have been trying to decide as one day i might get around to making some, trying to find a compromise between strength and weight, god knows these trucks done need any extra weight!!
"If it ain't V8, take it back"
Warning: Opinions and Expressions may offend.
User avatar
coxsy
Hard Yaka
Posts: 5200
Joined: Tue Jun 20, 2006 12:00 pm
Location: mangere auckland

Re: Easy 1/4 panel cut and sidebar mount point

Post by coxsy »

ABR ones are held on differant , i know i copyed them, remade the sliders like yours, made another set for a torrano boss charged $200 a side for them
89 safari, pto winch, 33x15 simexs. sliders,75mm lift . turbo intercoolered
User avatar
Muzza
Hard Yaka
Posts: 107
Joined: Sun Jul 30, 2006 12:00 pm
Location: Central Hawkes Bay

Re: Easy 1/4 panel cut and sidebar mount point

Post by Muzza »

gary_in_nz wrote:that is very nice work, how thick box section did you go?? also looks like 40x40?? i have been trying to decide as one day i might get around to making some, trying to find a compromise between strength and weight, god knows these trucks done need any extra weight!!


Image
Image
Image
Image

Should have made the images larger to start with. Must go back and do

No. The box section is 50x50 od and 3mm wall as the main tube is 50mm od and the outer bar and laterals are 43mm od. You could size everything down abit if going to higher strengh steel ?? ( Engineer looking at that when priceing up ).
My body lift is 25mm and there is enough plate in the rear mount to attach the box section up or down for 0 to 2" lift. If attaching toward the top of the plate ( 2" lift ) it would be a good idea to go to 8mm plate instead of the 6mm I used.
As for the front mount, if you have less than 1" lift just attach the box section lower on the chassis bracket and if your lift is more than 1" just step the box section up 25mm once you get past the body/chassis mounting bolt.
The main bar running under the sill is offset to the outside abit and about 7mm below. I have left a 10mm gap between the bottom of the opening door and the sill. It is only when you have the full weight of the truck on the bar that the door is only just restricted from opening. Leaving more gap between the door and outer sill would fix this if needed.

I know what you mean about weight as my mate chopped the whole top of his truck and it felt completly different to drive.
Using fiberglass for the 1/4 panel chop worked so well that my brain has images of replaceing the whole bodywork with it. :lol:
Can post up some more detailed pics and measurements if needed.

Cheers Murray
User avatar
rokhound
Hard Yaka
Posts: 2558
Joined: Sat Apr 22, 2006 12:00 pm
Location: Christchurch

Re: Easy 1/4 panel cut and sidebar mount point

Post by rokhound »

How do those bars go when in decent ruts and on an off camber? Do any of the panels get dragged or dinged?
I reckon side bars are the most important protection equipment a 4x4 can have, but not if they are too narrow. IMO you need to be able to fulcrum the truck around on the bars when they are resting against a tree or rock, and invariably when you are leaning on them like this, the truck is also leaning into the obstacle.
I made some for my 90 series and they are slightly wider than the tyres, and seem to be only just wide enough.
Ugly is a state of mind..... and the state of my truck!
User avatar
Sadam_Husain
Angry bird
Posts: 5164
Joined: Mon Feb 20, 2006 12:00 pm
Location: WELLINGTON

Re: Easy 1/4 panel cut and sidebar mount point

Post by Sadam_Husain »

rokhound wrote:How do those bars go when in decent ruts and on an off camber? Do any of the panels get dragged or dinged?
I reckon side bars are the most important protection equipment a 4x4 can have, but not if they are too narrow. IMO you need to be able to fulcrum the truck around on the bars when they are resting against a tree or rock, and invariably when you are leaning on them like this, the truck is also leaning into the obstacle.
I made some for my 90 series and they are slightly wider than the tyres, and seem to be only just wide enough.


Like Rok says :wink:
My bars keep my front guards straight but I still keep smacking my doors and back of the cab :roll: :roll: :lol:


Image

Image
User avatar
Muzza
Hard Yaka
Posts: 107
Joined: Sun Jul 30, 2006 12:00 pm
Location: Central Hawkes Bay

Re: Easy 1/4 panel cut and sidebar mount point

Post by Muzza »

rokhound wrote:How do those bars go when in decent ruts and on an off camber? Do any of the panels get dragged or dinged?
I reckon side bars are the most important protection equipment a 4x4 can have, but not if they are too narrow. IMO you need to be able to fulcrum the truck around on the bars when they are resting against a tree or rock, and invariably when you are leaning on them like this, the truck is also leaning into the obstacle.
I made some for my 90 series and they are slightly wider than the tyres, and seem to be only just wide enough.


Hi - I have read some of your threads on this subject before and I know what you are saying, and for extreme work like rockhopping I would be inclined to agree with you, BUT I have called them side bars, NOT rocksliders.
For alot of people who use their truck as a daily driver and general club truck I am inclined to think that there is a certain degree of compromise between total protection and useability. I find this setup works really good for me as it still allows good access to the cab and a high ( if not total ) degree of protection. On the GQ's the wheels ( I have 8" rims with Cruiser offset ) stick out from the body quiet abit and they hold you off the banks, so it is only when going around tight corners that the bars are dragging and for the type of country I am in if they were any wider they would be a real pain because they would be dragging to much and stopping me. The GQ's have a much wider track than the body compared to other trucks and I feel that is an important difference.

Was down in RallyWoods the other weekend and the tracks in that place are truck deep in some places and you definately get squeezed and dragged around corners. I never had any front or rear protection at that stage, only the sidebars, and every corner got bent and bruised But not the sides of the truck.
Yes ! when you are on steep "oncamber" tracks the body does roll and tilt into the bank ( just look at the top of my snorkel ) but on my truck it is the top of the cab that drags, not lower down and so you would need bloody wide sliders ( out past the wheels )to help you there and at that point they would be dragging and stopping your progress.

And don't forget the most important thing LOOKS !..... Looks a little wanky if they are to wide. :lol: :lol:
I think it's a little bit of "different strokes for different folks". - Man i've still got my carpet in, air con and stereo.. :lol: :lol:

I am planning to be down your way in about a month and would be good to touch base with some of the locals

Cheers Murray
:)
Hey this is good typing practice.
User avatar
rokhound
Hard Yaka
Posts: 2558
Joined: Sat Apr 22, 2006 12:00 pm
Location: Christchurch

Re: Easy 1/4 panel cut and sidebar mount point

Post by rokhound »

Sweet. I don't have any first hand experience with Patrols/saf's, and it sounds like you have taken everything into consideration that pertains to the style of terrain you play on, and that is the thing that is the most important of all. It has been said before, if we all drove the same stuff, we would all have the same rig!
Keep the dirty side down :wink:

Oh and Marty, At least it didn't affect the carrying capability of your flat deck last week :mrgreen: :mrgreen: (thanks a heap dude :wink: :P )
Ugly is a state of mind..... and the state of my truck!
User avatar
gary_in_nz
Hard Yaka
Posts: 636
Joined: Thu Mar 15, 2007 12:00 pm
Location: Hawkes Bay
Contact:

Re: Easy 1/4 panel cut and sidebar mount point

Post by gary_in_nz »

rokhound wrote: It has been said before, if we all drove the same stuff, we would all have the same rig!
Keep the dirty side down :wink:
)


thats the truth. if it wasnt for me with my nissan, a chap with a pajero and another with a jeep, the club up here would be the East Coast Toyota and Suzuki Club, and just be plain boring. but they still give me stick for having a safari?? one day... one day... i will show them hahahaha
"If it ain't V8, take it back"
Warning: Opinions and Expressions may offend.
User avatar
coxsy
Hard Yaka
Posts: 5200
Joined: Tue Jun 20, 2006 12:00 pm
Location: mangere auckland

Re: Easy 1/4 panel cut and sidebar mount point

Post by coxsy »

just run over the suzuki's :lol:
89 safari, pto winch, 33x15 simexs. sliders,75mm lift . turbo intercoolered
User avatar
coxsy
Hard Yaka
Posts: 5200
Joined: Tue Jun 20, 2006 12:00 pm
Location: mangere auckland

Re: Easy 1/4 panel cut and sidebar mount point

Post by coxsy »

what i had
Image
half way you can see my clamp rear mount two 12mm bolts
Image
what is like now
Image
89 safari, pto winch, 33x15 simexs. sliders,75mm lift . turbo intercoolered
Post Reply

Return to “Nissan”