The story begins....
Not so many weeks ago I thought I would collect firewood off the farm with my trusty 1991 D21. She's been everywhere to date, so what is a harmless 35 degree bank going to do....WELL..
Going down was no problems, but getting back up was rather interesting. Long grass, AT tyres and a low belly meant she danced around on the lip of the bank like posessed break dancing fool.
All over the dam place, ending up sideways down the bank, and hard up against the wire fence.
......An hour or two later, with a peeled back front bumper, removed left front indicator and lovely looking racing stripes down the entire side of the vehicle, I was still there. Pull out the trusty wire cutters I thought, and snip, snip went the wire fence and it shot off like a catapult. No not the car, but the fence with my bumper.
Reversed another 50m into the other paddock to get a good run up, but really ending up further back that where I was originally stuck.
Moral of the story
- Really long damp grass is worse than mud
- Wire fences hurt
- Bumpers can actually fly
So I will begin to spend some money now....... As experienced Terrano owners, who have been there and done that. If you could start again, what would be the first thing you would tackle?? I'm looking at a 75mm suspesion lift to start.
Cheers
Operation Terrano
Moderator: Mark
-
fullthrottle
- Shuttle Queen
- Posts: 677
- Joined: Tue Jun 28, 2011 3:18 pm
- Location: Welly
Re: Operation Terrano
75mm rear lift, you mean 
IFS, you can't do much there.
Lift is only to swing bigger rubber.
Who wants to start again. Yep....been there done that.
http://www.offroadexpress.co.nz/Forums/viewtopic.php?f=18&t=26455
Have a bit of a read.
I have ended up with a carbon copy and it goes just as hard.
It is a combination of the equipment under you and the nut behind the wheel.
Feel free to ask any questions
Cheers,
I keep looking for the loose nut behind the wheel, but I can't find it!!
-
fullthrottle
- Shuttle Queen
- Posts: 677
- Joined: Tue Jun 28, 2011 3:18 pm
- Location: Welly
Re: Operation Terrano
sibainmud wrote:75mm rear lift, you mean
IFS, you can't do much there.
Lift is only to swing bigger rubber.
Who wants to start again. Yep....been there done that.
http://www.offroadexpress.co.nz/Forums/viewtopic.php?f=18&t=26455
Have a bit of a read.
I have ended up with a carbon copy and it goes just as hard.
It is a combination of the equipment under you and the nut behind the wheel.
Feel free to ask any questions
Cheers,
That was a good read/story. Would be nice to have the goodies at hand, but not this time says the wife.
RE: 75mm rear lift. I've had mixed comments about this. Some say 75mm lift in the rear springs is ok and can be matched by just winding up the torsion bars. Some say 50mm. Some have no idea (me).
I have a set of steel rims in the shed for it and will be purchasing MT's for them, so if I'm going to buy MT's I thought I might as well get a size that will add clearance. Looks like 32 is a magic number that doesn't cause any issues.
Mechanically (engine, auto, diff) it is fine and never had any issues with them. I've put the rego on hold while I do this and its mainly the farm tractor/quad anyway.
Anyway, back to stage 1 - Suspension? 50 or 75mm
-
Sketchy_Racer
- Hard Yaka
- Posts: 178
- Joined: Thu Apr 29, 2010 11:30 pm
- Location: Wellington
Re: Operation Terrano
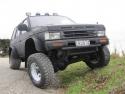
Only go as high as you have to. The biggest improvements to my Terrano was the body lift which gave me a better approach and departure angle and extended shocks all round with some "mods" to the Ifs to get a bit more flex out of it.
http://www.imagebam.com/image/9ca53e146421054
That was with the rear sway bar in, I find with the rear sway bar out it flexes too much in the rear(is the possible!) and is unbalanced front to rear.
Its not a lot of flex in terms of a solid front end, but its probably close to the best "stock" IFS flex, I'd guess Sibainmud's would be the same.
Highly underated offroad the Terranos, good size, wheelbase and weight combo.
-
fullthrottle
- Shuttle Queen
- Posts: 677
- Joined: Tue Jun 28, 2011 3:18 pm
- Location: Welly
Re: Operation Terrano
Thanks for the info. High enough to drive over wire fences would be great
Out of interest, how high did you go with your body lift?
there seems to be a number of other adjustments to consider when passing a certain body lift height.
For now, since I've put my girl in the shed and suspended the rego, I've decided to go with a 50mm rear spring lift first. Will see what the height looks like after installing them. I'm sure it will look like more than 50mm as the old springs are surely a bit tired.
Purchased the springs from Todd Carnie @ Wheel Crazy Thames
http://www.trademe.co.nz/Browse/Listing ... =447018473
seems to know his stuff and had some good advice. Prices are good to for good brands.
If all looks good, will have a good look around and see if she could handle a 2" body lift to, and work out what needs adjusting.
-
Sketchy_Racer
- Hard Yaka
- Posts: 178
- Joined: Thu Apr 29, 2010 11:30 pm
- Location: Wellington
Re: Operation Terrano
Yep 2" body lift seems the go and will go in with relative ease. Search for Kiwipete on here and look through his threads, he has one which is a good report on how to do the body lift.
-
fullthrottle
- Shuttle Queen
- Posts: 677
- Joined: Tue Jun 28, 2011 3:18 pm
- Location: Welly
Re: Operation Terrano
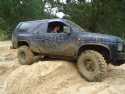
Just for the record, here she is on a wintery south coast trip, Before my dance with the bank and wire fence.......
Re: Operation Terrano
My current terrano has 2" suspension, 2" bodylift on 33's. They rub, Bad enough to bugger up my front gaurds haha.. No rubbing in the bad though, or not much anyway.
If i was to do it again, Id go 3" spring lift, Raise torsions abit but not too max! and 2" body, with 32's. That will easily outperform most surfs out there
Have fun!
If i was to do it again, Id go 3" spring lift, Raise torsions abit but not too max! and 2" body, with 32's. That will easily outperform most surfs out there
Have fun!
-
fullthrottle
- Shuttle Queen
- Posts: 677
- Joined: Tue Jun 28, 2011 3:18 pm
- Location: Welly
Re: Operation Terrano
OK finally have some time to do the suspension tomorrow. Got some new Cobra springs with an extra 50mm height than the originals.
Just have a couple of questions....
1) I notice that under the existing springs there is some thin rubber rings, probably to just stop metal to metal wear. They look fairly worn, so should I replace these, and with what? I probably have an old rubber car mat I can cut up.
2) I was looking at the torsion bar adjustments and wanted to check based on my pictures below. Are these adjusters already cranked almost all the way up already? There is a heck of a lot of thread already showing.
Not sure which way they wind to increase front height.
(Ignore wet look, I've just sprayed a bit of WD40 around on the threads)
Cheers
- Attachments
-
- Right torsion
-
- Left torsion
Re: Operation Terrano
You wind them in to go up, yes they are wound nearly right up. to go higher you need to slide the bars out of the anchors and re-index them about 2 splines Pretty easy once you get the hang of it.
-
fullthrottle
- Shuttle Queen
- Posts: 677
- Joined: Tue Jun 28, 2011 3:18 pm
- Location: Welly
Re: Operation Terrano
Right the new springs are in.
What a right pain in the ass to get those in. A word of warning for anyone wanting to try this.
- Give the underside of the vehicle a good waterblast the day before you start.
- I found that if the spring compressors are not located in the right place they will hit the spring mount points. Even more difficult to guess the right spot to set them when inserting the new springs.
- Remove the wheels, sway-bar and shocks, as it gives you a bit more room to get a socket on the end of the spring compressors and throw things about if its not going your way.
Anyway, the finished product. Exactly 50mm higher than original. Nice job Wheel Crazy Thames. Next I'll re-index the torsion bars, but for now I'm quite liking the hotrod look
- Attachments
-
- Spring insert
-
- Before
-
- After
Last edited by fullthrottle on Mon Apr 30, 2012 4:15 pm, edited 1 time in total.
-
fullthrottle
- Shuttle Queen
- Posts: 677
- Joined: Tue Jun 28, 2011 3:18 pm
- Location: Welly
Re: Operation Terrano
OK, so I’ve finally got around to doing the torsion bar adjustment a couple of weeks ago. Looks much better now. Was fairly straight forward and no real problems encountered.
Here is the procedure: (You can perform these steps to each side as you go or repeat once one side is completed)
1. Jack up the front to get both front wheels off the ground. This releases the tension on the torsion bars.
2. Give the threads on the torsion bar adjusters and the spline a squirt with CRC or WD40 just to free them up a bit.
3. Put a mark on the adjuster and torsion bar so you know what spline they were originally lined up to. I find giving it a scratch with something sharp and then putting a bit of white paint into the scratch works well.
4. Next undo the top nut completely off the thread. Then start unwinding the main nut, all the way off the thread. Pull out the adjuster thread/bolt.
5. Now you will need to remove the C-Clip, washer from the adjuster. If you don’t have some C-Clip spreaders I found a couple of decent sized screwdrivers did the job. One to hold the C-Clip from sliding around, and the other to gently tap the other side of the C-Clip so it pops off the adjuster.
6. Next you will need to give the adjuster a good tap so it slides off the torsion bar spline. You will find that the back of the adjuster has a grove in it which stops it from sliding back as the cross-member locates into this. So you will need to pull the torsion bar down a bit. My torsion bars were original so needed a bit more force to get the adjuster off. I found a smack with a good sized pin punch on the adjuster near the spline did the trick. The adjuster will slide right off and you can pull it right out of the cross-member.
7. Next give all the areas a good clean and grease. I put a thin smear of grease around the spline and seating point for the half moon washer.
8. Now slide the adjuster back onto the spline at 2 or 3 spline positions from where it originally was (note white mark positions). When you put the adjuster threaded rod back into position you just need to make sure you have enough thread showing at the top so you can get the nut back on. If your torsion bars are old and original you will find that they have stretched a fair bit / increased in elasticity. So from no tension to tensioned (at desired height) you may find that you have the adjust nearly the full length of the thread.
9. Put the C-Clip back into position.
10. Put the adjuster bolt back into position and start screwing the main nut back on. You will find this nut needs to be wound a fair way until there is some real tension.
11. Lower the front of the truck back down and measure from the top of each rim to bottom of the guard to get the heights equal on both sides. When adjusting each side, make sure you jack the front wheels off the ground.
12. Take the truck for a spin over some rough ground to settle the bars in and the measure and readjust if required.
Happy trails....
Here is the procedure: (You can perform these steps to each side as you go or repeat once one side is completed)
1. Jack up the front to get both front wheels off the ground. This releases the tension on the torsion bars.
2. Give the threads on the torsion bar adjusters and the spline a squirt with CRC or WD40 just to free them up a bit.
3. Put a mark on the adjuster and torsion bar so you know what spline they were originally lined up to. I find giving it a scratch with something sharp and then putting a bit of white paint into the scratch works well.
- Torsion marking
4. Next undo the top nut completely off the thread. Then start unwinding the main nut, all the way off the thread. Pull out the adjuster thread/bolt.
- Torsion adjuster bolt
5. Now you will need to remove the C-Clip, washer from the adjuster. If you don’t have some C-Clip spreaders I found a couple of decent sized screwdrivers did the job. One to hold the C-Clip from sliding around, and the other to gently tap the other side of the C-Clip so it pops off the adjuster.
6. Next you will need to give the adjuster a good tap so it slides off the torsion bar spline. You will find that the back of the adjuster has a grove in it which stops it from sliding back as the cross-member locates into this. So you will need to pull the torsion bar down a bit. My torsion bars were original so needed a bit more force to get the adjuster off. I found a smack with a good sized pin punch on the adjuster near the spline did the trick. The adjuster will slide right off and you can pull it right out of the cross-member.
7. Next give all the areas a good clean and grease. I put a thin smear of grease around the spline and seating point for the half moon washer.
8. Now slide the adjuster back onto the spline at 2 or 3 spline positions from where it originally was (note white mark positions). When you put the adjuster threaded rod back into position you just need to make sure you have enough thread showing at the top so you can get the nut back on. If your torsion bars are old and original you will find that they have stretched a fair bit / increased in elasticity. So from no tension to tensioned (at desired height) you may find that you have the adjust nearly the full length of the thread.
9. Put the C-Clip back into position.
10. Put the adjuster bolt back into position and start screwing the main nut back on. You will find this nut needs to be wound a fair way until there is some real tension.
- Adjustment
11. Lower the front of the truck back down and measure from the top of each rim to bottom of the guard to get the heights equal on both sides. When adjusting each side, make sure you jack the front wheels off the ground.
12. Take the truck for a spin over some rough ground to settle the bars in and the measure and readjust if required.
- After torsion adjustment
Happy trails....
-
fullthrottle
- Shuttle Queen
- Posts: 677
- Joined: Tue Jun 28, 2011 3:18 pm
- Location: Welly
Re: Operation Terrano
Since putting the Cobra 50mm lifted, heavy duty springs in the rear and reindexing and winding the torsion bars up in the front to match, I've noticed the existing shocks just can't contain the bounce fully. So I'll be replacing the shocks.
This weekend I've done some measurements.
--Rear--
Measured centre of eye to centre of eye.
Closed - When the diff just hits the bumpstop - 440mm
Open - About 10mm away from the spring feeling a little loose - 630mm
--Front--
Measured centre of eye to top of shock where the pin starts.
Closed - Just hitting the bumpstop - 305mm
Open - Extended all the way to the next bumpstop - 360mm
So I'm just researching some options now....
Re: Operation Terrano
fullthrottle wrote:Since putting the Cobra 50mm lifted,heavy duty springs in the rear,.., I've noticed the existing shocks just can't contain the bounce fully. So I'll be replacing the shocks.
Funny as I had the opposite. My rear shocks were quite bouncy, then with lift springs the bounce disappeared. My thought was the changed ride height put the shock into a less worn part, so regained its dampning again.
Do need to change them to some longer ones to get better travel and articulation soon tho. As the budget allows....
Will be watching to see what you come up with
Nath
-
fullthrottle
- Shuttle Queen
- Posts: 677
- Joined: Tue Jun 28, 2011 3:18 pm
- Location: Welly
Re: Operation Terrano
slide wrote:Funny as I had the opposite. My rear shocks were quite bouncy, then with lift springs the bounce disappeared. My thought was the changed ride height put the shock into a less worn part, so regained its dampning again.
Nath
Hi Nath. Interesting. for me I've noticed it only when I now drive up a bank with ridges up it. As the wheels bounce over each ridge its like the wheels double bounce.
Strange, but it does need new shocks anyway. Has the factory originals on the front which must be nackered after 21 years
While measuring the front there isn't much more room to go any higher as its almost touching the bumpstop. 50mm in the front seems to be the max.
-
fullthrottle
- Shuttle Queen
- Posts: 677
- Joined: Tue Jun 28, 2011 3:18 pm
- Location: Welly
Re: Operation Terrano
Light bulb moment......
While measuring for those shocks in the rear, I reckon that if I unbolted the shocks and jacked the back of the truck up, I could probably install the new springs without having used spring compressors......Now that would have been much easier.
While measuring for those shocks in the rear, I reckon that if I unbolted the shocks and jacked the back of the truck up, I could probably install the new springs without having used spring compressors......Now that would have been much easier.
Re: Operation Terrano
fullthrottle wrote:Light bulb moment......
While measuring for those shocks in the rear, I reckon that if I unbolted the shocks and jacked the back of the truck up, I could probably install the new springs without having used spring compressors......Now that would have been much easier.
Bingo
I was wondering why the big write up on your method
Closest I came to using spring compressors was a load locker tied through the spring while the truck is on the ground. Then you don't have to jack it up so far
Was good reading anyway
Cheers
I keep looking for the loose nut behind the wheel, but I can't find it!!
Re: Operation Terrano
Ok, so now I've taken the piss.
The front bars, too high. The ride height is greater but the bounce is caused by the upper bump stops being compressed way too much. They will eventually be spat out. The principle of the front suspension is to get equal travel both up and down.
Mine is set about 10mm up on standard settings. This gives the maximum flex in the front.


See how level it sits when flexed. All of my coey's call it "The couch"
Trial and error is the best way of learning
Cheers,
The front bars, too high. The ride height is greater but the bounce is caused by the upper bump stops being compressed way too much. They will eventually be spat out. The principle of the front suspension is to get equal travel both up and down.
Mine is set about 10mm up on standard settings. This gives the maximum flex in the front.
See how level it sits when flexed. All of my coey's call it "The couch"
Trial and error is the best way of learning
Cheers,
I keep looking for the loose nut behind the wheel, but I can't find it!!
-
fullthrottle
- Shuttle Queen
- Posts: 677
- Joined: Tue Jun 28, 2011 3:18 pm
- Location: Welly
Re: Operation Terrano
OK, the body lift is now pretty much done. Thanks to Simon and TAZ for your help. Still have the two rear bolts to sort out, bumpers to adjust, handbrake cable to adjust and drive shaft loop mounts to extend.
Actually doing the body lift was fairly easy. The hardest part was taking those side steps off and having to remove the seats and lift carpet to get to the bloody bolts.
Here are some pics:
So what did I do to get the job done.......
1) Remove botom section of radiator cowling. This will allow the radiator to move up with the body while the fan stays in the same position.
2) Remove driveshaft loop. This will stop you lifting because it is bolted to the body and loop runs through the center cross-member.
3) Remove front bumper, as the slots in the body where the bumber mounts pass through are not long enough and will stop you lifting the body.
4) Unbolt and remove all 5 mounts on one side.
5) Unbolt and remove the front and rear bolts on the other side.
6) Jack up 1st side and insert lift blocks and bolt loosely into place.
NOTE: 150mm bolt for rear is just enough.
7) Do the same for the other side. and tighten all round.
Once done....
Check the petrol filler pipe has shifted OK with the lift.
Extend/adjust the handbrake cable
You will need to cut and remount the bumpers if you want them to sit in their original positions.
Trim the bottom rubber boot plate of the 4WD selector.
Add blocks to the driveshaft loop mounts and refit.
Actually doing the body lift was fairly easy. The hardest part was taking those side steps off and having to remove the seats and lift carpet to get to the bloody bolts.
Here are some pics:
- Before body lift
- Lift blocks, thanks TAZ and Wellington Towbars
- Existing body mounts removed from one side
- Triming of the 4WD selector
- Job done
So what did I do to get the job done.......
1) Remove botom section of radiator cowling. This will allow the radiator to move up with the body while the fan stays in the same position.
2) Remove driveshaft loop. This will stop you lifting because it is bolted to the body and loop runs through the center cross-member.
3) Remove front bumper, as the slots in the body where the bumber mounts pass through are not long enough and will stop you lifting the body.
4) Unbolt and remove all 5 mounts on one side.
5) Unbolt and remove the front and rear bolts on the other side.
6) Jack up 1st side and insert lift blocks and bolt loosely into place.
NOTE: 150mm bolt for rear is just enough.
7) Do the same for the other side. and tighten all round.
Once done....
Check the petrol filler pipe has shifted OK with the lift.
Extend/adjust the handbrake cable
You will need to cut and remount the bumpers if you want them to sit in their original positions.
Trim the bottom rubber boot plate of the 4WD selector.
Add blocks to the driveshaft loop mounts and refit.
Last edited by fullthrottle on Sat May 12, 2012 9:33 pm, edited 1 time in total.
Re: Operation Terrano
Looks alot better. Good effort

Re: Operation Terrano
Nice work. 
Ok people, move along. Nothing to see here. Thank you, move along.
Ph 0212078472
Ph 0212078472
-
fullthrottle
- Shuttle Queen
- Posts: 677
- Joined: Tue Jun 28, 2011 3:18 pm
- Location: Welly
Re: Operation Terrano
Ok. Resolved the bolt issue. A 150mm M12 bolt in the rear will work, but only just.
I have also cranked down the torsion bars to about a 10-15mm gap from the bumpstop. Installed some new shocks all round with help from my main man at Wheel Crazy and she rides really sweet now.
I have also cranked down the torsion bars to about a 10-15mm gap from the bumpstop. Installed some new shocks all round with help from my main man at Wheel Crazy and she rides really sweet now.
Re: Operation Terrano
fullthrottle wrote:Installed some new shocks all round
What brand shocks did you end up going with?
-
fullthrottle
- Shuttle Queen
- Posts: 677
- Joined: Tue Jun 28, 2011 3:18 pm
- Location: Welly
Re: Operation Terrano
slide wrote:fullthrottle wrote:Installed some new shocks all round
What brand shocks did you end up going with?
I went with KYB in the end. They were the only ones that had the measurements I wanted and when having a good look around they actually have a good reputation for the high volume sales they have. Plus I couldn't find any valid reason not to.
So far they are very good. Big difference in performance.
-
fullthrottle
- Shuttle Queen
- Posts: 677
- Joined: Tue Jun 28, 2011 3:18 pm
- Location: Welly
Re: Operation Terrano
OK, over the past couple of days I've stripped down the rims I've had for about 2 years, painted them up black. Adjusted the front bumper mounts, and today collected the new rubber.
Maxxis Bighorn MT762 32 x 11.5 x 15 for the best price I could find of $299 each.
Took her out for a spin today and holly cow, she is completely different. Rides nice and firm with the shocks, suspension and bigger rubber. Careful on the corners, she likes to try taking you for a spin.
Those 32's with a -12.5 offset rim are a perfect fit under the guards. Can't go any bigger with those rims without hacking the body up. Just have to remove the flaps and trim as they do nothing for the tyres now anyway.
- Attachments
-
Re: Operation Terrano
fullthrottle wrote:So what did I do to get the job done.......
1) Remove botom section of radiator cowling. This will allow the radiator to move up with the body while the fan stays in the same position.
2) Remove driveshaft loop. This will stop you lifting because it is bolted to the body and loop runs through the center cross-member.
3) Remove front bumper, as the slots in the body where the bumber mounts pass through are not long enough and will stop you lifting the body.
4) Unbolt and remove all 5 mounts on one side.
5) Loosen all the bolts on the other side so the body will pivot on them when the opposite side is raised.
6) Jack up 1st side and insert lift blocks and bolt loosely into place.
NOTE: 150mm bolt for rear is just enough.
7) Do the same for the other side. and tighten all round.
Once done....
Check the petrol filler pipe has shifted OK with the lift.
Extend/adjust the handbrake cable
You will need to cut and remount the bumpers if you want them to sit in their original positions.
Trim the bottom rubber boot plate of the 4WD selector.
Add blocks to the driveshaft loop mounts and refit.
Made a small adjustment to #5 for you
Ok people, move along. Nothing to see here. Thank you, move along.
Ph 0212078472
Ph 0212078472
-
fullthrottle
- Shuttle Queen
- Posts: 677
- Joined: Tue Jun 28, 2011 3:18 pm
- Location: Welly
Re: Operation Terrano
kiwipete wrote:
Made a small adjustment to #5 for you
Cheers my good man. That may have made my life a bit easier as I only did the front and rear of the other side.

Re: Operation Terrano
fullthrottle wrote:OK, so I’ve finally got around to doing the torsion bar adjustment a couple of weeks ago. Looks much better now. Was fairly straight forward and no real problems encountered.
Here is the procedure: (You can perform these steps to each side as you go or repeat once one side is completed)
1. Jack up the front to get both front wheels off the ground. This releases the tension on the torsion bars.
2. Give the threads on the torsion bar adjusters and the spline a squirt with CRC or WD40 just to free them up a bit.
3. Put a mark on the adjuster and torsion bar so you know what spline they were originally lined up to. I find giving it a scratch with something sharp and then putting a bit of white paint into the scratch works well. ETC....
What I've found is it's easier to do it on the front of the bar....after you've backed the adjusters right off, undo the 3 bolts that hold it to the lower arm, and slide it back down the bar, turn it however many splines ya want, then bolt it back on.
Nice job though, she looks good.
Re: Operation Terrano
dont forget to get a brace made up for your idler arm, with save you heaps.
i had 2 inch suspension and 2 inch bodylift, which seemed allright.
but then something went wrong in the front and i decided to put a solid axle under it.
also, with my front the Top A Arms would hit the shocks, so watch out for that, as aparently it can fail a warrant.
i had a problem where i lost the nut on the back body block, which was a pain because it was somewhat lost in the bit that drops down. after about an hour i found it. what a pain though....
Re: Operation Terrano
Dirtydog wrote:also, with my front the Top A Arms would hit the shocks, so watch out for that, as apparently it can fail a warrant.
New top control arm bushes solve that problem
Cheers,
I keep looking for the loose nut behind the wheel, but I can't find it!!