Just wanting some info before going ahead.

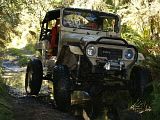
The breather is the left hose heading up and has the normal wee cap on the top and is mounted on the crossbar just below floor level.
Is it as simple as removing the hose pictured and replacing it was a longer length of similar hose and using the same hose clamp at the bottom and same wee cap on the top making sure the end is up higher?
I was talking to Matt(4U) the other day (he services our equipment at work) and he recommended to use clear hose so you can see water or any other blockage in there which is a great suggestion.
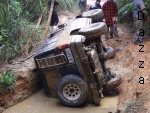
Is it necessary to use a larger internal diameter hose since its needing to draw from further away?
Do I need different connectors?
What's the go on fuel filters in line? Necessary or just an added protection?
What route have other cruiser owners used to take the hose up and where did you end it? (front and rear)